How the Confederated Tribes of Coos Lower Umpqua Siuslaw Indians Provide Emergency Assistance

Solution Contributed By: Jan Lawrence, Digital Process Manager; Jacob Hawk, Administration & Project Assistant; Jeannie McNeil, Enrollment Coordinator and Sierra Puckett, Archivist and Technical Assistant, Confederated Tribes of Coos Lower Umpqua Siuslaw Indians

The Confederated Tribes of Coos Lower Umpqua Siuslaw Indians based in Oregon has 1,269 members located around the country. During the COVID-19 pandemic, the tribe was awarded money from the federal government to provide emergency assistance to members. The confederated tribes used Laserfiche Forms to distribute $3 million worth of funds to tribal members quickly and efficiently. The tribe also used Forms to distribute computers to tribal members for use with school or telehealth appointments.

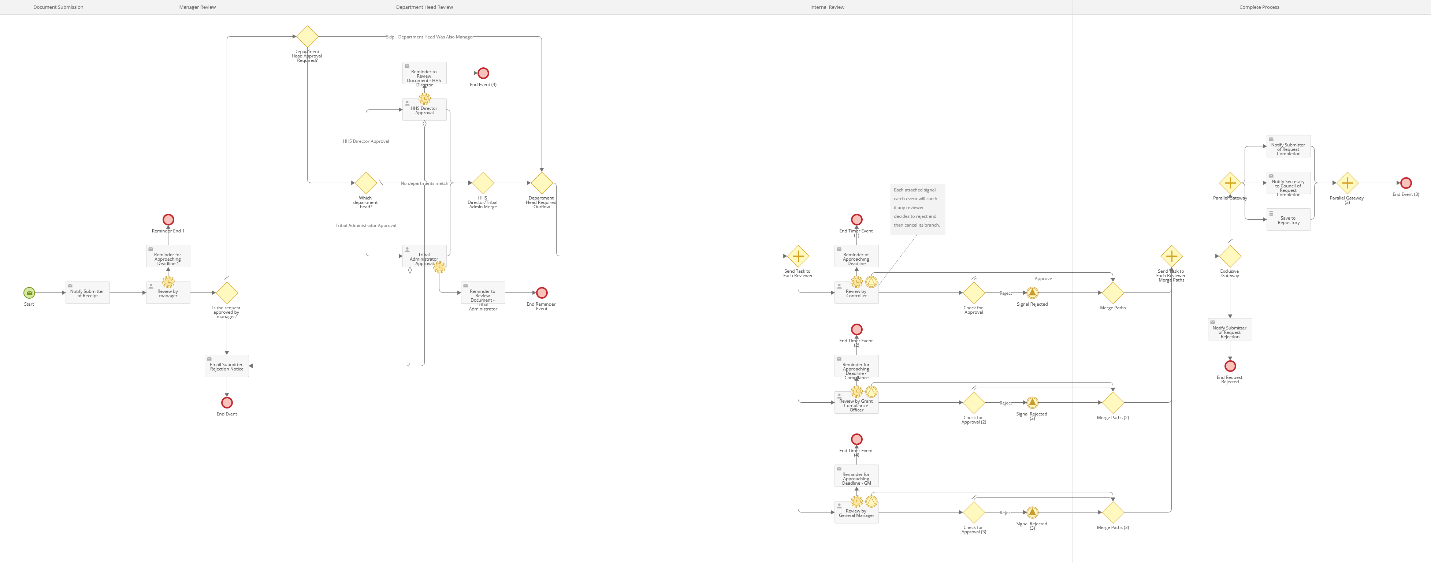
Emergency Assistance Process

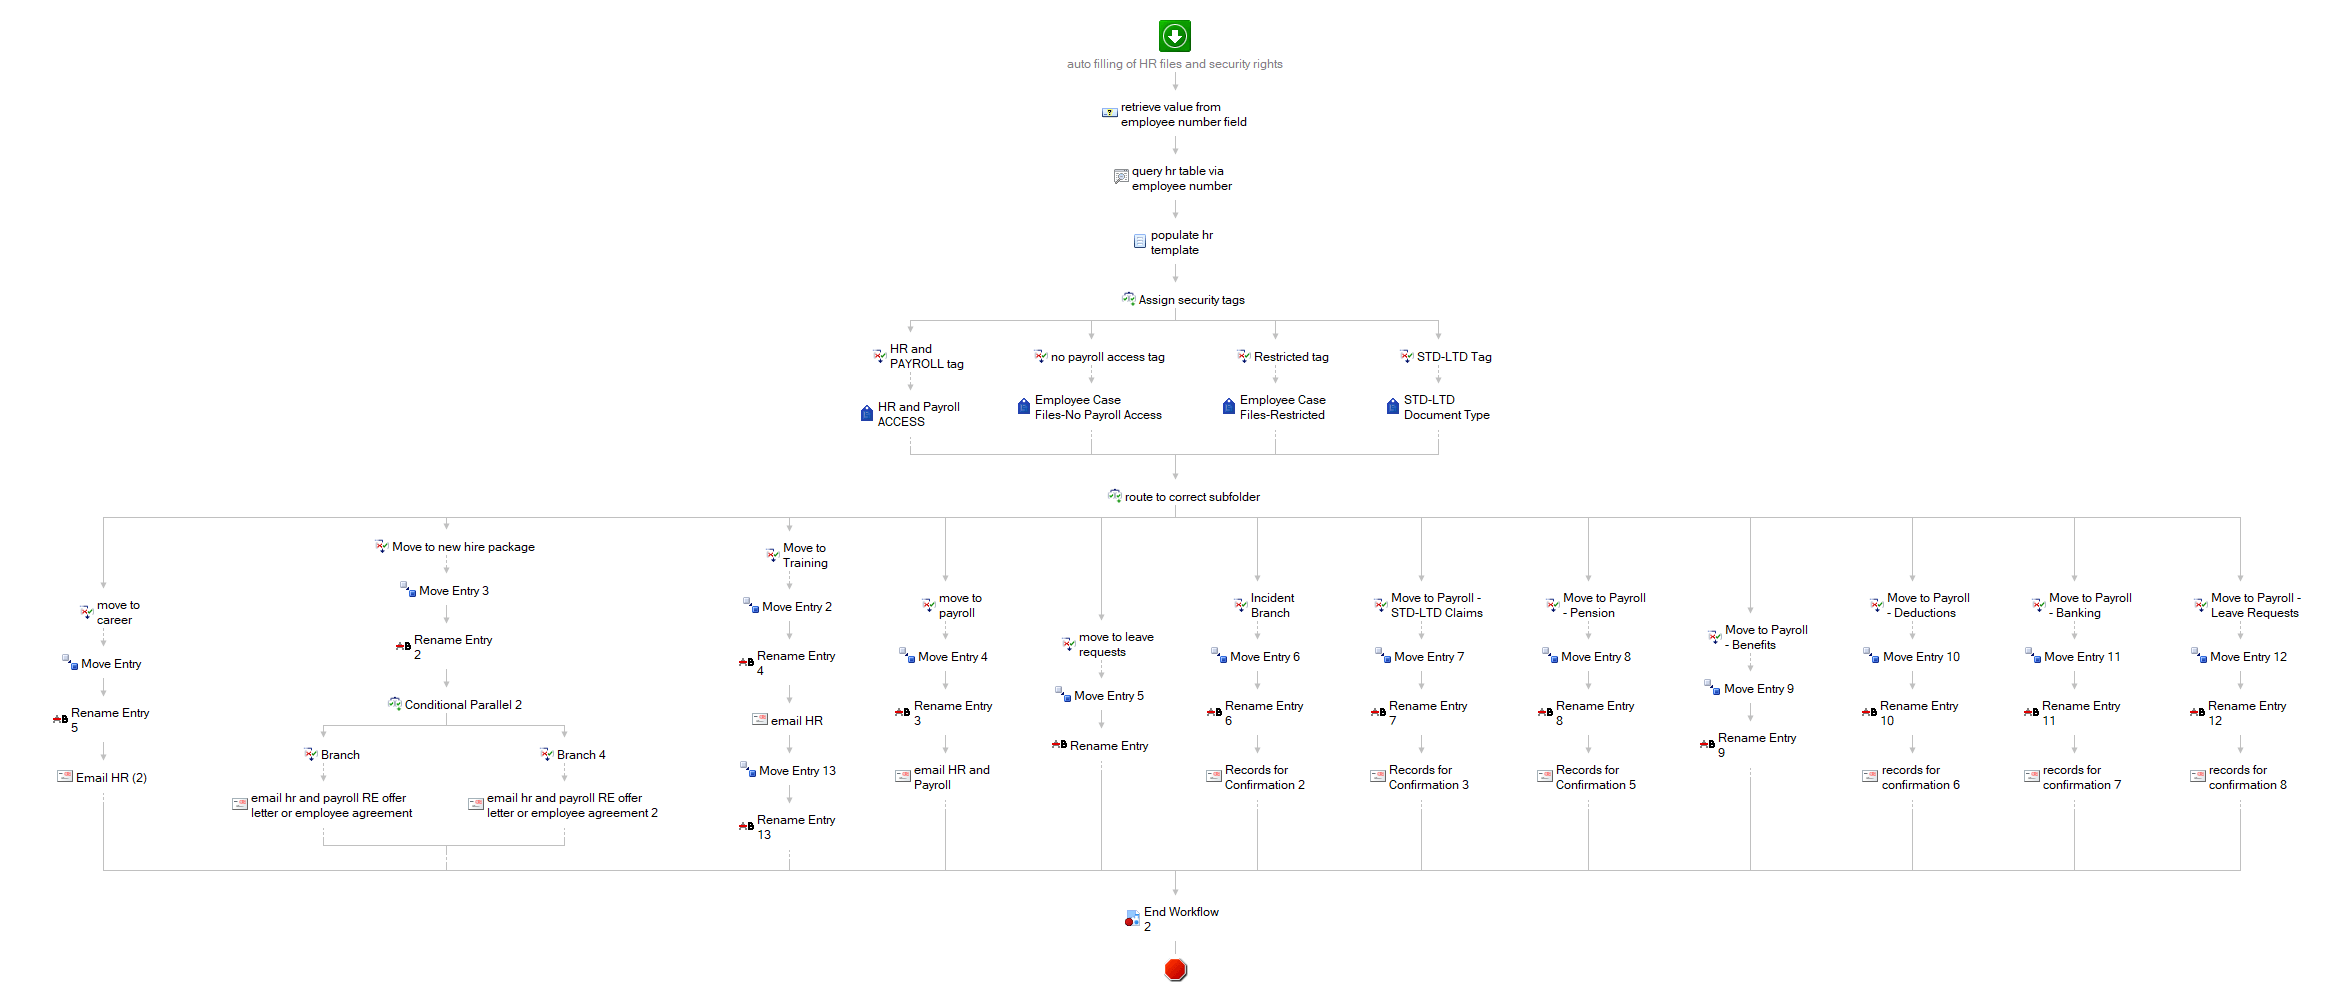
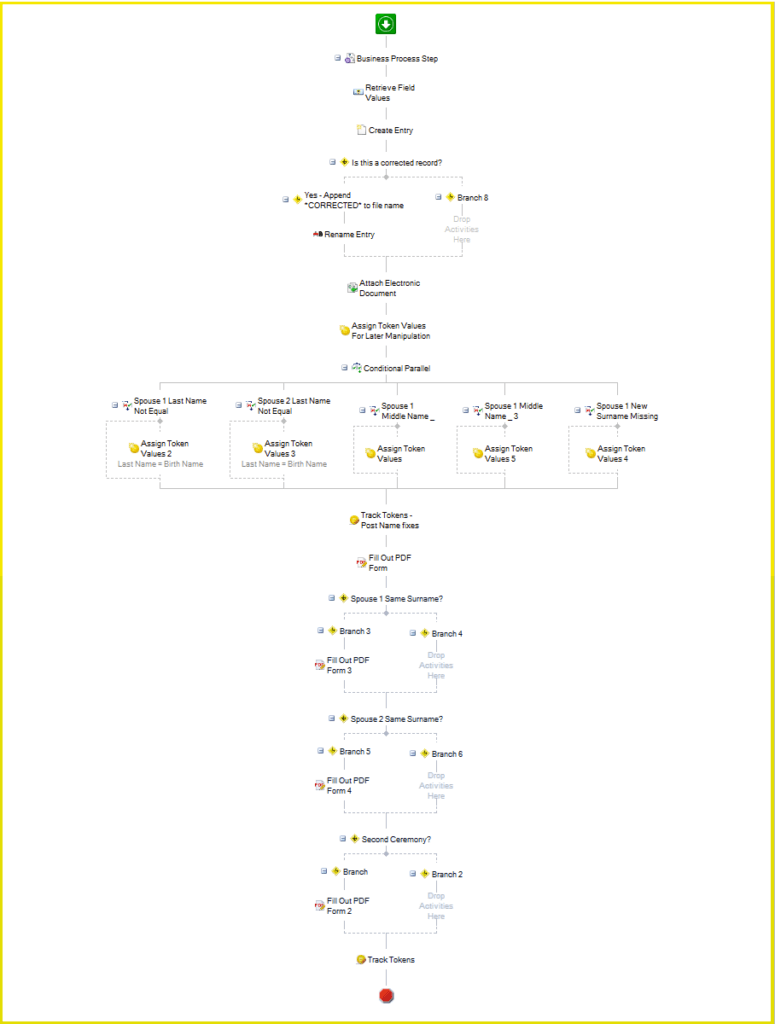
The challenge faced by the confederated tribes was to create a process to disburse money from the federal government to provide financial assistance to every tribe member, on a short timeline. The tribes wanted to streamline communications throughout the process and mail out checks quickly. It was also necessary to make sure there were no duplicate applications.

“With this form we are able to distribute $3 million in funds. Laserfiche reporting is amazing. We ran reports daily and were able to catch duplicate applications early. This whole process was completely streamlined,” says Jan Lawrence, Digital Process Manager

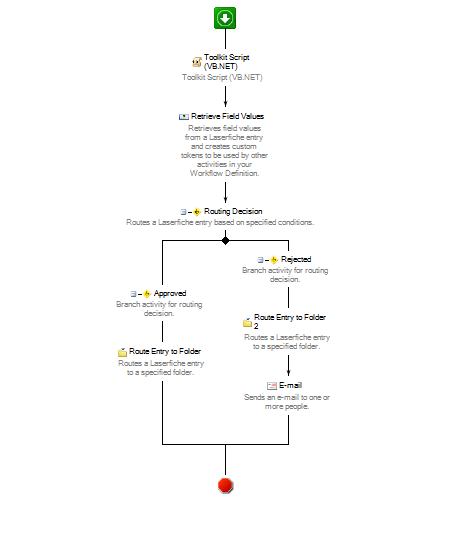
The application was created in Laserfiche Forms. Members were able to fill out and submit the form from any computer or mobile device. If a member was unable to fill out the form electronically, they were still able to submit a paper form. A team member then transferred the information from the paper form into an electronic form.Coos Lower Umpqua Siuslaw Indians Provide COVID-19 Relief Using Laserfiche Form

Coos Lower Umpqua Siuslaw Indians Provide COVID-19 Relief Using Laserfiche Form

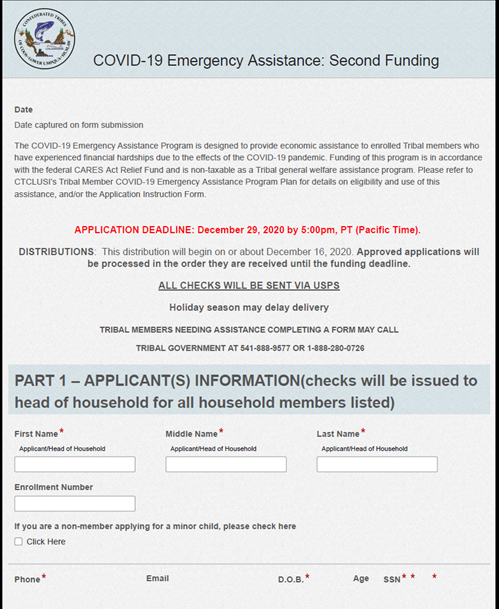
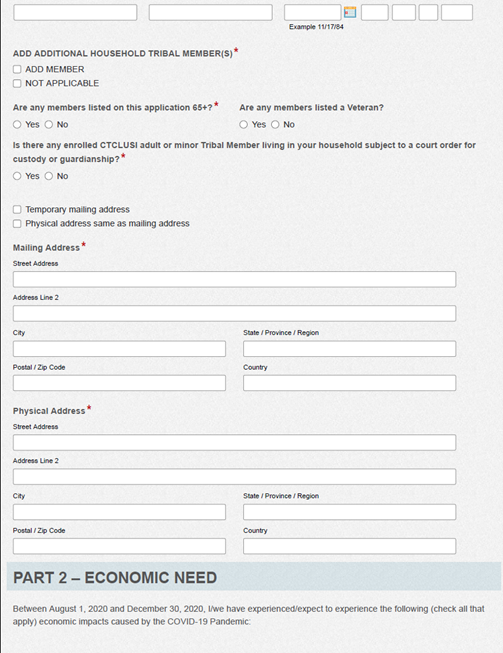
Once submitted, the form is sent to the membership enrollment coordinator for verification of tribal membership. The membership enrollment coordinator looks up the member in the membership database and checks the form information for accuracy.

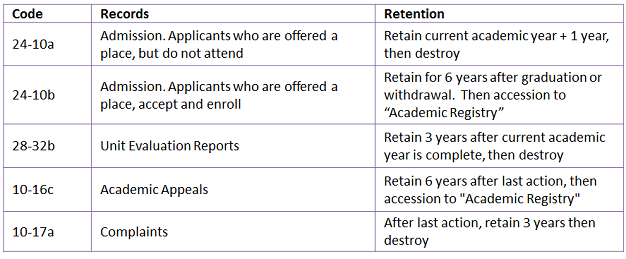
Once the form information is verified, the form is sent to finance as a check request. This check request form has all irrelevant information excluded, and only includes the information that finance needs to cut the check. Once the check is cut and mailed, the process ends.

Coos Lower Umpqua Siuslaw Indians Provide COVID-19 Relief Using Laserfiche Form

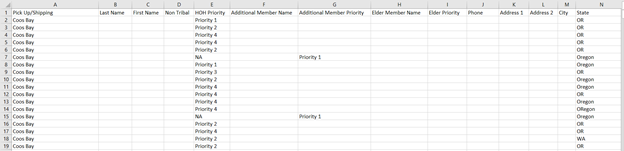
To keep track of how much money was disbursed, and how many members have been applying for services, the tribes ran reports on a regular schedule. These reports were exported into a spreadsheet and shared with relevant employees across the organization.

Computer Request Process

With distance learning and telehealth becoming a necessity during the COVID-19 pandemic, tribal members without computer access were at a disadvantage. To close the digital divide, the tribes created a program of disbursing computers to those who could not afford one. This computer request and disbursement process is similar to the emergency assistance process described in the previous section.

The process starts with the tribal member filling out an electronic request form. The requestor has the option of picking up the computer at one of a few locations or having it mailed.

Coos Lower Umpqua Siuslaw Indians Provide COVID-19 Relief Using Laserfiche FormCoos Lower Umpqua Siuslaw Indians Provide COVID-19 Relief Using Laserfiche Form

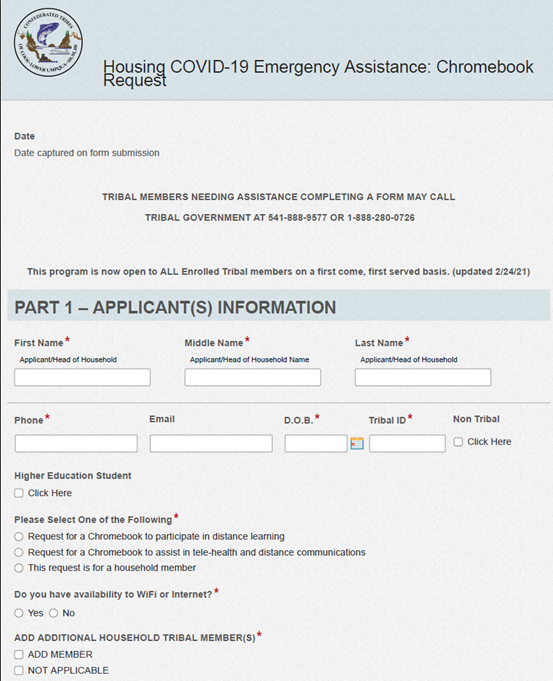
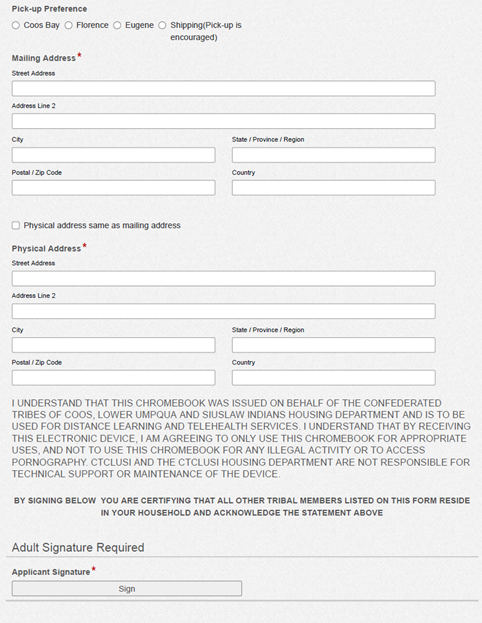
Once the form is submitted, the enrollment coordinator verifies the requestor’s tribal membership and program eligibility in the membership system. When the verification is completed, a notification is sent to the housing department. Department team members package and ship any computers that need to be mailed. If, at any point in the process, the requestor is deemed ineligible for the program, they are notified by email.

Coos Lower Umpqua Siuslaw Indians Provide COVID-19 Relief Using Laserfiche Workflow

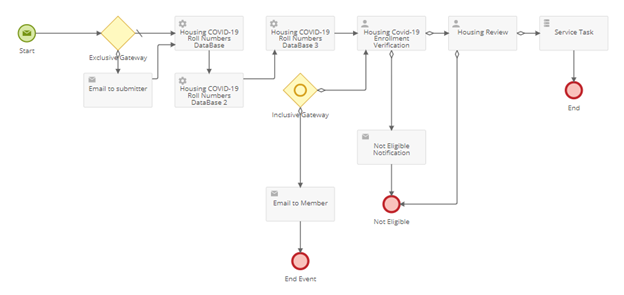
To keep track of how many computers were distributed, as well as which ones were to be picked up or mailed, the housing department ran regular reports. These reports were downloaded into a spreadsheet and shared with select individuals within the organization.

Coos Lower Umpqua Siuslaw Indians Provide COVID-19 Relief Using LaserficheWant to see how Laserfiche can help your organization streamline customer-facing business processes? Schedule a free demo.

How Westbank First Nation Uses Laserfiche to Improve the Employee Experience

Laserfiche Solution Contributed By: Chad Rota, Supervisor, Records and Information Management, Westbank First Nation

Located in the Okanagan region of British Columbia, Canada, self-governing Westbank First Nation (WFN) is one of seven bands that comprise the Okanagan Nation Alliance. WFN has a membership of approximately 900 people and employs more than 200 staff to serve the nearly 10,000 residents living on Westbank reserve lands.

Before Laserfiche, WFN used paper forms to process employee change notification requests. These forms started out as PDF forms and were printed, signed, and passed around the various departments through inter-office mail. This process was inefficient, time consuming, and prone to lost and/or wasted paper: if any update needed to be made to the request, the process had to start all over.

Laserfiche Forms Built a Lot More Flexibility into the Process

Instead of filling out a PDF form and printing it, an employee now fills out an electronic form. The employee can select the appropriate manager to whom the request should be routed. If the employee reports directly to the director of operations, then the application is routed directly there and skips all the other approval levels in between.

This image shows an electronic form with various options for status changes
The employee can select from multiple status change options

At each level of approval, the approver has the option of sending the request to another manager, directly to human resources, or back to the submitter with required changes.

This image shows an electronic forms with three different options for approval decisions
The approver can make one of three decisions before submitting the form

Each request can be reviewed and approved by one or multiple people. Once all managers have viewed and approved it, the request is vetted by human resources and then sent to the director of operations for final approval. Throughout the process, the request can be sent back to either reviewer or submitter at any time to make changes. Each reviewer can also make some changes to the form while reviewing it.

Finalized requests are stored in Laserfiche, and Forms sends an automatic notification to payroll. A payroll employee checks that all documentation in the folder is compiled properly and makes the appropriate changes to the payroll system. Once finished with their task, the payroll employee launches a Laserfiche Workflow business process which routes the documents to the appropriate places in the repository for storage, names them correctly, and applies the relevant security tags based on the document type.

This workflow also uses the Employee Number field to look up information in the human resources database to populate the rest of each document’s fields.

This image shows a Laserfiche workflow taht routes documents to the right folders.
Laserfiche Workflow moves the documents to the right folders and applies the appropriate security tags. Click to view larger in a new window.

This Workflow business process is used to move, rename, and apply security to all human resources documents, not just change requests. WFN processes over 50 human resources documents every week, and this workflow ensures that the human resources portion of the repository remains organized and secure.

Employees Can Access All Forms and Documents through a Custom Portal

In order to help employees find the appropriate document or form to fill out, the staff at WFN created a custom staff resources portal. This portal is actually a Laserfiche form with the Submit button hidden. The button is hidden by making its color and text blend in with the background.

The staff resources page is created in Laserfiche Forms
This image shows how to format the Submit button so that it blends in with the background color.
The color of the Submit button can be changed in the Themes tab in Laserfiche Forms

Employees specify what they would like to do by checking the appropriate boxes. This opens up other fields which contain links to the appropriate Laserfiche WebLink pages or Laserfiche Forms, including any directions.

This image shows the various options on the employee portal that appear when the user checks the Laserfiche Forms and Tutorials option

This image shows the employee portal when a user checks the Policies and Procedures Library option
Different options appear based on what was checked for the first question

Since launching the staff resources page, the records management and information technology teams have received significantly fewer emails and calls with questions regarding where to access specific forms. Employees are able to find everything they need on their own. Since this portal is created using Laserfiche Forms, it can be easily modified and updated with any new available resources.

“The new portal has eliminated a lot of mystery and curiosity around Laserfiche. Users can now access everything in one place. This has led to a lot more independent Laserfiche users,” says Chad Rota, Supervisor, Records and Information Management.

Moving forward, WFN plans on exploring an integration between its payroll system and Laserfiche using Laserfiche Connector to help automate various human resources processes even further.

How the City of Ithaca Streamlined the Marriage License Process

Laserfiche Solution Contributed By: Julie Holcomb, City Clerk and Alan Karasin, Senior Network Administrator, City of Ithaca, NY

Located in central New York, the city of Ithaca is the county seat of Tompkins County and home to 30,000 residents. Each fall, nearly 30,000 students make their way to Ithaca’s Cornell University, Ithaca College and Tompkins-Cortland Community College.

The city used to process marriage licenses using a proprietary software system that worked well for them at the time, but there was growing concerns regarding the future of software maintenance. As the system was reaching its end-of-life, the city decided to re-evaluate the process and use Laserfiche to streamline it with development assistance from their solution provider, General Code.

Marriage License Applications Are Submitted Through Laserfiche Forms

The new process starts when the couple applying for a marriage license arrives at the license office with their official documents. The customer service representative fills out a marriage license application form in Laserfiche Forms using the information provided by the couple. Once that form is filled out and submitted, Laserfiche Workflow creates a formatted PDF document with the information. The customer service rep prints out this document onto a paper form provided by the state. The couple reviews the printed form to make sure that all the information in it is correct. If any information is incorrect, the rep updates it in Forms and prints out another form. Once all the information is finalized, the rep approves it and the printed form is signed by everyone.

Information for the marriage license is obtained through a Laserfiche form
An example of a printed marriage license document

The submitted form is placed in a queue awaiting information from the actual marriage ceremony. The couple has 60 days to get married from the date that they pick up the marriage license. Once the couple is married, they bring or mail the form back into the office. The rep enters the marriage information into Laserfiche Forms.

Spreadsheet On Computer Screen. Analyst Employee Working

Once that information is filled out and the form submitted, Workflow generates the marriage certificate which the rep prints out and mails to the couple. The rep then scans the original, signed marriage license form into the couple’s folder in Laserfiche.

The marriage license process in Laserfiche Forms

If 90 days pass and the couple doesn’t return the certificate with the marriage information, the license expires and all documents are moved to the Expired folder in Laserfiche.

Retrieving a Marriage Certificate Copy Is Quick and Easy

Many citizens come to the marriage licensing office to retrieve a certified copy of their marriage records. Since all marriage certification information is stored in Laserfiche, the customer service rep simply performs a field search using some of the person’s information to find the appropriate folder. The folder either contains the original certificate information, and a scanned copy of the original marriage license, or, for all older licenses, an empty document with just the metadata that contains the appropriate information.

Older records may require the rep to enter additional information from historical marriage books into the metadata fields to complete the record but once this is done initially, the task never needs to be repeated. If there is no actual certificate available, the rep launches a workflow that generates the certified transcript of the marriage record. The rep then prints this certificate on the appropriate form. This whole process takes just a few minutes.

Laserfiche Workflow uses the information from Laserfiche Forms to create a formatted PDF document

Benefits of Laserfiche

Streamlining the marriage license process with Laserfiche has resulted in many benefits for the city of Ithaca. Unlike the old process, the new process can be launched from any computer with an internet connection, making it possible for people who are homebound or incarcerated to be able to apply for a marriage license.  Marriage license transcripts are also much easier to retrieve since they are all stored in a central location and can be easily searched for vs. flipping through pages of older handwritten books.

Town and City Clerks in New York State now have an additional product they can consider when evaluating their licensing needs. As with many Laserfiche projects, these benefits are the “gift that keep on giving.” Future generations of municipal workers will become much more efficient and effective as they will no longer need to sort through old records in questionable condition and stored in less than optimal locations.

Samish Indian Nation Automated Grant Approval with Laserfiche Forms

Laserfiche Solution Contributed By: JR Walters, IT Director, Samish Indian Nation

Headquartered in the Pacific Northwest, the Samish Indian Nation is governed by a seven member Tribal Council elected to oversee the tribe’s welfare and resources. Members are offered a wide variety of opportunities including housing assistance, elders’ services, healthcare and wellness, and cultural enrichment.

In order to help manage the various programs offered to the tribal members, the nation works with state and federal agencies to implement many grant funded activities. In addition to maintaining the economic welfare of the tribe, these grant deliverables help to protect the environment, and preserve natural and cultural resources.

Before Laserfiche, approving grant applications was a time-consuming, manual process. The tribe’s departments are distributed between five sites and sending paper grant application packets through interoffice mail for internal review and approval was inefficient and costly. Occasionally, grant submission deadlines were barely met because paperwork got lost between sites, sat too long for approval, or was difficult to find and assemble into the grant application packet.

Laserfiche has completely digitized the grant approval process. New grants are submitted through Laserfiche Forms and managers are able to view and approve them from their mobile devices.

With Laserfiche, the time to process a grant has been reduced from one week to just one day.

“I’m absolutely in love with Forms and process automation. I see so much potential in how other departments could utilize it,” says JR Walters, IT Director.

Grant Application Approval Requests Are Submitted Through an Electronic Form

The process starts when an employee applying for a grant, fills out the grant application approval request form in Laserfiche Forms.

Employees fill out an electronic form to start the grant approval process

Once submitted, the grant application is routed to the department supervisor for approval. If the department supervisor approves it, the application is routed to the general manager, compliance officer and controller, for simultaneous review. Once approved by everyone, the grant application is put in front of the seven member tribal council for approval. Each of the approvers is notified of grants requiring their approval through email.

Email notifications keep grant application approvers notified of pending tasks

If any of the approvers reject the grant, the process ends and the submitter is notified by email. He or she then has the option of submitting a new application form.

Laserfiche Forms makes it easy to configure email notifications for rejected applications

Throughout the process, timers are attached to each approval task. In this way, if the form isn’t approved in a timely matter, the approver receives a follow up email reminder.

Submitted grant application review forms and supplemental information are stored in folders in the Laserfiche repository specific to the grant.

Grant applications are organized by grant name in the repository

The Process Was Designed with the Help of the Business Process Library

In order to simplify designing of this process, the tribal nation took advantage of the Business Process Library (BPL). The nation downloaded the Legal Document Review Forms template and modified it to suit the specific needs of the grant approval process. Some of these modifications included:

  • Adding additional reviewer tasks
  • Increasing the number of email notifications
  • Adding timers and reminder emails
  • Configuring the appropriate folders for saving the forms to the repository

“Before starting to design a process from scratch, I look to see if it has already been done in the Business Process Library. Since it is already done once, it is easy to duplicate. The BPL is a great resource,” says Walters.

The grant application approval process design

Processing Grant Applications Now Takes One Day Instead of One Week

Automating the grant application approval process with Laserfiche has resulted in the following benefits for Samish Tribal Nation:

  • Grant applications are now processed in one day instead of a week or longer
  • Managers can review from their mobile devices which leads to a faster turnaround time for grant approvals
  • Documents can be tracked quickly throughout their lifecycle and are never lost
  • Staff can process more grants in the same time period

How the City of Southlake, TX Automated Police Department Hiring

Laserfiche Solution Contributed By: Veronica Lomas, Records Manager and Chris Chaillot, Talent Acquisition Partner, City of Southlake, TX

The City of Southlake, TX is a suburb of the Dallas/Fort Worth metroplex with a population of 30,000. Based on median household income, Southlake is one of the wealthiest cities in the United States.

One of the ways that Laserfiche is helping Southlake support its mission of delivering excellent customer service and governance to its citizens is by allowing the city to automate the police department hiring process.

Originally, candidates for the police department had to fill out a 28-page paper application packet. Candidates had to write N/A in each of the form fields that weren’t relevant to them, and because the application was so thorough, there were many fields to fill out. Once filled out, the application had to be either scanned in and emailed, or mailed back to the police department. It was difficult to track the application and all associated supplemental documents. In addition, the application contained a lot of sensitive information, such as social security numbers, which made security a challenge.

Each application had to be reviewed by the sergeant, and applications that passed the initial review were sent to HR to invite to testing. The time between receiving the application and approving it for an interview took anywhere from two weeks to a month.

In preparation for the applicant’s interview, a copy of the application was made for each member of the interview board. This entire process wasted a lot of paper.

Southlake used Laserfiche Forms to make the police department hiring process faster, more streamlined and efficient. As a result, the volume of new applicants has doubled. The department now has a larger pool of applicants to choose from, and can hire more qualified people. Since the time to process new applications has decreased to 90 minutes from 2-4 weeks, qualified applicants are offered a job much faster than before.

“We know we are always competing with the other departments for top-notch applicants and the person who gives the offer first wins. When we get to tell people that they can get hired within six weeks, we end up winning.” says Chris Chaillot, Talent Acquisition Partner.

The Time between Application Receipt and Interview Approval Is Now 90 Minutes

New candidates for the police department fill out an electronic Laserfiche form. This form is dynamic and displays only the fields pertinent to the applicant, based on the information provided in the form. For example, if the applicant answers that they have served in the armed forces, they have to fill out different questions than an applicant who answers that they have not served.

If an applicant did not serve in the armed forces, they can simply move on to the next question

If the applicant served in the armed forces, they have to fill out more specific information before moving on to the next question

These questions are governed by over 80 field rules. In addition, the form has many questions set as required, so that only fully completed forms can be submitted.

Once the form is submitted, it is routed to the sergeant who is responsible for the base review of the application. The sergeant reads through the application to make sure that applicant did not select any of the questions in the Criminal Legal History that result in an automatic disqualification.

Certain questions on the form, if answered in a particular way, automatically disqualify the applicant

In order to help the sergeant with the review, Laserfiche Forms has different levels of priority configured for the review task based on which of the options in the Criminal Legal History section have been checked. The sergeant can easily see in his Inbox tasks that require Urgent attention, since they will be marked in red.

Setting a different priority level for applications based on options checked by the applicant streamlines application review

Once the applicant passes the initial review, he or she is automatically added to the candidate testing pool. As the candidate passes or fails each test, a member of the talent acquisition team enters the information into Forms for tracking and notifications.

The application goes down a different path depending on the test results.

  • If the candidate fails the written test, he or she is eligible for an immediate retest
  • If the candidate fails the oral board, he or she can retest one year later

The Forms process ends when the candidates pass both tests or fail one but don’t want to participate in the retest. Otherwise, the application is held within the Forms process until the retests are successful.

“Laserfiche Forms has transformed the way we process applications. Even when I am away from the office I receive an alert and have the ability to evaluate new applications from my phone or tablet. This incredibly efficient turnaround allows us to confirm candidates for our test dates sooner, and we start a dialogue with the candidate while the City of Southlake is still fresh on their mind. Strong first impressions and a positive candidate experience are key to retaining quality applicants, and the sooner those conversations can start the better!” says Sergeant Mike Dunn.

Out-of-the-Box Reporting Tools Help the City Stay Compliant with Regulations

Laserfiche Forms helps Southlake keep compliant with the Texas Commission on Law Enforcement (TCOLE) requirements by tracking all of the testing requirements and results. Authorized individuals can run reports within Forms and pull metrics for TCOLE compliance.

In addition, Forms reports allow the talent acquisition team to get an overall look at the applicants in various stages of the hiring process and how long each stage is taking.

The reporting tools in Laserfiche Forms make it easy to see how many applicants are in different stages of the hiring process

The dashboards in Laserfiche Forms show how long each stage of the hiring process is takingIf an applicant has a question about their application, a talent acquisition team member can quickly find the applicant’s entire application history in Laserfiche Forms.

Each step that the candidate’s application took as part of the hiring process is displayed in a centralized History tab

Benefits of Laserfiche

Automating the police department hiring process with Laserfiche Forms has resulted in the following benefits for the city of Southlake:

  • The volume of new applicants has doubled. As a result, the department has a larger pool of applicants to choose from and can hire more qualified people.
  • Since the time to process new applications has decreased to 90 minutes from 2-4 weeks, qualified applicants are offered a job much faster than before.

 
New Call-to-action

How to Design your First Laserfiche Workflow

Laserfiche Solution Contributed by: Amy Johnson, Systems Administrator, Hanover County

As the Systems Administrator in the Commissioner of the Revenue’s Office, I designed and implemented the department’s workflows myself. (The IT department at Hanover County only provides support.) Here are some of my strategies for planning, designing and implementing your very first Laserfiche Workflow.

“I know it can seem scary, but you can do it!”

Before You Start Designing

1. Sit down and make a list of ideas of processes within your department or organization that you would like to automate. Remember to start simple.

“Sometimes the small workflow is as important as the big, flashy one.”

Our first workflow dealt with obtaining Statutory Assessment worksheets, routing them to managers for approval and then routing them to the records folders for storage and retention.

The workflow that is covered in this article

2. Determine the goal of your workflow. Your goal should be specific. In my case, it was, “I would like to eliminate redundant printing of Statutory Assessment worksheets.” Ask yourself if you are automating a process or trying to solve a problem.

  • If you see or experience an actual breakdown in the efficiency of the current process, then you should first solve the problem before automating the process.

3. Do your research and take advantage of the multitude of resources available to all Laserfiche users:

  • The Building Laserfiche Workflows Certification course taught me how to approach planning, diagramming and designing my workflows.
  • The many white papers and training videos available on the Learn and Support Site provide specific details on various aspects of the workflow design process.
  • Your VAR is also an excellent resource. I put my VAR on speed dial and called them whenever I ran into problems or lost my confidence.

Diagram Your Process

Once you’ve determined the process and the goal and educated yourself on workflow design, it is time to actually diagram the process.

  1. Gather all of the stakeholders in one place and come up with a diagram of how the business process automation should look. When designing my first workflow, I invited the managers who are responsible for approving the Statutory Assessment worksheets as well as the division manager to join me. I drew out the whole process on a piece of paper and we discussed all of the detailed steps together, going into such specifics as how the manager would prefer to approve the worksheets (with a template field or a personal stamp).
  2. Remember that it is ok to change or revise current processes in order to make your workflows as efficient as possible. Sometimes you may think that the process works one way, but in reality, there are certain steps you may have skipped.

    “Time spent diagramming upfront will more than pay itself back later.”

  3. It is important that you do not skimp on the planning phase. The more you put into the actual design of the session, the better the end result. When constructing my workflows, I spend more time planning than actually designing.

Design the Workflow

Once you have finalized your actual diagram and gone through as many changes as necessary, it is time to start designing your actual workflow.

Laserfiche Workflow includes a multitude of pre-designed, user-friendly activities. Here are some things to keep in mind when designing your workflow:

  • You must have Workflow Designer actually installed on your computer or on the computer where you want to design the workflow.
  • It is a best practice to create a user account for Laserfiche Workflow in the Administration Console. This user will be the one performing all of the automated tasks when the workflows actually run.

One of the most important parts of designing workflows is specifying the starting rules—what conditions will invoke the workflow. When setting up your starting rules, make sure to follow these guidelines:

  • Exclude the Workflow user from being able to initiate workflows in order to prevent “runaway workflows” – workflows that that keep initiating themselves in an endless loop.
  • Make the entry type (document, folder, etc.) and path as specific as possible in order to prevent the workflow from starting when you do not want it to.
An example of Workflow starting rules

Remember, if you start designing and lose your confidence, just call your VAR for help. I actually hired my VAR to come and sit with me for the day while I designed my first workflow. Just having him there boosted my confidence.

  • Design as much as you want since you can always delete and start over.
  • Don’t be afraid to publish what you’ve designed. You must first publish the workflow before creating the starting rule.

The most important thing to remember is:

“Test and test again—even VARs need a few tries to get things working 100%.”

I had to test my first workflow at least 15 times before I got it to work exactly as I wanted. You can create sample documents and then run them through the workflow as you are designing it to make sure that the workflow functions as expected. It is much safer to test on sample documents than actual live data.

Now That You’ve Completed Your First Workflow

Unveil your first workflow to your users, as well as your boss. Make sure you don’t tell them that it wasn’t that hard to create.

  • Be prepared to revise this workflow as needed. Simply make the changes you want in the Laserfiche Workflow Designer and republish until you are fully satisfied. After my first workflow went live, I had to revise some of the email activities because, after seeing the actual process in action, we determined that they could be optimized.
  • Pat yourself on the back and move on to the next one! Come up with a list of processes you want to automate and tackle them one by one.


How to Plan an Effective Laserfiche Integration

An integration is the process of linking together different software applications functionally to act as a coordinated whole within the context of a business process. The goal of an integration is fluid communication that allows multiple systems to talk to each other as needed based on activities that occur within a process.

There are many reasons for integrating two software systems, such as:

  • Saving time and money by automating manual tasks and making business processes more efficient.
  • Reducing end-user training by delivering additional functionality through the user’s line-of-business application.
  • Eliminating data transcription errors.

There are three common types of integration between Laserfiche and other systems:

  1. Sharing data: Information is synchronized in multiple systems. All of the systems share the same data.
    Example: Data is captured from an invoice using Laserfiche Quick Fields. This data is then synced to the accounting system. The invoice totals are cross-referenced and approved in the accounting system. The status is updated in the Laserfiche metadata.
  2. Image enablement: Content is delivered to and documents are scanned from the interface of another application. Basically, documents in Laserfiche are accessed from another front end and data in that application is used to populate the metadata of scanned documents.
    Example: An invoice can be called up directly from within the accounting system with the click of a button.
  3. Creating content from external data: Content is created inside another system and then saved immediately in Laserfiche.
    Example: The accounting system is used to create reports which are then archived directly in Laserfiche.

What is the best way to approach integration?

When thinking about integration, the best policy is to describe the actual business process first, and then look at a possible solution (which may or may not include integration). Listing integration requirements upfront defines the options in terms of technology and approach.

  1. Analyze the business process.

Ask these questions:

  • What is the final outcome of this process?
  • Who needs to be involved?
  • How can the existing process be streamlined?
  • What systems/applications are currently involved?
  • What is the function of each of these systems? Can Laserfiche take over any of those functions?
    • Laserfiche Quick Fields can lookup information from an external database as well as run a custom database SQL query.
    • Laserfiche Workflow allows data sharing to be embedded around a process using enterprise integration activities, custom scripts and custom activities.
    • Laserfiche Forms can lookup information in an external database and use it to prepopulate form fields.
  1. Define what an integration can do for the organization.

Ask these questions:

  • What is this integration supposed to accomplish?
  • What problem is it supposed to solve?
  • Why is this integration important?

Integrations should measurably extend the value of the enterprise content management (ECM) system. If integration does not add clear value, then the necessity of it should be reconsidered.

What tools does Laserfiche offer to help with integration?

The Laserfiche architecture is very open to allow customers to easily interact with Laserfiche from any other application.

  • Laserfiche Connector: This is a simple, code-free way to integrate other applications with Laserfiche. The Laserfiche Connector allows the user to search for documents in Laserfiche or scan documents into Laserfiche based on field values in their primary web-based or Windows desktop application, such as an enterprise resource planning (ERP) or customer relationship management (CRM) system. It also allows a user to populate a Laserfiche form with information from a third-party application.
  • Laserfiche Software Development Kit (SDK): This is the same set of libraries that the Laserfiche development team uses, so they are straightforward to use and complete. Most Laserfiche integrations will be largely written using one or more of these libraries.
  • Laserfiche WebLink and the Laserfiche web client: Both of these applications are URL driven, so issuing searches or bringing up a document through the web interface is as simple as linking the particular application to the web server with the correct URL.
  • Laserfiche Workflow SDK: This SDK is a specialized library for programmatically working with the Workflow Server.

What pre-built integrations are offered by Laserfiche?

  • The DocuSign or SIGNiX integration makes it possible to sign documents online directly from within the Laserfiche web client.
  • The Laser App integration allows for forms that are filled out in the Laser App interface to be automatically posted to Laserfiche as a PDF for validation and further processing.
  • The Microsoft OneDrive and Google Drive integration makes it easy to import documents into Laserfiche from those popular cloud-based services.
  • The Microsoft Office integration allows a user to save Microsoft Word, Excel and PowerPoint files into Laserfiche and add or change Laserfiche metadata without leaving that program.
  • The Microsoft Outlook integration makes it easy to send emails and attachments into Laserfiche with one click.

How does one research the potential integration?

Before speaking with a value added reseller, a customer can do some of his own preliminary research:

  • Download and run the test utility to see if the integration is possible with Laserfiche Connector.
  • Browse the Integration Marketplace to see if the type of integration already exists.
  • Search the Support Site and Laserfiche corporate site for examples of how others may have integrated Laserfiche with a particular system.
  • Search Laserfiche Answers or ask a question in a discussion thread.
  • Check out one of the regional Laserfiche User Groups.
  • Read about how others have integrated their systems with Laserfiche on the Solution Exchange.


Best Practices in Laserfiche Security

Contributed by: Connie Anderson, Senior Technical Writer, Laserfiche 

When setting up security, each Laserfiche repository will be different and have different requirements to consider. Without careful planning and regular updates as your site grows and changes, your system may become chaotic and unsecured. To keep this from happening, have the following recommendations in mind when setting up Laserfiche security. 

Four Factors in Implementing Entry Access Rights 

Entry access rights determine the operations that a user can perform on folders or documents. For example, users may be able to read invoices, but not edit or delete them. 

It is a best practice to assign entry access rights to groups rather than individual users. This way, you can simply add users to groups and they will automatically be assigned the correct rights.

  1. Who: Figure out which users need to be in which group.
  • Categorize users into groups:
    • By department. For example, members of the sales department have different rights than members of the accounting department.
    • By role. For example, administrators have different rights than scanner operators.
  • Users can be members of more than one group. In that case, security will be calculated based on the rights assigned to all relevant groups.

This way, if a new person is hired, simply add them to the appropriate group and they will automatically inherit the correct security.

  1. What and how much: Figure out what content needs to be accessed by which group and how much access they should have.

For example, members of the accounting department need to create, read and modify financial statements, but most other departments don’t even need to know where the financial statements are stored.

  • If a user is not granted a right but is also not denied that right, they will not be able to perform the action. However, they can still inherit the ability to perform the action from another group.
  • If a user is denied a right, either on the user itself or via group membership, that deny will take precedence. Even if they have been allowed that right via a different group, they will still not have that right.

In general, it is a best practice to simply not allow a right if a user should not be able to do something, rather than explicitly denying it. Explicit denies should be used primarily for exception cases.

  1. Scope: Apply entry access rights at the broadest level possible while still restricting access in the way that you need.
  • Use the scope “This folder, subfolders and documents” to easily grant or deny access to entire sections of your folder tree. Then restrict access based on which folders you want particular groups to have the ability to access. Example: If you want everyone to have access to everything in the “Human Resources” folder, then assign them the “This folder, subfolders and documents” scope.
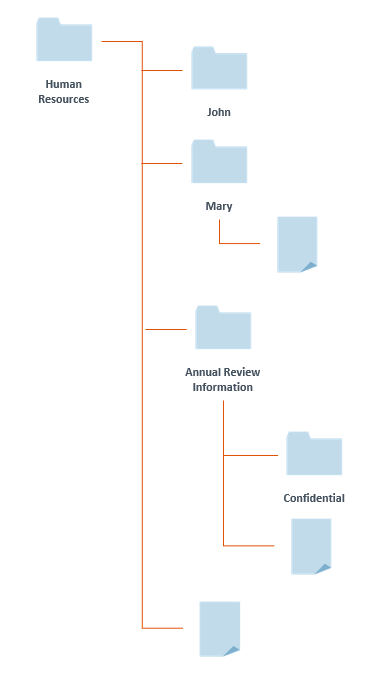
  • If you want them to have access to everything except for the folders and documents in the “Annual Review Information” folder, then assign scope to be the “Human Resources” folder and its immediate children.
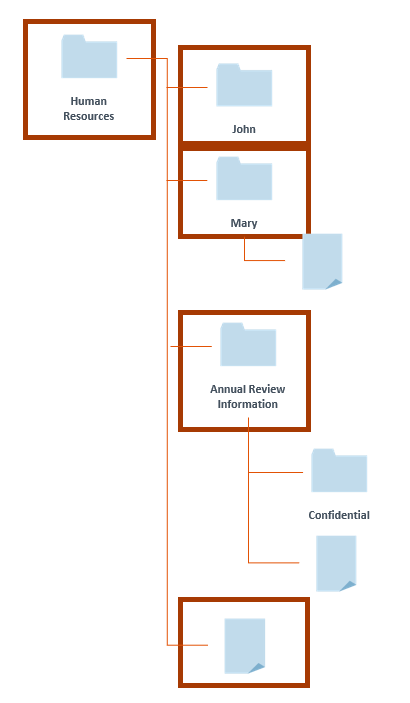
  • Use the folder tree to organize your security, with certain sections of the tree being accessible to certain groups, and use scope to grant only the appropriate sections to the appropriate groups.
  • Create structures with restricted rights at higher levels and more permissive rights at lower levels of the folder tree.
  1. Where: Simplify granting security by making sure documents with similar security needs are stored in the same folder. We strongly recommend setting security at the folder level rather than at the document level. This helps to ensure that your security settings remain consistent, that new documents are created with appropriate security automatically, and that any security issues you might encounter are easy to troubleshoot.
  • After setting up security on a folder, assuming you’ve considered scope correctly, users will automatically have the appropriate rights to the documents residing in it.

Privileges

Privileges are special account rights that grant the ability to perform operations dealing with the management of a Laserfiche repository. Privileges can be divided among different types of administrators. 

For example, a high-level administrator can be granted Manage Entry Access and Manage Metadata privileges while a department manager will have Manage Templates and Fields and Manage Stamps.

Some privileges have repercussions across the entire repository. For example, a user with the Manage Tags privilege can grant security tags, and a user with the Manage Entry Access privilege can browse the entire repository. The number one rule about privileges is: know what a privilege does before you grant it.

The “Everyone” group

Since all users will always be part of the “Everyone” group, you should give it only very limited security access.

By default, all members of the “Everyone” group are assigned two privileges that confer significant system performance benefits. These privileges allow them to bypass certain security settings:

  • Bypass Filter Expressions
  • Bypass Browse

If you will be using the Folder Filter Expressions advanced security feature, or restricting the Browse right for certain folders, you will need to remove the relevant privilege from the “Everyone” group. Otherwise, it is recommended that you leave these privileges in place.

Other Security Considerations

Security Tags

Since it is a best practice to grant entry access rights to particular folders, not individual documents, if you want to control access to documents regardless of where they are located in the folder tree, you can use security tags. A security tag ensures that only users who have been granted that tag will be able to see documents that have that tag applied to them, regardless of where the document is in the repository. 

Use security tags for documents that:

  • Require more restricted access than other documents in the same folder
  • Are special cases or require special handling
  • Will move through many folders during their life cycle

Security tags will not be inherited by documents in a folder if they are applied to a folder. In general, security tags should be applied only to documents, not to folders.

Feature Rights

Feature rights provide administrators with the ability to enable or disable certain functions for users across the entire repository. For example, the Scan feature right controls a user’s ability to scan documents. If they do not have the Scan feature right on a folder, they will not be able to scan new documents into that folder, even if they have sufficient entry access rights to create documents at that location. Feature rights are best used when you want to simplify a user’s experience by disabling functions across the whole repository. 

Field and Template Access Rights

Laserfiche gives you the ability to configure access to specific parts of your repository, such as the fields, and templates. In general, these access rights have reasonable default values; if you don’t have a reason to need to restrict access to specific fields or templates, you do not need to configure field and template security and can use the default values. However, they are useful for exception cases. For example, you may want to use security to hide sensitive field values, such as social security numbers. 

Want to learn more Laserfiche best practices? Explore the Laserfiche Aspire learning platform. 


Best Practices in Records Management

Laserfiche Records Management Edition (RME) functions as an integral part of a well-designed records management program. It has easily configurable components that fit all of your organization’s business needs. Here are some tips and tricks for both Electronic records managers and administrators for ensuring a smooth RME implementation.

Records Manager

The role of a records manager is to manage the records of an organization according to a formal plan. One of the obstacles records managers face is that retention schedules may not provide explicit instructions. This gray area can be used to your advantage by allowing a bit of leeway when setting up cutoff instructions.

A cutoff instruction determines when a record is eligible for cutoff (eligible to enter retention). There are seven different cutoff instructions in Laserfiche, but we will focus on the three most popular:

  • Time-based cutoff: When a retention schedule is triggered based on a time-based cycle period (such as monthly or weekly).
  • Event-based cutoff: When an event on the record (such as employee termination) triggers a retention schedule.
  • Time + Event-based cutoff: Triggered when an event occurs, but the records are only eligible for cutoff after a subsequent time-based cycle period. Basically, this cutoff collects all of the records for which retention was triggered by an event and gives them all the same starting date for future eligibility calculations.

It is a best practice to use either a Time-based or Time + Event-based cutoff. When it comes time for final disposition, all the records with the same cutoff eligibility date will be eligible for disposition on the same date, enabling you to process hundreds of records in one batch instead of one record at a time. Most regulations specify a minimum retention period, so keeping a record a few weeks longer in order to process it with other records should not be a problem.

Reuse instruction definitions

Many records management instruction definitions are similar. For example, there is usually a standardized archive location, general standard retention times for basic handling and so on. Creating generic cutoff, retention and disposition instructions allows you to reuse them across record types and keep the number of unique instructions to pick from to a minimum, making records management much more efficient.

For example, let’s use the following physical retention schedule for a university and convert it to RME.

Rm Best Practices Reuse Instruction

The easiest way to do this is to reuse some of the elements. The color-coded items are the ones that we can group together.

Color-Coded Items

From this we can create two different cutoff instructions:

  • Time-based: Academic Year.
  • Time + Event-based: An event + Academic Year.

We can also create three retention schedules:

  • 1 year, then destroy.
  • 6 years, then accession to “Academic Registry”.
  • 3 years, then destroy.

Laserfiche Administrator

The Laserfiche administrator’s role involves creating, configuring, securing and maintaining the enterprise content management system. Here are some suggestions to make this system easy to maintain, from a records perspective:

  • Determine which documents are records. Not every document is considered a record, so not every document needs to be stored in a records folder.
  • Organize your records series on a broad level, such as by department or by content type and year, and the records folders at a more specific level, such as by month or employee name.

Records Management

  • In addition to making your records retention easier to apply, organizing your records in this way imposes a limit on how many records can be stored in a particular folder. For example, there is a limited number of records that can be stored in the folder corresponding to the month of May in the year 2011. This will prevent your system from infinite growth, which could negatively affect performance.
  • Use Laserfiche Workflow to route your records to the correct storage location in the Laserfiche repository based on either the field values Laserfiche Quick Fields extracts from them or the field values a user manually enters during scanning. This alleviates users from having to remember where different types of documents are stored in Laserfiche. It also saves the records manager from having to manually store each document themselves. Simply configure Laserfiche Workflow to start when you update one of your metadata fields and it will automatically name and store your records for you.
  • Implement transparent records management (TRM). TRM allows records managers and general users to have their own repository views and still have access to the same content.

Records Management3

  • In the above screenshot the records manager’s folder structure is on the left and the user’s folder structure is on the right. The records manager’s folder structure is functional and allows him to store all of his records in a way that will maintain compliance with the published retention schedules and aid the administrator in setting up security. The user’s folder structure is more logical and provides an intuitive way to find content. In order to make TRM possible, Laserfiche Workflow automatically stores the original documents in the appropriate location in the overall records management structure while creating shortcuts in other folders that general users have access to.
  • Automatically create records management items, such as cutoff instructions and retention schedules, from an Excel spreadsheet with the Records Series Setup Utility.

If you’d like to learn more about records management best practices, download the free, complete guide to records management.

Guide to Records Management CTA Button

How MW Industries Automated the Request for Quote (RFQ) Process with Laserfiche Forms

Laserfiche Solution Contributed By: Jason Pennell, Information Systems Manager, Economy Spring

MW Industries is headquartered in Chicago and is comprised of 21 divisions located throughout the US. The company is one of the world’s premier manufacturers of industrial springs, fasteners, machined parts and flat-stamped spring-related products that are used in the automotive and healthcare industries.

Economy Spring is based in Southington, CT and is one of the divisions of MW Industries. Economy Spring has been using Laserfiche for more than 15 years taking advantage of the powerful scan and retrieve functionality to store and share all incoming documents received by letter, fax or email.

Economy Spring processes around 700 requests for quotes (RFQs) each year. This process was inefficient and processing a quote took up to a week or longer at times. Employees had to wait for hours before receiving paperwork through interoffice mail or delivery. Information needed for a quote was gathered haphazardly over many days. The customer service representative (CSR) and engineers spent a significant amount of time walking to pick up, deliver and find paperwork. Economy Spring needed to reduce quote time and lower labor costs. Also, quotes generated faster had a greater likelihood of being selected as the winning bid.

Thus, management directed Economy Spring’s IT department to design and implement a solution that would automate the RFQ process and provide flexibility for streamlining additional business processes down the line. Thus two years ago, after working with the VAR, Economy Spring expanded its use of Laserfiche to include Forms because it has both the power and flexibility to meet its current needs and address future projects.

Automating the RFQ process with Laserfiche Forms reduced the quote processing time to just one to two days. Economy Spring plans to reduce that time to under 24 hours with future enhancements to the process.

Legacy Process

Before Laserfiche, a CSR entered all RFQs received via email into the Infor VISUAL manufacturing ERP system. The email and attached drawings were printed and delivered by interoffice mail to the engineering department for quoting. Each engineer would arbitrarily take one of the packets to quote. Often, the engineer needed information from one or more floor departments to help prepare the quote.

The engineer would walk the packet to the floor department who reviewed it and added the required information before walking it back to him. The engineer would repeat this process until all information was collected and compiled. Finally, the engineer would create a quote in the ERP system and place the packet back into interoffice mail for delivery to the CSR. The CSR then notified the customer of the new quote via email and filed the packet into a filing cabinet.

Current Process

Laserfiche Forms transformed this manual, paper heavy process into a fully automated, paperless process.

95% of RFQs still arrive via email. The CSR enters the RFQ into the ERP system and generates a quote number. He enters that quote number into a Laserfiche form which auto populates the customer information and part numbers to be quoted from the ERP system. The CSR drags any supplemental documents such as email correspondence or drawings into the form before submitting it.

The quote package is saved in the repository in a dynamically generated folder structure. An email notification is automatically sent to the team of engineers about a new RFQ awaiting their review.

One of the engineers takes ownership of the quote by selecting his name in the form. If he has all the information needed to provide the quote, he can do so immediately. Otherwise, he selects one or more floor departments (up to eight) that can provide more information to help with the quote. Depending on his selection, Laserfiche Forms dynamically displays the required form data, providing each worker with just the information that he needs to fill out.

Laserfiche Forms issues a simultaneous request to all of the specified departments to provide the requested information. Sometimes, a service cannot be performed in-house and must be performed by an off-site vendor. If that is the case, the engineer selects which department will contact the outside vendor to get pricing – either Engineering or Purchasing.

The floor departments review the engineer’s request in Laserfiche Forms and add all of the requested information.

The forms are then routed back to the engineer, who can either ask for more information and send back the form, decide that this part is a no quote, or provide a quote. The engineer and floor departments can go back and forth as many times as needed, with all comments tracked in the form.

Once the engineer has all the information needed to provide the quote, he creates it in the ERP system and signifies completion by filing out the “quote created date” field in another form.

Once a quote is created, the CSR is notified instantly by email. If a quote is over a certain dollar value, it is first reviewed by management. Otherwise, it goes directly to the CSR. The CSR reviews the quote and notifies the customer.

At any time during the process, the engineer can decide that the part is a no quote, which means that it is not something that the organization can manufacture. If that is the case, the CSR is notified by email and can in turn, notify the customer.

Benefits

Automating the RFQ process in Laserfiche Forms resulted in the following benefits for Economy Spring and MW Industries:

  • The win rate for every RFQ has increased from five to six percent to 13-15% since the company that quotes first has a larger chance of winning the bid.
  • The time to generate a quote has decreased from over one week down to one to two days.
  • All information pertaining to a quote can be viewed by anyone at any time. No time is lost searching or walking to find and gather information.

Since this project, Economy has partnered with OneSource Document Solutions to implement additional business process improvements by using Laserfiche Quick Fields, Workflow and Connector that have resulted in tens of thousands of dollars in savings.

Laserfiche use at Economy Spring has increased and the software is now used by most of the 180 employees. As a result of this successful initiative at their Economy Spring division, MW industries has been starting to deploy Laserfiche throughout its 20 other divisions nationwide.

According to Jason Pennell “Laserfiche is as critical to Economy Spring as its ERP product.”