How to Design an Effective Laserfiche Document Template

A field stores information about a particular Laserfiche entry (document or folder). It is possible to apply fields to specific entries by using templates, which are collections of related fields. An entry can only have one template assigned to it, but each template can contain multiple fields. This article outlines how to create a Laserfiche template that includes different field types, multi-value fields, dynamic fields, and field constraints.

To demonstrate how to create a Laserfiche template, I will use the fictional example of Laser University.

Example: Laser University

As part of Laser University’s admissions process, prospective students have to submit an application along with the following supplemental documents:

  • Personal statement.
  • Candidate recommendation.
  • Transcript.

All of these documents are scanned into Laserfiche with Laserfiche Scanning or printed into Laserfiche with Laserfiche Snapshot and stored in the applicant’s folder in the Laserfiche repository.

Laser University’s admission officers agreed on the following parameters to organize submitted applications and documents. The officers based this list on the information that they would need when searching for applications and related documents.

  • First and last name.
  • Date of birth.
  • Proposed major of study.
  • Phone number.
  • E-mail address.
  • GPA.
  • SAT score.
  • Type of degree.
  • State of residency.
  • Type of student (new student or transfer student).
  • Type of document.

Here is how Laser University converted these items into a template that is applied to every application and related document in the Laserfiche repository.

Types of fields

Different field types can contain a different type of information. Some examples of field types include:

  • Text fields.
  • Number fields.
  • Date fields.
  • List fields.

Each field type can be used for a separate purpose. Here is a list of all of the fields in the Laser University “Admissions Application” template and their field types.
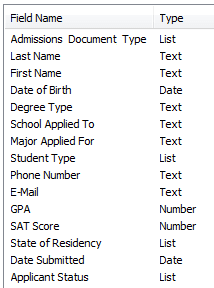
Multi-value fields

Sometimes, it would make sense if one field was able to contain more than one value. For example, prospective students can have more than one phone number such as a home phone and a cell phone. To account for this, Laser University can create two different fields: one for cell phone and one for home phone. Two fields would make searching by phone number very inefficient, though, since the admissions officer would not know which of the fields to search because one of them could be null.

A better option would be to create a multi-value phone number field to store either one or both phone numbers. Most fields can be set to contain multiple values and the number of values assigned to such a field varies from entry to entry, depending on user input.

Therefore, Laser University can make one field for “Phone Number” and then set it to allow multiple values. An admissions clerk can then add as many phone numbers as necessary into the field. When searching for an applicant’s document by phone number, an admissions officer can simply perform a single search using whichever phone number he has in front of him.

Field constraints

Using a multi-value field for the phone number can make searching for prospective applicants by phone number simpler, but if phone numbers aren’t entered in a consistent format (xxx-xxx-xxxx vs (xxx)xxx-xxxx), this searching will still be difficult. This is where field constraints fit in.

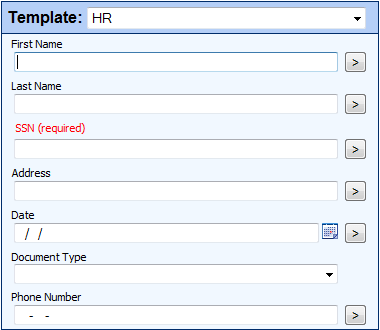
Field constraints restrict users to enter data that fits a particular pattern or is of a particular type. To make it easier for admissions officers to locate documents related to a particular applicant, the administrator can set field constraints on the phone number field. All phone numbers will have to follow this format: xxx-xxx-xxxx. This field constraint can be set with regular expressions.
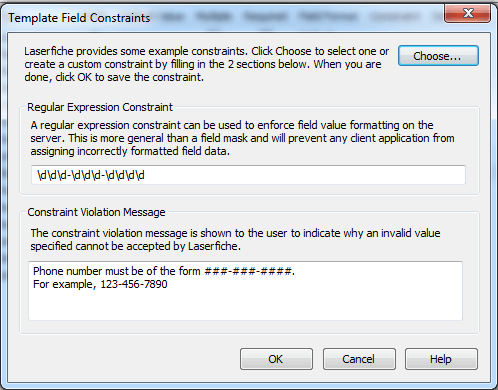
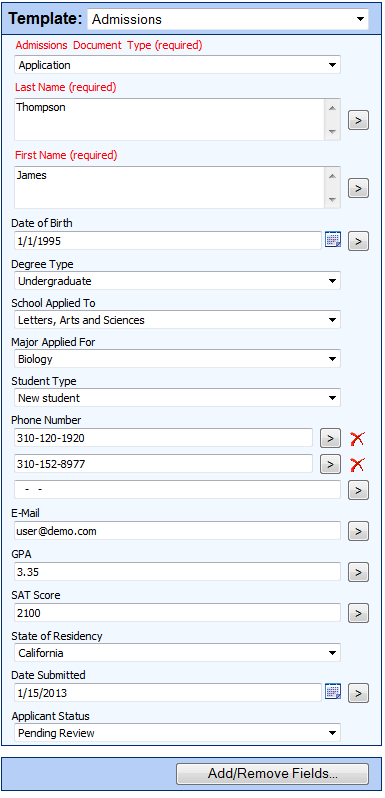
When a user opens the “Admissions – Application” template, he will now see that the phone number field contains two dashes. These dashes signify that a user will not be allowed to enter a phone number in any other format (such as adding parenthesis).

Since all phone numbers are now formatted uniformly, searching by phone number will now be easy.

In addition to field constraints, fields in a template can be designated as “required.” Required fields prevent a user from saving the document without filling them out first. Laser University designated the following fields to be required because they are all used in naming the final documents:

  • Admissions document type.
  • Last name.
  • First name.

Required fields are configured in the Laserfiche Administration Console by simply checking a box.

Dynamic fields

Sometimes, list fields may contain so many different values that it is difficult for the admissions clerk to select the one he needs. For example, since there are over 100 different majors at Laser University, it is time consuming to select just one from a list field that contains them all.

Selecting a particular item from a list field can be simplified by using dynamic fields. Dynamic fields allow a user to be presented with options to select in one field, based on what he had previously selected in another field. Dynamic fields look up information in an external SQL database table and use this to filter the results.

Laser University has set up a series of dynamic fields to help with populating the “School Applied To” and “Major Applied For” fields. For this purpose, the university used an existing database table.

Laser University’s existing external database table looks like this:
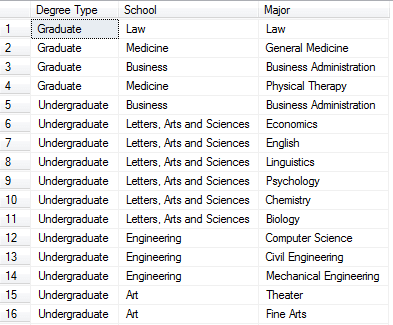
In the table pictured above each degree type has associated schools and majors. These relationships have been used to set up the dynamic fields.

When configuring these fields in the Administration Console, the “School Applied To” field is assigned one parent field – the “Degree Type”, and the “Major Applied For” is assigned two parent fields – “Degree Type” and “School Applied To.”

When filling out this template, the admissions clerk will first select a degree type from the “Degree Type” list field. This field will contain a list of all the degree types that are specified in the external database table. Next, the admissions clerk will select the correct school from the “School Applied To” field. The choices in this field are limited to those schools that accept the degree just specified. Once the admissions clerk selects a school, the “Major Applied For” field will be restricted to only those majors that satisfy the degree type and particular school.

For example, if the admissions clerk selects the undergraduate degree type, then the schools listed in the “School Applied To” field are only schools that provide an undergraduate degree (the law school will not be listed since that school only provides graduate degrees). Once the clerk selects the Letters, Arts and Sciences school, the majors listed in “Major Applied For” will only be those that are offered at the school, and for which a student can get an undergraduate degree (mechanical engineering will not be listed, as that major is located in the School of Engineering).

Final template

Here is what the final, populated template looks like:
Best practices for using templates and fields

Administrators should keep the following best practices in mind, when setting up fields and templates.

  • Reuse fields across templates. If many templates should have a “Last Name” field, then create one field and apply it to the multiple templates. This simplifies searching by allowing a user to find all student records for a person with the last name of “Smith” without having to worry about which template to search in.
  • List fields, dynamic fields and field constraints can help reduce errors due to data entry or spelling mistakes. This will also make documents easier to search for in the repository.
  • When creating templates, think of all the different things that an end- user would want to search on and include those as template fields.

Automate Employee Onboarding with Laserfiche Forms

Reviewing paper job applications can be time-consuming for HR recruiters. This article outlines how to configure Laserfiche Electronic Forms to make the hiring process more efficient.

The process

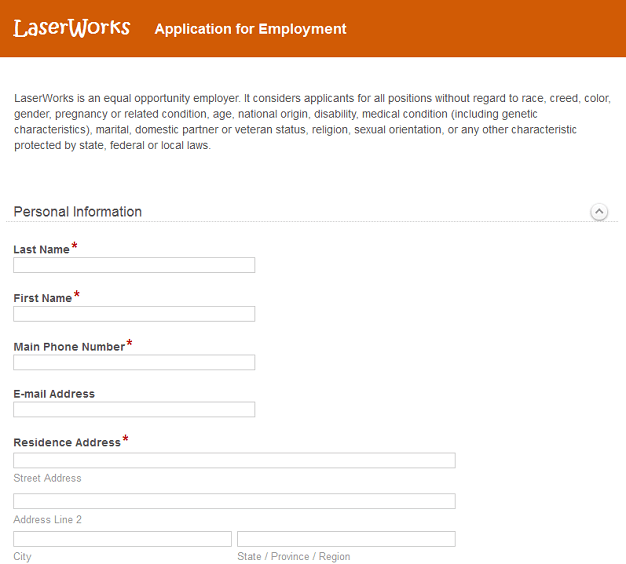
The hiring process begins when a job opening is posted on the company’s website. The link to the electronic application form created with Laserfiche Forms is embedded in the job description. When a prospective applicant clicks the link, she is presented with the employment application:

job_app_1_cropped_revised

The applicant fills out the application. The fields marked with asterisks are required.

At the end of the application, the applicant can upload a cover letter and resume. If the job posting requires additional documents (e.g., writing samples), she can upload those as well.

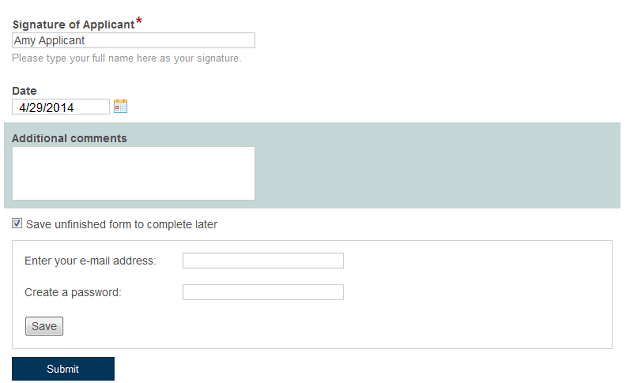
The applicant does not need to complete and submit the form in one session. She can save the form as a draft and complete it later. Once everything is filled out, the applicant simply clicks “Submit.”

Job App Save the Form

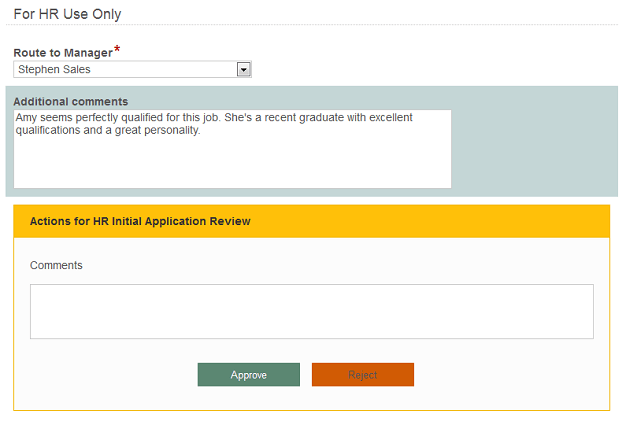
The form and supplemental documents are routed to the recruiter, who inspects the application to see if the candidate might be a good fit for the job. If this is the case, the recruiter can assign the application to a departmental manager. The recruiter can also leave comments for the manager, such as the notes from a phone screening.

Form Route

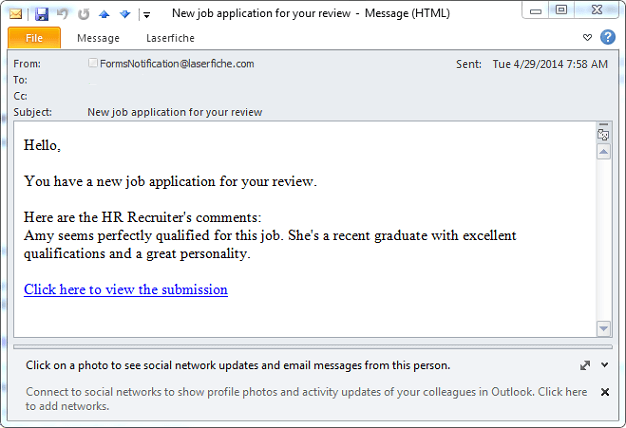
If the application is approved by the recruiter, an email is automatically generated and sent to the department manager notifying him of a new application for his review.

Department Manager Notifying Email

If the manager doesn’t review the application in three business days, he’ll get another email reminder.

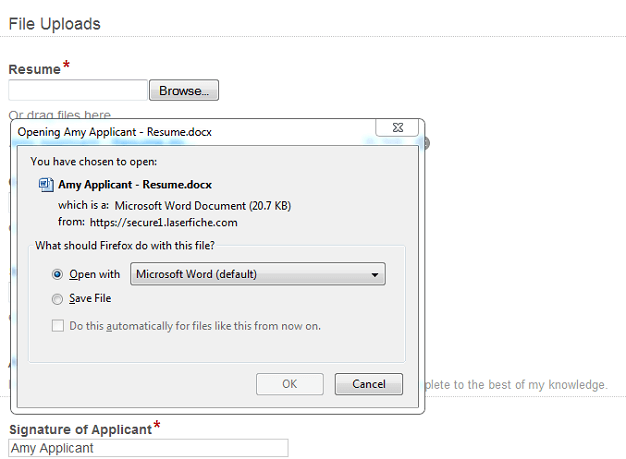
The department manager can look through the application and download the candidate’s resume by clicking the resume link.

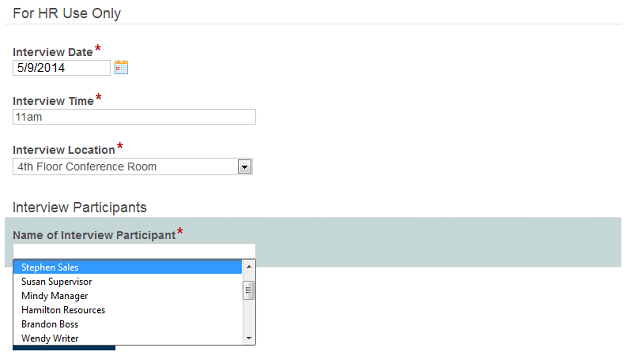
If the department manager decides that he would like to interview the candidate, he clicks “Schedule Interview.” This alerts the recruiter to schedule an interview with the candidate. The recruiter notes the date, time and location of the interview on the form, along with the interviewer’s name. In order to simplify this task, the field prompts the user with company employee names.

Schedule Interview

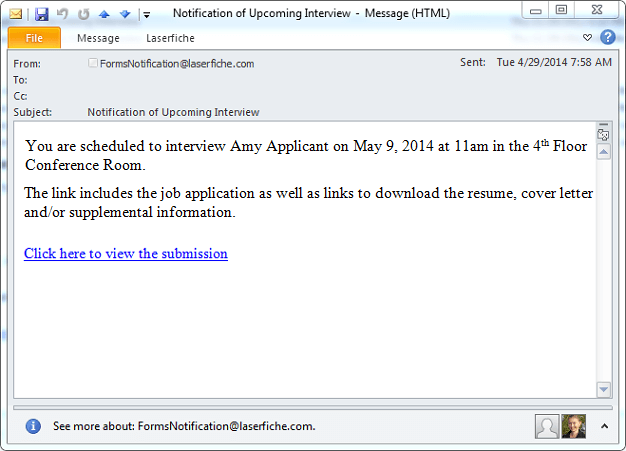
Once the interview is scheduled, the recruiter clicks “Interview Scheduled.” This action generates an email to the interviewer that includes interview information as well as a link to the original job application.

Interview Scheduled Email

The interviewer can view the information, download associated files and print any he’d like to have on hand during the interview. When finished, he clicks “Application Viewed.” After the interview, the hiring manager receives an email with a link to the form, where he can hire or reject the candidate.

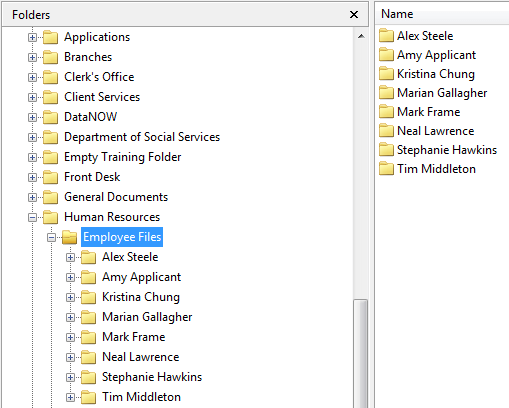
If the applicant is hired, the application and supplemental information are saved to a newly created employee folder. Otherwise, the application is routed to a “Rejected Candidates” folder for storage.

Employee Folder

What is going on behind the scenes

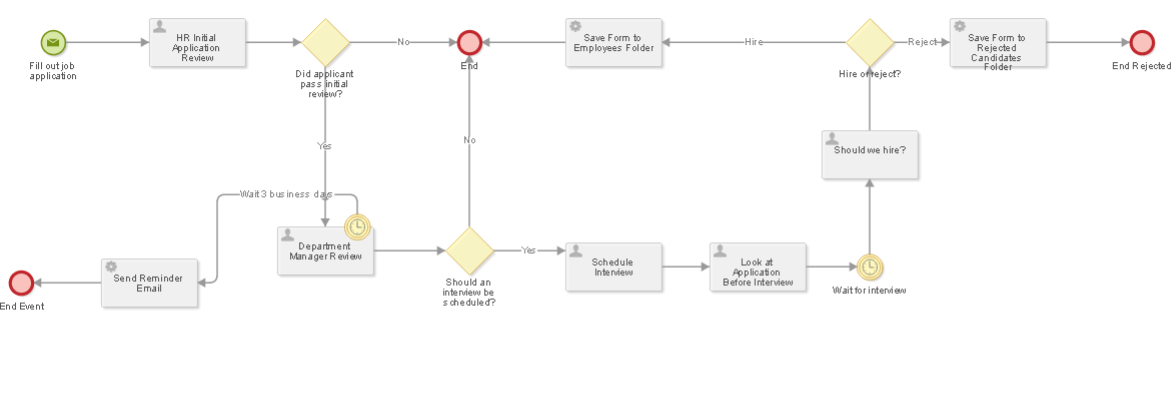
The entire business process is mapped out in the Laserfiche Forms Process Modeler.

job_app_10revised
Click on image to view larger in new window.

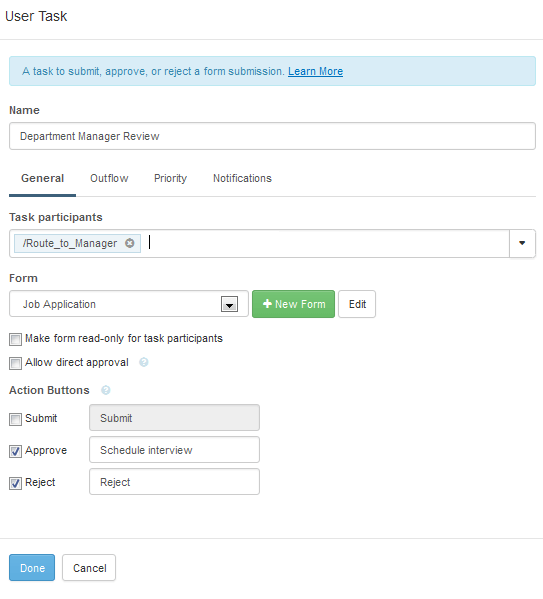
The process starts when a user fills out the job application on the website. After that, each action taken by an employee is represented by a user task. Here is what the “Department Manager Review” user task looks like.

job_app_11_revised

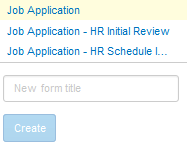
Every user task deals with a particular form. This process uses three different forms.

job_app_12_revised

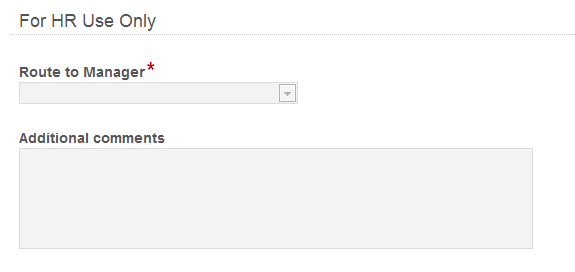
Information from the original job application is copied to the forms that the recruiter and department manager will review, along with other fields specific to those users. For example, the form that the recruiter sees when reviewing the application is not the original job application form but the job application form with the special “For HR Use Only” appended to the bottom.

For Hr Use Only

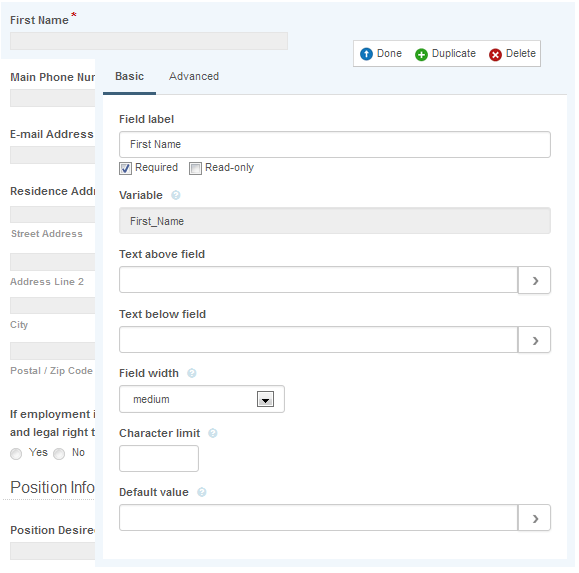
Each form field has a specific variable associated with it. This variable contains the information that is entered into the field. For example, the “First Name” field has a corresponding variable called “First_Name.”

job_app_14_revised

For example, when creating the form that the recruiter sees when reviewing the application, instead of inserting a regular field and calling it “First Name,” we can simply insert the “First_Name” variable. This ensures that that the field will contain the same information entered in the original job application when the recruiter views it.

In order to simplify the new form creation process, we can also copy the form, rename it and then add the “For HR User Only” section on the bottom. Forms can be copied directly from within the Form Designer.

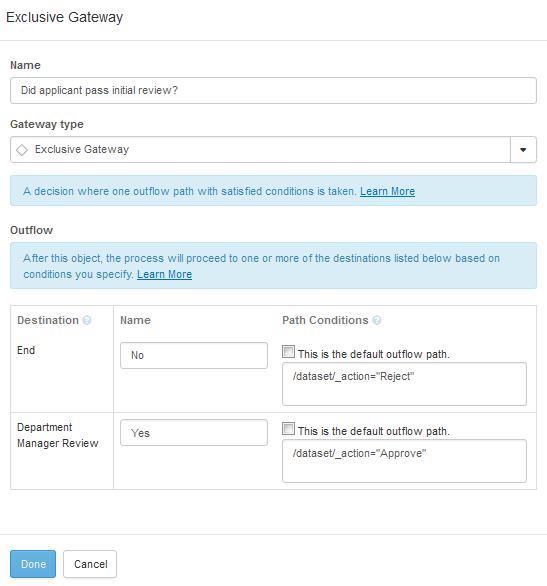
In the Laserfiche Forms Process Modeler, decisions are denoted by gateways, such as this “Did applicant pass initial review?” gateway.

job_app_16_revised

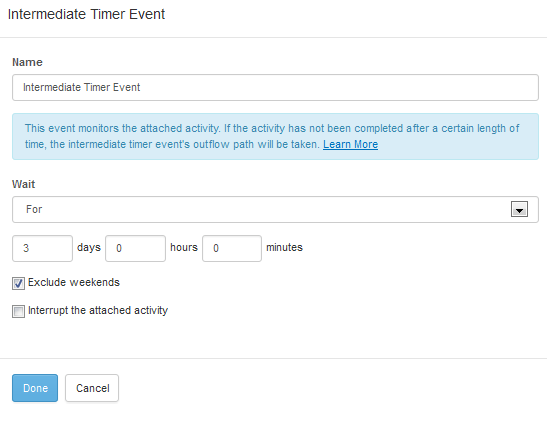
Once the application has passed the recruiter’s initial review, it is sent to the department manager for review. If the manager doesn’t review it within three business days, he’ll get a follow up email. This is accomplished by attaching an intermediate timer to the Department Manager Review user task. Here is how this timer is configured:

job_app_17_revised

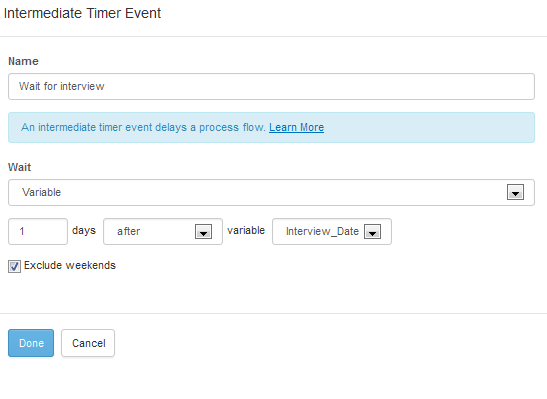
Another intermediate timer event occurs before a hiring decision is made. This timer event reminds the HR manager a day after the interview to make a decision about the candidate.

job_app_18_revised

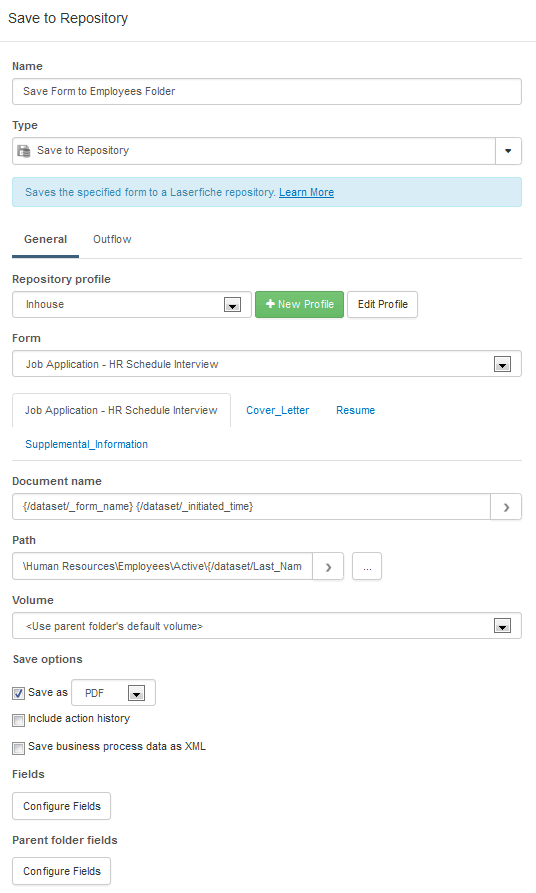
Once the HR manager decides if the candidate should be hired or rejected, the candidate’s job application and all supplemental files are saved in the Laserfiche repository with the Save to Repository service task. This task also allows the user to specify the template and fields that will be appended to the submission in Laserfiche. Since the files for hired and rejected applicants are saved in different folders, this HR onboarding process uses two Save to Repository tasks. Here is what the task for hired candidates looks like:

job_app_19_revised

Advantages of Laserfiche Forms

Some benefits of automating your hiring process with Laserfiche Forms include:

  • Job applications are always legible and complete, since required fields prevent important information from being omitted.
  • Applications can be quickly and seamlessly passed to various employees for review. Because forms can be viewed easily on desktops, laptops and mobile devices, managers can review and act on them from any location.
  • Administrators can easily see the status of each application, allowing them to quickly eliminate bottlenecks.

You can learn more about paperless processes in HR by downloading the free guide to HR automation.


How the Iowa Tribe of Oklahoma Created a Paperless Human Resources Department

Contributed by:  Iowa Tribe of Oklahoma

With more than 350 employees, the Iowa Tribe of Oklahoma is one of the largest employers in Payne County, OK. Prior to implementing Laserfiche, we had to deal with inconsistent personnel files and paperwork being constantly misfiled or lost. Laserfiche completely revitalized our human resources department and made it almost completely paperless. With twenty-five different workflows running in our HR department, we’ve used Laserfiche to automate everything from employee onboarding to employee separation.

Job application

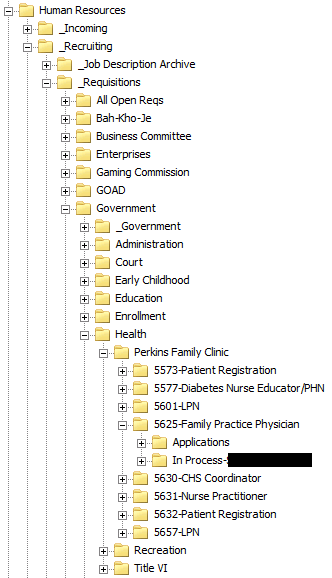
The employee onboarding process begins when a job requisition is submitted electronically through our Microsoft SharePoint approval system. Once this requisition is approved, the HR assistant sends it into Laserfiche with Laserfiche Snapshot. Laserfiche Workflow then routes this document into a special requisition folder in Laserfiche.

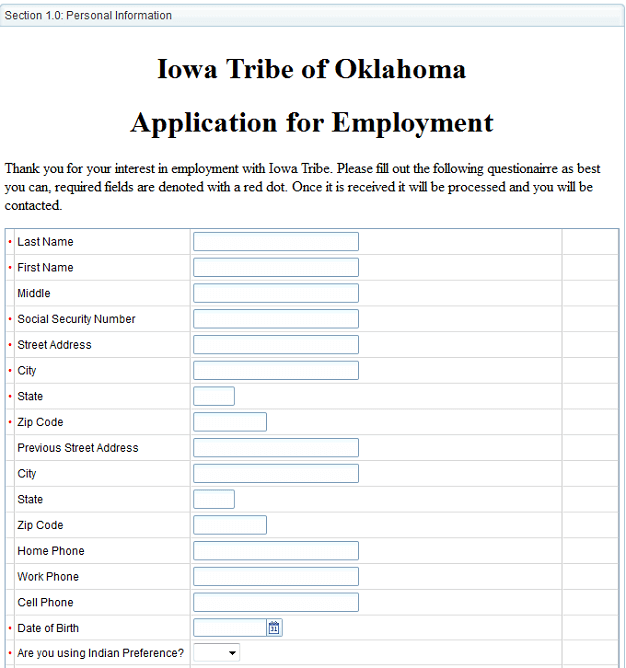
The HR assistant posts this job description on our Website. Potential employees apply for the position by filling out an electronic employment application created with LincDoc – software that creates electronic forms.

Iowa Tribe Job Application<br />

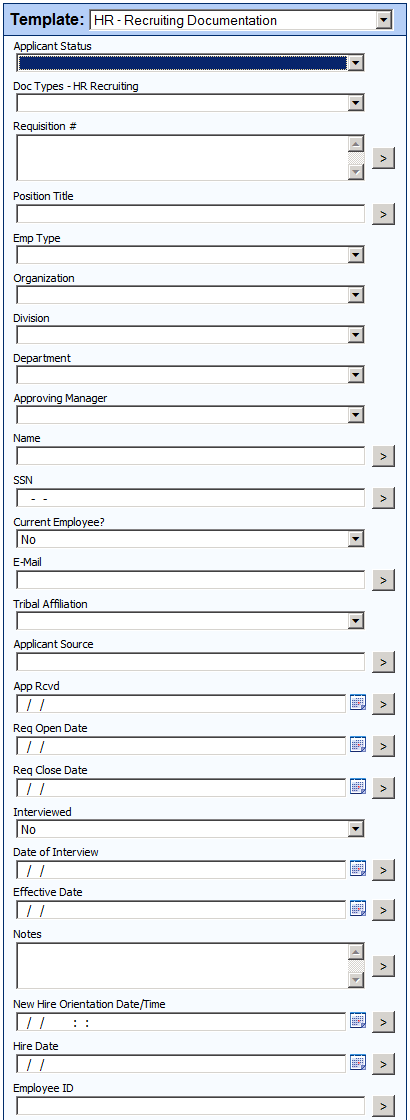
LincDoc is fully integrated with Laserfiche, so once a candidate submits the employment application, it is automatically saved in the “LincwareApplications” folder in the repository with the appropriate template automatically applied.

Employment Application<br />

A large number of the fields in the template, such as “Name”, “SSN” and “Tribal Affiliation” are also populated automatically through the Laserfiche/LincDoc integration.

Laserfiche/Lincdoc Integration<br />

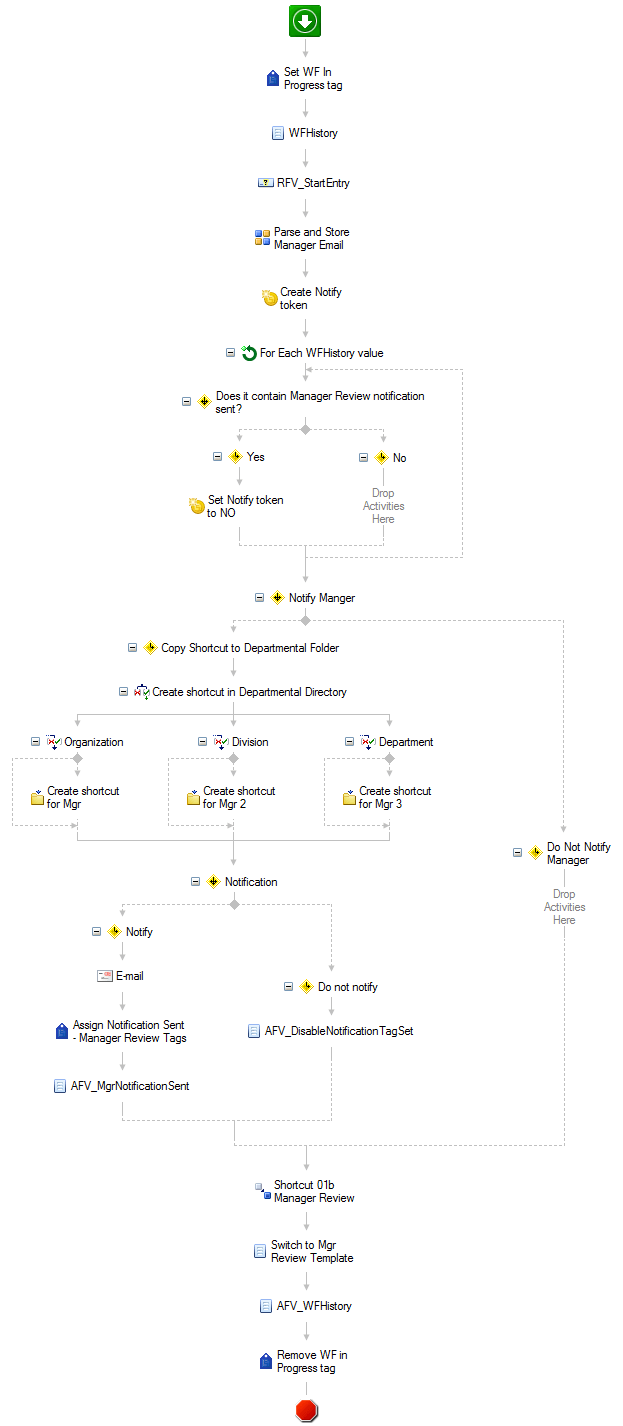
Laserfiche Workflow monitors the “Applications” folder and automatically routes incoming applications to the appropriate hiring manager for consideration based on the value of the “Approving Manager” field. Here is a screenshot of this workflow:

Laserfiche Workflow<br />

A shortcut to this job application is also placed in the requisition folder to await a hiring selection.

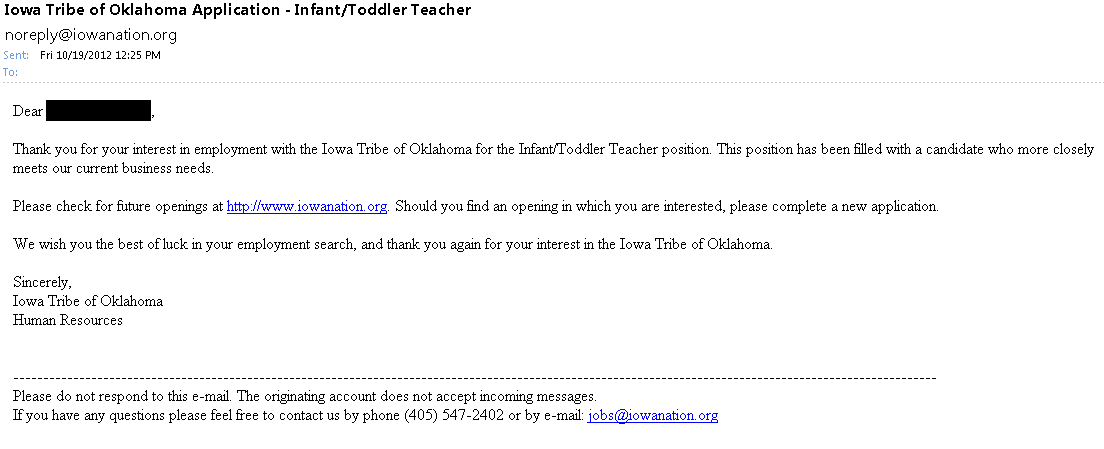
The hiring manager is able to communicate with candidates during the entire application review process by changing the value of the “Applicant Status” list field. Candidates receive an e-mail notifying them of every status change. Some of the status updates a manager can select are:

  • Does not meet minimum qualifications.
  • Application received after closed.
  • Manager declined.
  • Selected for hire.

Here is an example of an e-mail notification that is sent when the status is changed to “Manager declined”:

"“Manager

Employee onboarding

Once a hiring manager decides to hire an employee, the application is routed to Human Resources to complete the remainder of the onboarding process. HR maintains communication with the hiring manager throughout the hiring process by updating the “Applicant Status” field. Some of the different statuses they can choose from are:

  • Offer accepted.
  • Drug screen and background check completed.
  • New hire orientation scheduled.
  • Hired.

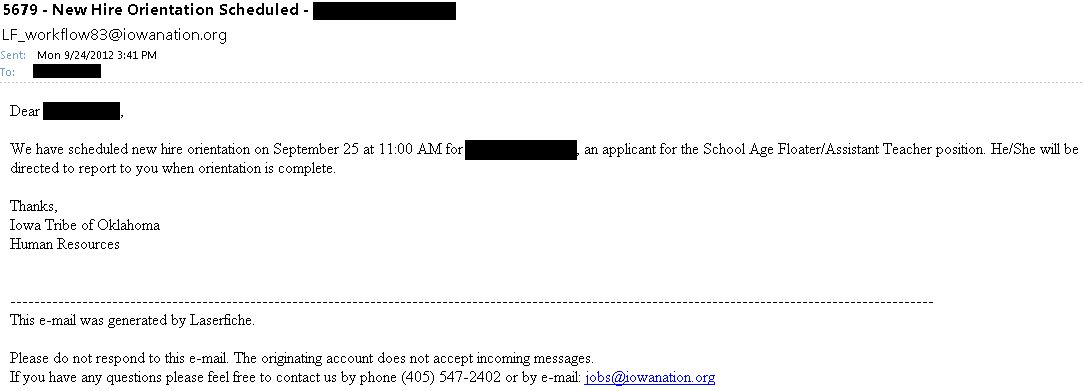
Here is an example of a notification e-mail that is sent when the status is changed to “New hire orientation scheduled”:

"“New

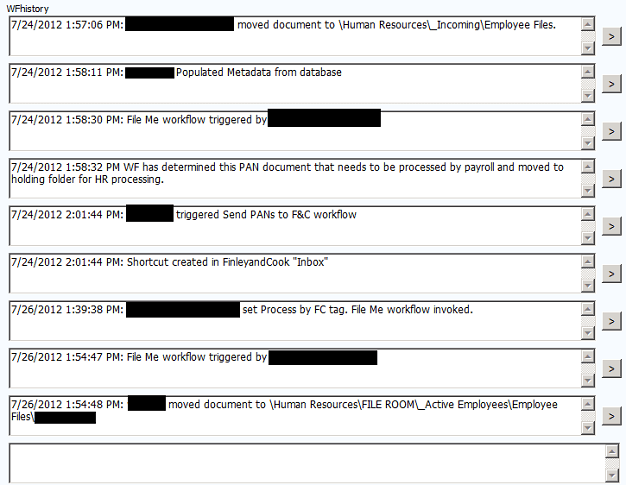
Throughout the process, every action taken on the document by Laserfiche Workflow is tracked in a special “WFhistory” multi-value field.

“Wfhistory” Multi-Value Field<br />

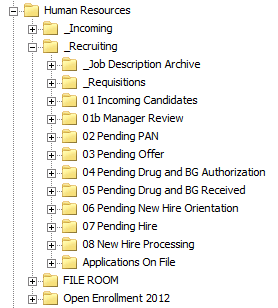
As the application moves through the various steps in the onboarding process, it also physically moves through the various folders in the Laserfiche repository.

Laserfiche Repository<br />

Once an applicant’s status is changed to “Hired”, Laserfiche Workflow notifies Payroll, Purchasing and IT by e-mail to begin distribution of company resources in preparation for the employee’s start date.

"Notifies

Laserfiche Workflow also:

  • Finds all other job applications that the applicant has in Laserfiche for other positions and sets their status to “rescinded”.
  • Finds all of the other job applications for this particular position and sets their status to “Manager declined”. This automatically notifies the candidates by e-mail that the position has been filled.

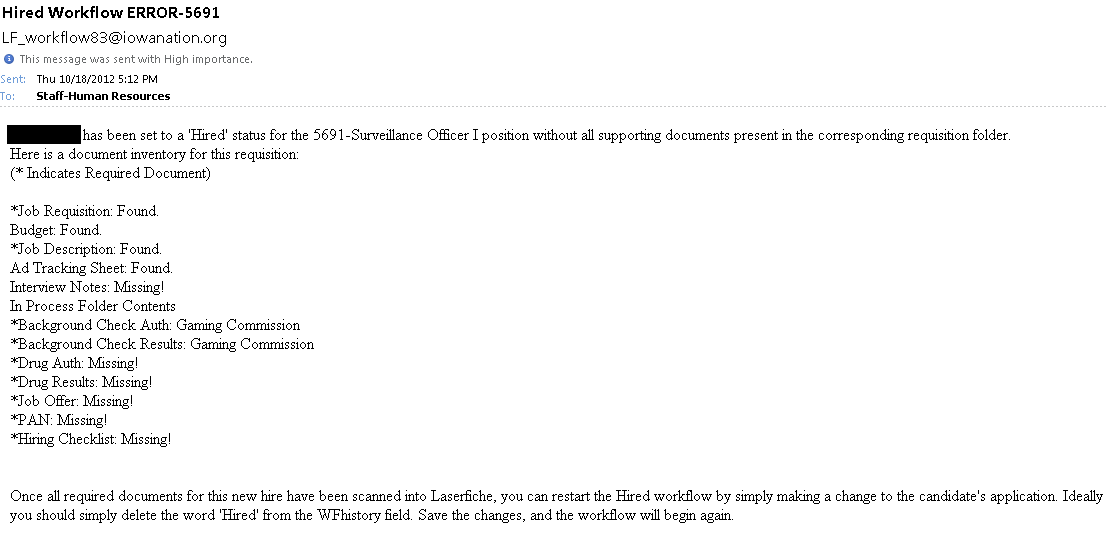
Another workflow performs an inventory of the requisition folder to check if the new employee has any missing documents.

  • If there are missing documents, HR is notified by e-mail.
"Notified
  • If no documents are missing the new employee’s documents are converted to recruitment documents and moved to a pending hire folder where they await an employee number.
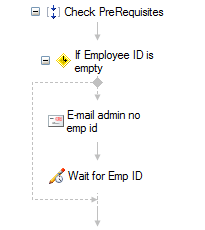
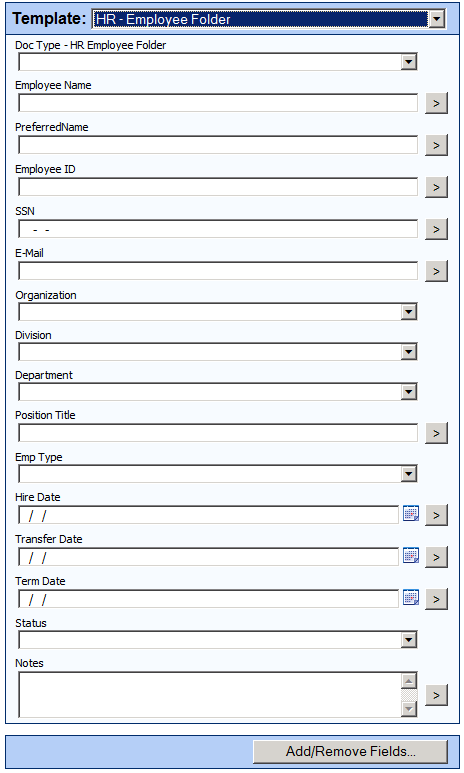
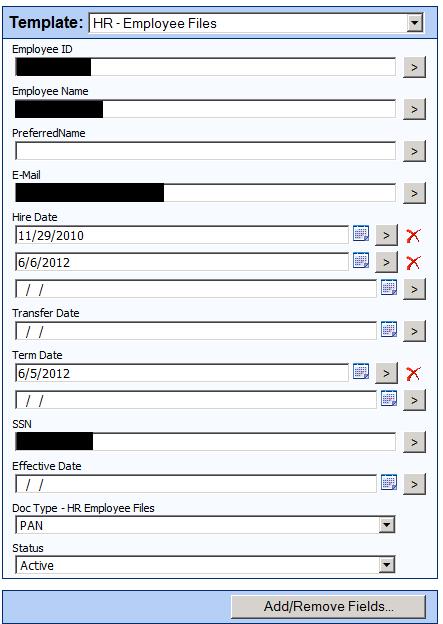
  • As soon as HR assigns an employee number and fills out the “Employee ID” field, all of the documents are moved to a brand new active employee folder where an “HR-Employee Folder” template is assigned.
“Hr-Employee Folder”<br />

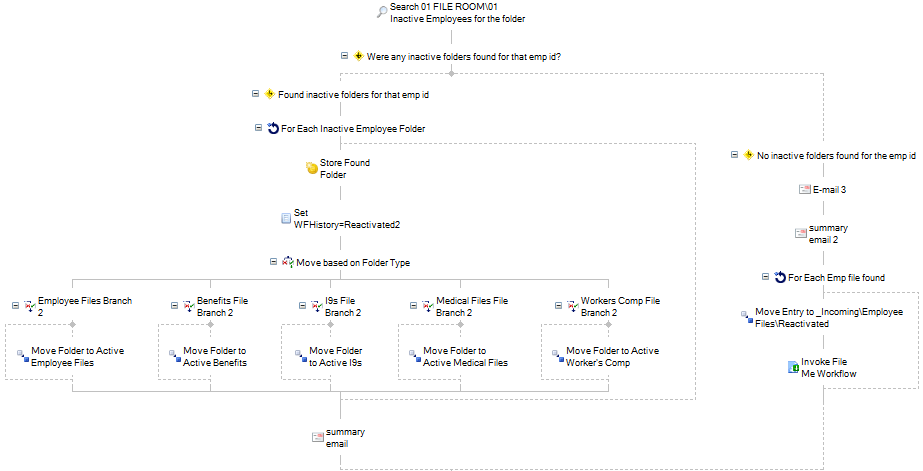
Another workflow scans the inactive employee record series to determine whether the new hire is a previous employee with an existing employee file. If it locates one, it automatically moves all documents back to the active employee folder.

"Workflow

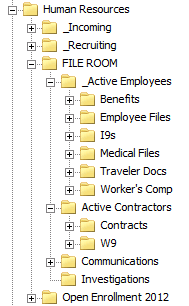
Here is a screenshot of our active employee folders:

Active Employee Folders<br />

Employee document management

In addition to new employee documents, all other HR documents are stored in Laserfiche as soon as they are received. Some of the different document types are:

  • Personnel Action Notices (PANs) – forms that contain any change to an employee’s record or status.
  • Direct deposit forms.
  • Employee evaluations.
  • W4s.
  • I9s.
  • Benefits enrollment.
  • Worker’s compensation forms.
  • Discipline forms.
  • Certifications.
  • Leave donations.
  • Medical return to work letters.
  • Incident drug screens.
  • Garnishments.

All of these documents are either created electronically and sent to Laserfiche with Laserfiche Snapshot or scanned onto the network, imported into Laserfiche with Import Agent and immediately shredded. They are also assigned the “HR-Employee Files” template.

Hr-Employee Files<br />

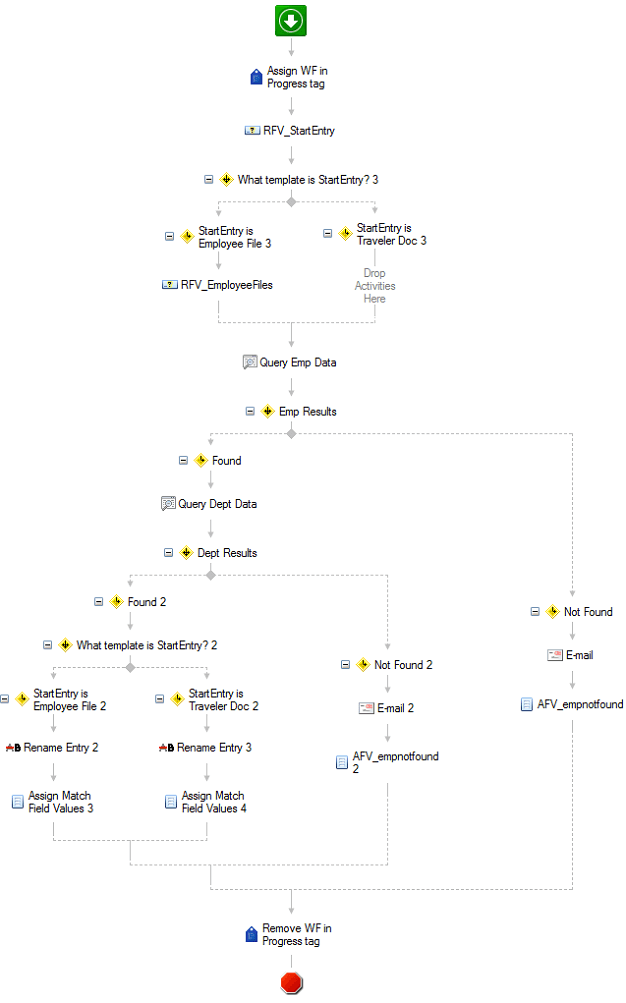
Laserfiche Workflow finds each new document, determines its type and routes it to either Payroll or Benefits as needed. Workflow also performs a database lookup to automatically populate the metadata. Here is the main workflow that processes our incoming employee documents:

Main Workflow<br />

Employee separation

Employee Separation<br />

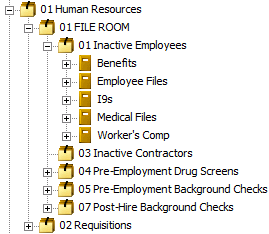
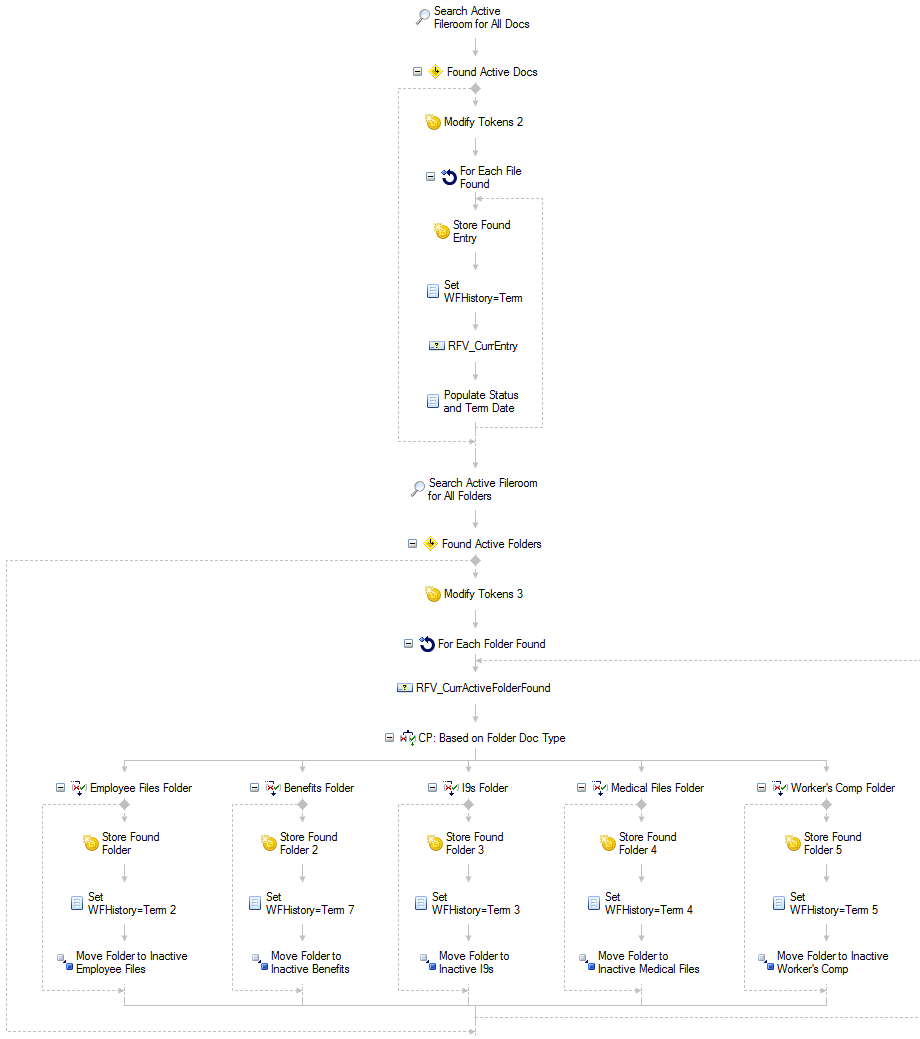
In addition to employee onboarding, Laserfiche Workflow also manages employee separation. Once HR staff submits a separation PAN, Workflow scans the repository for all documents for that employee, terminates them, and files them in our inactive employee record series to keep on file per the retention schedule for each document type.

Here is a section of our separation workflow:

"Separation

Benefits of Laserfiche

Implementing Laserfiche in the HR department has resulted in the following benefits at Iowa Tribe of Oklahoma:

  • We have eliminated 80 cubic feet of filing cabinets.
  • Authorized users can access any active employee file onsite from a Web browser or offsite via authorized VPN access.
  • The workflow which checks for missing documentation saved us 300 hours a year of employee time.
  • There is now clear and constant communication between everyone involved in the employee onboarding process including the hiring managers, job candidates and HR staff.

You can learn more about paperless processes in HR by downloading the free guide to HR automation


How to Diagram Your Business Process

A business process is a set of activities or tasks that accomplish a specific organizational goal. By automating business processes using Laserfiche Workflow, organizations around the world have increased productivity and cut costs. Before you jump into your Workflow implementation, however, it is vitally important to diagram your business processes to ensure that they are as simple, logical and consistent as possible.

Why should I diagram my business process?

A business process diagram is a roadmap for implementation—it outlines the expected outcome and provides something concrete to build from.

Diagramming a business process:

  • Makes it possible to look at the big picture and take into account all types of potential scenarios.
  • Helps you research and understand your process thoroughly so that you can see how it can be changed or improved when automated.
  • Produces a visual aid that everyone can agree on—ensuring that everyone is on the same page.
  • Helps you reduce upfront errors and prevent unnecessary changes down the road.

How do I diagram a business process?

There are three steps to diagramming a business process:

  1. Create an initial diagram based on upfront discovery.
  2. Gather the additional requirements.
  3. Incorporate those requirements into the diagram.

If need be, repeat steps 2 and 3 until everyone is satisfied with the end result.

Create an initial diagram based on upfront discovery.

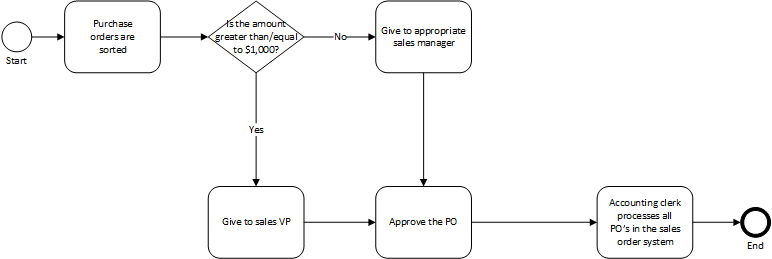
An initial diagram is a general overview of what the stakeholders think the business process looks like. This is the general diagram that you will be “fleshing out” throughout the diagramming process. Before crafting this diagram, sit down with stakeholders to come up with initial, high-level steps in the business process.

Here is an example of an initial diagram for a purchase order generation process:

Gather the additional requirements.

Gathering requirements consists of obtaining information about the business process from the people involved in each step, such as end users, stakeholders, administrative assistants and department heads.

During requirements gathering phase, you may discover that employees no longer follow the established procedures or that the current office workflow is exceedingly frustrating. You can also find out how tasks are actually completed as opposed to how they are supposed to be completed.

Answer these questions during requirements gathering:

  • What is the overall goal of the business process?
  • What triggers the start of the process?
  • What signals the end of the process?
  • What are the activities in each step and who is involved in each activity?
  • Are there any alternate routes in the process?

Make sure you use specific terminology when questioning users and have them explain ambiguous phrases.

Examples:

  • “File” can mean a single document or a packet of individual documents.
  • “Sending” a document can mean e-mailing it, saving it on a network folder or transporting the hard copy.

Some other commonly misunderstood and misused terms include:

  • Bring in/store.
  • Can/cannot access.
  • Review.
  • Receive.
  • Notify.
  • Process.

Diagramming business processes is the perfect opportunity to improve how things are done in your organization.

Ask yourself:

  • Are there any steps in the process that seem redundant?
  • Is there a certain part of the process that can be reconfigured to be more efficient?

Don’t be afraid to make changes to the current process and incorporate those into your diagram.

Incorporate those requirements into the diagram.

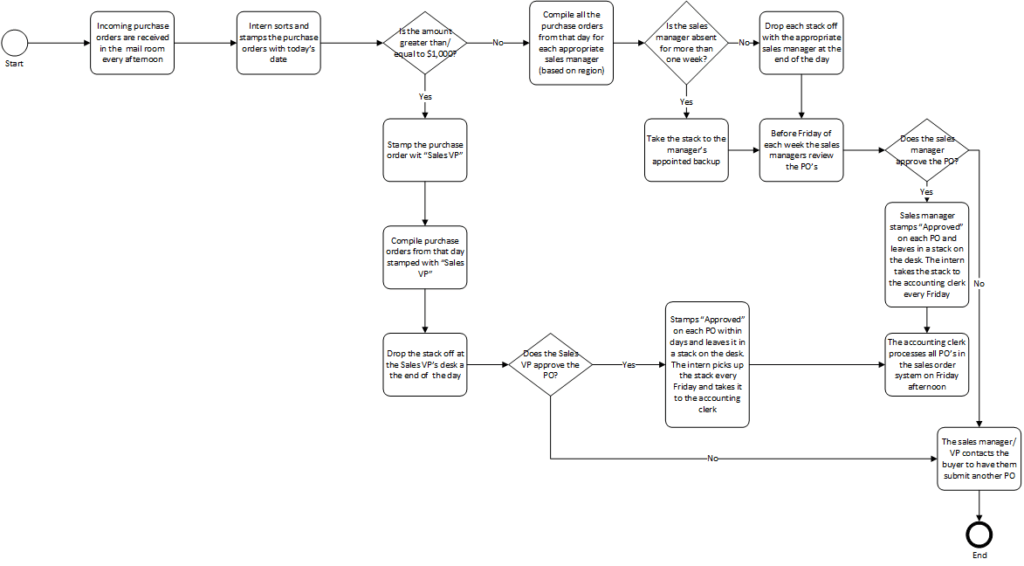
Once you’ve gathered the requirements, incorporate them into your diagram by fleshing out each step. Don’t make assumptions even on little things such as the format of a date field—a diagram is useless unless it is detailed, correct and comprehensive.

Show this diagram to the stakeholders and end users to make sure that they are satisfied with the finalized process. Revise the diagram until everyone is satisfied with the final version, but make sure that you keep the goal of the process in mind the entire time. Remember that this diagram should be finalized when it shows a process that achieves this goal and not necessarily when every user or department’s wish is fulfilled.

The final diagram of the purchase order generation process is much more detailed than the initial diagram:

Rethink the current process

Purchasing Laserfiche provides a great opportunity to perfect and streamline existing processes to make them as smooth and efficient as possible. Once you have a detailed diagram, it will be much easier to translate the business processes into Laserfiche Workflow, because you’ve made sure that they are efficient, straightforward and appropriate for everyone involved.

Business process automation is just one feature of a document management system like Laserfiche. Get help researching the many useful functions of document management with our free guide today!


How Adams 12 School District Streamlined Student Records

Contributed by: Adams 12 School District

Adams 12 is the fifth largest school district in Colorado with 5,000 employees and 39,500 students. Since we have roughly 8,500 graduates and withdrawals annually, there are a large number of student records that need archiving. Here is how we use Laserfiche to simplify the student records process.

Student records

At the district office, we keep records of students who have either graduated or withdrawn. We also handle an average of 276 requests for transcripts, employment verifications and immunization verifications a month.

  • After the records arrive at the district office, our records technician goes through each student record and purges any documents that do not need to be retained, such as student photographs. Registrars also assist with this process before sending the documents to the district office.
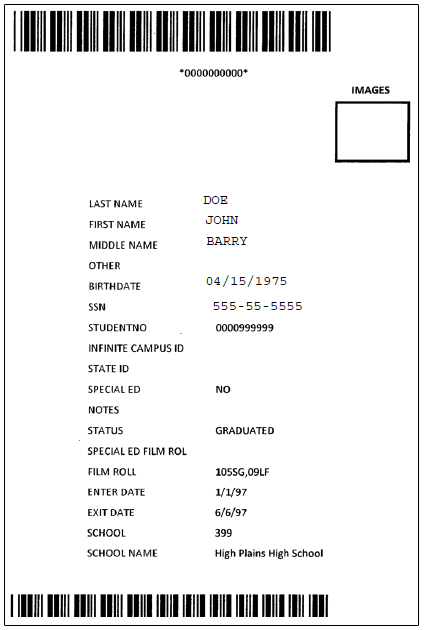
  • Once the records are organized, our records technician prints a barcode cover sheet for each set of records. These cover sheets are printed from a Microsoft Access database that is regularly updated with data from our Infinite Campus student records system.
  • There are two different barcodes on the sheet. The top one is from our old student records system SASI, and the bottom one from Infinite Campus, which we’ve been using since 2009. These barcodes are our way of identifying in which database the student data is stored.
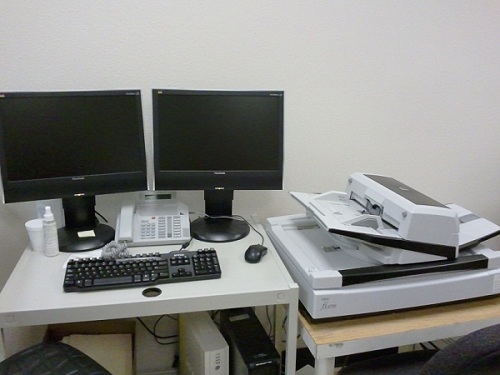
  • Once the cover sheets are printed, each one is appended to the corresponding documents. We create a batch of about 500 sheets which we run through a multi-purpose scanner (Kofax VRS) and scan directly into Laserfiche.
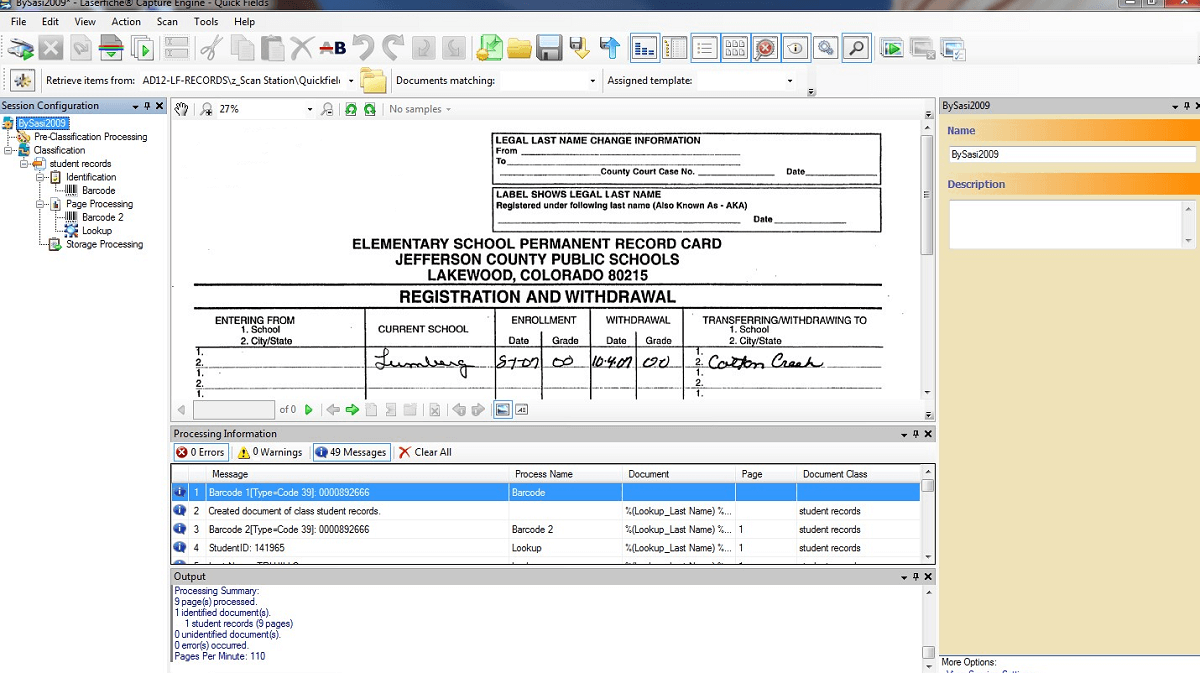
  • Once all the student record documents have been scanned, they are processed with Laserfiche Quick Fields. We use the Barcode process to read the student number from the barcode. This student number is then used in the Lookup process to gather the information from our student records system and populate the rest of the metadata. This prevents mistakes by reducing manual data entry.
Adams Student Record Documents
Click image to view larger in new window.
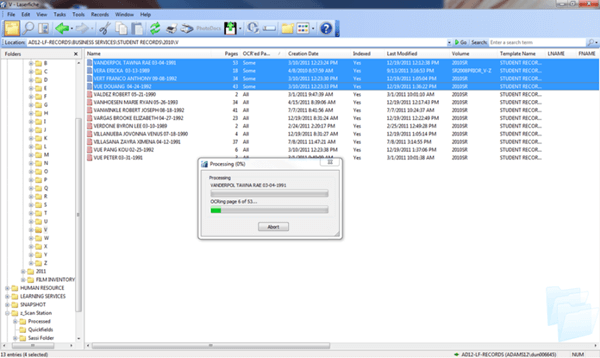
  • Finally, we run the OmniPage OCR process in the off hours to best utilize our time and resources.
Adams Omnipage Ocr Process
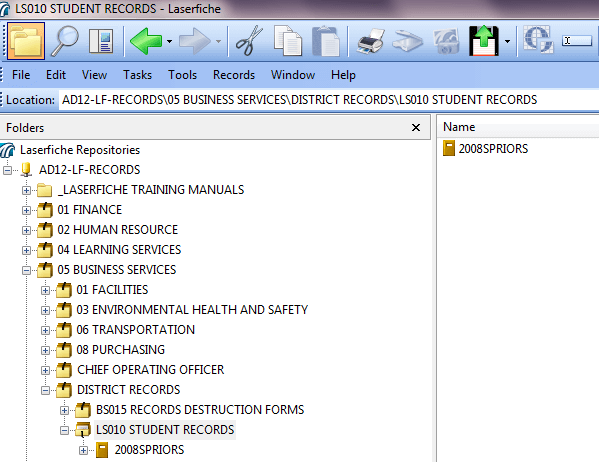
  • We use Laserfiche Records Management Edition to archive all of our student records.
Adams Laserfiche Records Management Edition
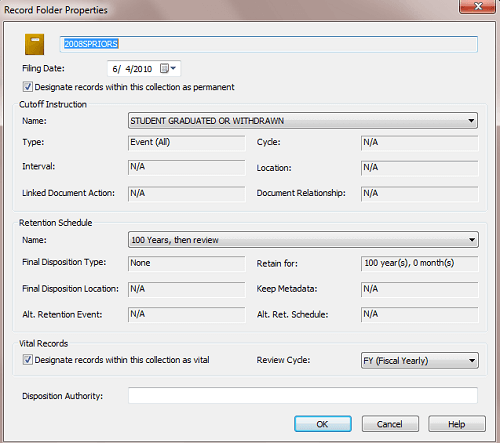
  • Though the records are stored permanently, I set up a retention schedule of “100 years, then review” because it is best to review these records and re-evaluate the retention against the schedule.
Adams Retention Schedule
  • Retrieving a transcript is now as easy as performing a search in Laserfiche on the unique Student Number.

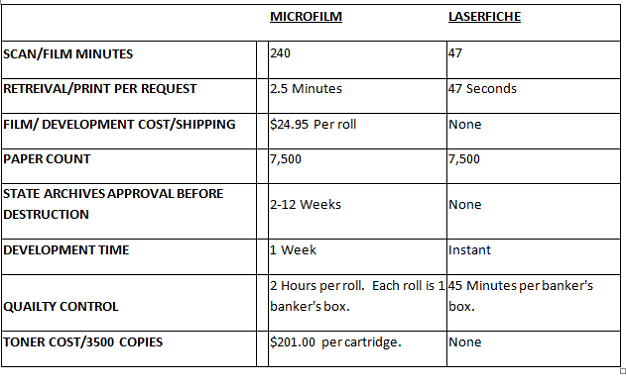
Efficiencies gained

Transitioning from microfilm to Laserfiche has resulted in the following efficiencies:

Repository Design Essentials

Information and data are central and critical assets in every organization. We search for, secure, share, remotely access and archive information daily. A disorganized repository can hinder such operations leading to wasted time, reduced productivity and employee frustration. While most repositories start out clean and organized, as time goes on, they tend to become cluttered.

Here are some signs that your repository may need to be cleaned up:

  • Users start storing documents in the wrong place.
  • Metadata is incorrect or missing.
  • Users can’t find what they need.
  • It takes a long time to train new users on repository conventions.
The following suggestions will help you unclutter your repository and keep it organized.
Folder structure

When designing your folder structure, start with a broad category at the top level and split it into subfolders of more narrow subcategories.

  • Each folder should have only one purpose.
  • Folder names should be clear and abbreviations/codes should be avoided.

  • Folder and document names should be consistent.
    • Standardize your naming with the use of tokens.
    • Automate naming with Quick Fields and Workflow.

Column display

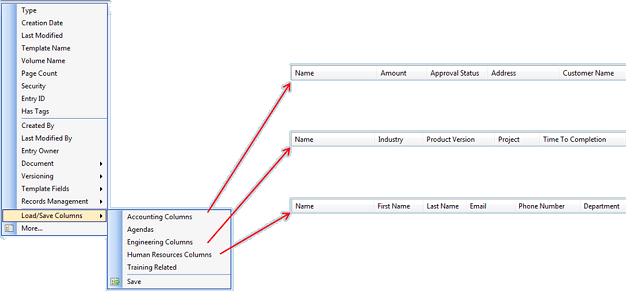
You can easily adjust the columns displayed in the folder view pane.

  • Each folder can have different corresponding columns displayed.
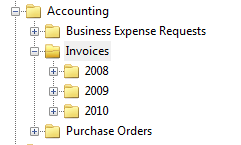
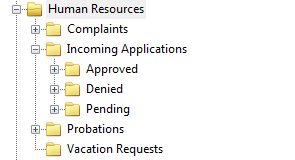
  • Columns should display information that will be useful to the user. Example: Human Resources and Accounting have different business needs. Thus, each has implemented a different column view in their respective folders:

    Human Resources

    Accounting
  • You can also save different column profiles. This enables various users to have different columns displayed for the same folder. Example: Accounting, Engineering and Human Resources each have a different saved column profile for the same folder below.

Template design

Designing templates is as important in maintaining an organized repository as implementing an effective file structure.

  • Make sure to use the correct type for each field. Example: You do not want to use a “Number” type for a field that is labeled “Name.”
  • Apply field constraints.
    • Use regular expressions to specify a format for character and number fields such as phone numbers or social security numbers.
    • Use list and dynamic fields to ensure consistency.
    • Assign default values to fields where this would be beneficial.

    Example: Users often include a date field in their template. Most of the time, the date they wish to include is the current date. It would then make sense to use the %(Date) token as the default value for that field.

  • Reuse fields across multiple templates when possible, to keep things clean and efficient. Example: Create one “First Name” field and then apply it to multiple templates rather than creating a new “First Name” field for each template.
  • Use required fields only when necessary. Using too many of them can significantly slow down scanner operators or compel them to enter bogus data.

Prioritize security

Security should be a prime consideration when designing a repository. Setting up security initially, rather then waiting to do it later, allows for the creation of folders according to user and group roles. Trying to do this later may require changes that invalidate your folder structure and conventions. It also increases the likelihood of inadvertently introducing loopholes.

  • Do not allow users to create documents at the root folder level.
  • Compartmentalize the repository on a “need-to-see” basis. Only give users the minimum right they need to do their jobs. Example: Accounts Payable employees do not need to see the “Accounts Receivable” folders in order to perform their business functions and vice versa.
  • Assign each user a personal folder within which they have full rights to create and delete documents.
  • Make certain types of metadata read-only so that they cannot be modified by unauthorized users.

Automate, automate, automate

In order to consistently keep your repository organized, utilize some of the automation tools provided by Laserfiche.

  • Use Laserfiche Quick Fields to extract relevant information from incoming documents and to standardize the naming and folder structure.
  • Use Laserfiche Workflow to organize existing repositories and keep them organized.

Record Series Setup Utility

Creating and configuring records management objects in the Laserfiche Records Management Edition (RME) can be time consuming. If you are dealing with a few records series at a time, this process won’t take long, but if you have to create a large number of records management objects in one sitting, it will be much faster to do so in a batch. This handy Records Series Setup utility enables you to fill out an Excel spreadsheet with most of your records management requirements and import it into your Laserfiche repository quickly and efficiently.

Where would you use this utility?

This utility is very helpful in the following instances:

  • If you are a brand new user just converting your whole system to Laserfiche RME.
  • If you are an existing user who needs to make many updates to the Laserfiche RME in a short period of time.

What does this utility do?

This utility imports data from a pre-populated Excel file and uses it to create records management items in your Laserfiche repository. Each sheet corresponds to a different records management object and the name of each column in the spreadsheet determines what type of data it contains.

The following records management items can be created with this utility:

  • Location
  • Cycle
  • Cutoff Instruction
  • Retention Schedule
  • Record Series

What does this process look like?

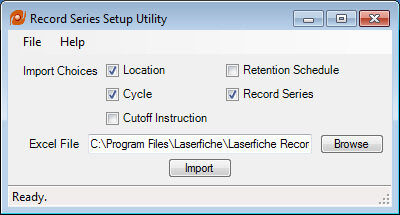
  1. A user selects what records management items to import, as well as the source of the Excel file.
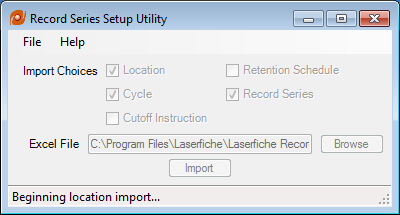
  2. After clicking Import the file gets imported.
    Record Series Setup Utility
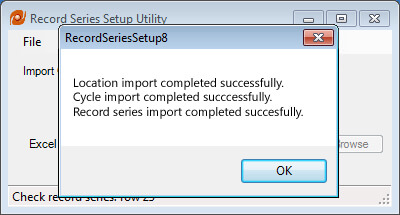
  3. Once the import is finished, a message notifies the user of the success or failure of the import process.

This utility logs each import and records successful and unsuccessful actions in a log file that you can access by choosing View Log under File in the utility’s menu bar.

What are the requirements for using this utility?

  • Access to a Laserfiche 8.2 Server or higher, with a Records Management Edition flag in the server license.
  • Microsoft Excel 2003 or higher to be installed on the same machine.
  • Access to an existing Laserfiche 8.2 or higher repository.

This utility must be run by a user with the following credentials:

  • Records Manager privilege
  • Create Folders and Write Metadata Entry Access Rights on and under any existing folder in which the record series are to be created.

What should I keep in mind before using this utility?

You will first need to create an Excel spreadsheet (both “.xls” and “.xlsx” files are compatible) that has been pre-populated using the specifications described in the documentation (log in required).

Some key points about the Excel spreadsheet

  • Every sheet must be named appropriately but your Excel file does not need to contain all possible sheets.
    • Sheets will be processed in the following order:
      1. Location
      2. Cycle
      3. Cutoff Instruction
      4. Retention Schedule
      5. Record Series
    • You can use objects that you defined in one sheet to create objects in the next sheet.
  • Format and name the columns exactly as defined in the documentation. Do not place columns from two different sections in the same sheet.
  • Always enter the column names in the first line of your Excel sheet and the values for each record management object in the lines below the column name.
  • Do not include any completely blank rows as this utility will stop processing the sheet when it encounters a blank row. The documentation describes which columns must be filled out and which are optional.

How do I install this utility?

  • The documentation can be downloaded here.
  • The zip file with the utility can be downloaded here.
  • Run setup.exe to install the utility.

A version of the utility for Laserfiche 8.0/8.1 can be found here.

*A Support Site account is required to download both the documentation and the zip file.*

After installing the utility, a fully-functional sample spreadsheet can be found in the installation directory. Use this spreadsheet to test the utility and confirm you are using the correct syntax and format.

Sample Spreadsheet Laserfiche

Laserfiche Account Conversion Utility

There are various ways that users can be authenticated into the Laserfiche system. Administrators can either configure separate Laserfiche accounts or they can take advantage of existing Windows accounts (domain accounts) already in place in the organization. The Laserfiche Account Conversion Utility, which can be run in a batch, is designed to help administrators transition from using Laserfiche accounts to domain accounts, which, in most cases, is highly recommended.

What makes domain accounts better than Laserfiche accounts?

  • Users can log into the repository automatically without needing to remember a separate username and password.
  • If a Windows account for a new user has been created on the domain, this account will consequently be added to Laserfiche under the very same Windows group without the administrator having to do anything manually.
  • If a user leaves the organization, the administrator can simply disable or remove their domain account. The user will then be automatically removed from Laserfiche.

Note, domain accounts can be added to Laserfiche groups just like Laserfiche accounts.

Why would I need the Laserfiche Account Conversion Utility?

There is no easy, immediate way to configure domain accounts without losing existing security settings and group mappings. Though domain accounts are preferred to Laserfiche accounts, many repositories that were migrated to Laserfiche 8 continue to use or maintain Laserfiche accounts because of the amount of time it would take to manually convert them. This utility offers administrators a quick and easy way to automate the process.

In addition, since domain accounts are especially recommended when using Laserfiche Avante and Laserfiche Rio because they enable users to get maximum use of those named licenses, this utility can help you transition from Team or United to these systems.

How does this utility work?

The Account Conversion Utility copies virtually all of the Laserfiche settings and security currently assigned to a Laserfiche account to a matching domain account.

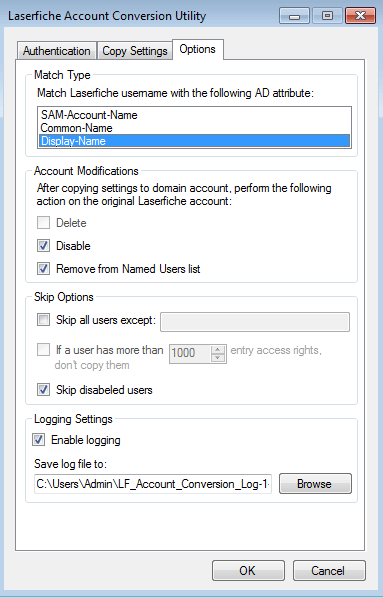
Matches are made based on the name of a Laserfiche user and one of the following Microsoft Active Directory attributes:

Example: A Laserfiche user named JDoe could be matched with a domain account using the same Display-Name.

Note, if your Laserfiche usernames do not match any of those Microsoft Active Directory attributes, you must rename the Laserfiche accounts before running the utility. Though this may seem like a lot of extra work, renaming accounts and then running the utility will still be much easier than trying to create and configure each domain account one-by-one.

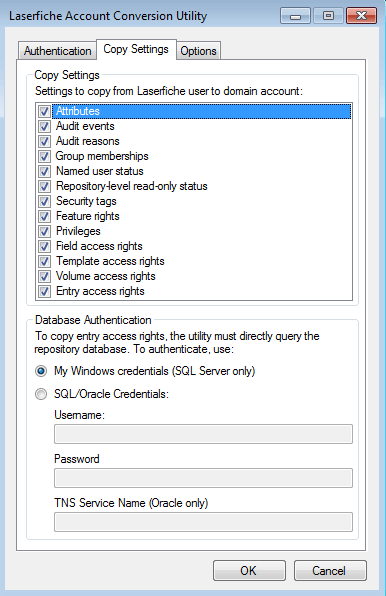
The Laserfiche Account Conversion Utility lets you copy any of the following settings:

What should I keep in mind when using this utility?

  • The utility can only be used to copy settings from Laserfiche accounts to domain accounts. It cannot be used to copy settings from Laserfiche groups to domain accounts.
  • The utility should be run from an all-access administrator account.
  • It is highly recommended that you either run the utility on a copy of the repository’s production database, or perform a complete database backup before running the utility.
  • After the utility has finished running, log in to the repository and test out the changes.

Where can I download this utility?

This utility, as well as an accompanying documentation (README.pdf), can be found here.

*A Support Site login is required to download the zip file.*

Read the accompanying documentation first, before attempting to run the utility.

To install the Laserfiche Account Conversion Utility:

  • Open the .zip file’s Install folder
  • Run Account Conversion Utility.msi
  • Follow the prompts

The source code can be found in the Account Conversion Utility.sln file inside the Source folder.
This project was created in VB.NET using Visual Studio 2008.

Automate Hiring: Basic Configuration

Hiring new employees involves many individuals in different departments. From creating the application form for the position to generating the offer letter, Laserfiche can automate many steps of this process and make it almost completely paperless. Here is how Laserfiche Forms and Laserfiche Workflow help with employee hiring.

Laserfiche Forms

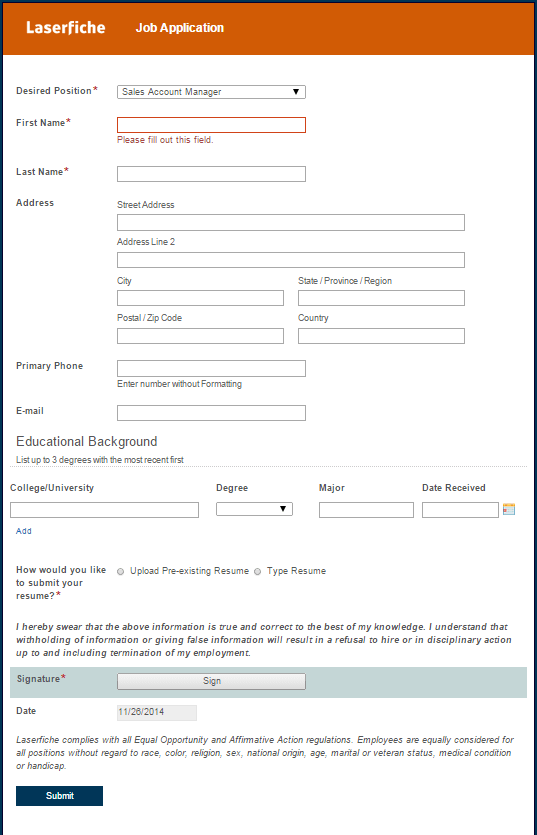
A candidate finds a job that she is interested in and clicks on the link to apply online. Within the candidate’s browser, Laserfiche Forms opens the job application. The name of the position automatically populates based on the job listing that the prospective employee selects.

The applicant fills out the application and can either type in or upload a resume.

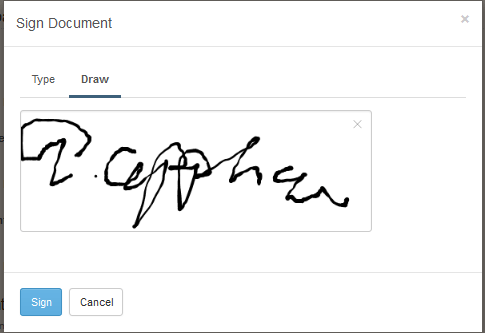
Before submitting, she signs the form electronically using her mouse. She can also type in a signature, if that is more convenient.

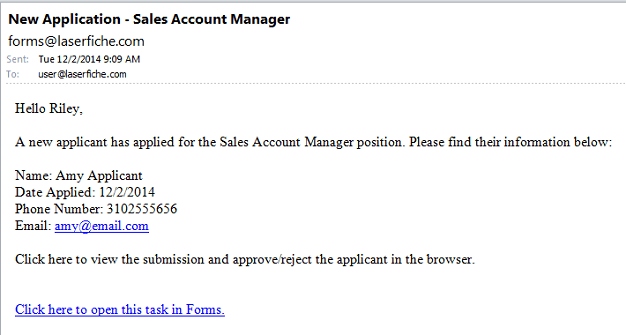
The submitted form and supplemental documents are saved in Laserfiche and an email is sent to a recruiter notifying her of the new application.

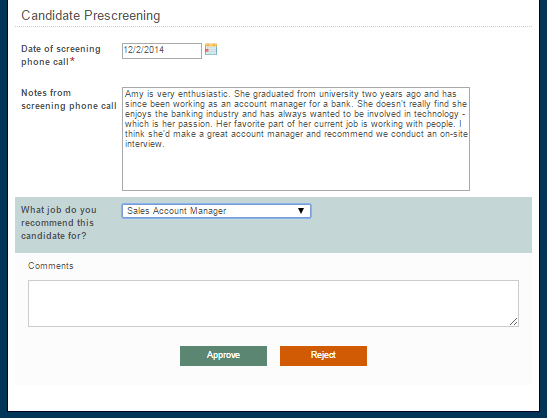
The recruiter reviews the application and either invalidates or approves it. Approved applicants are moved to the phone screening phase. The recruiter conducts the phone screening and types notes into another Laserfiche form. The recruiter approves or rejects the candidate. If the candidate is approved, the recruiter must also select the job for which the candidate should be interviewed—it can be different from the original position for which the person applied.

Laserfiche Workflow

Once approved, Laserfiche Workflow emails the job application, supplemental documents and phone screening notes to the appropriate department manager.

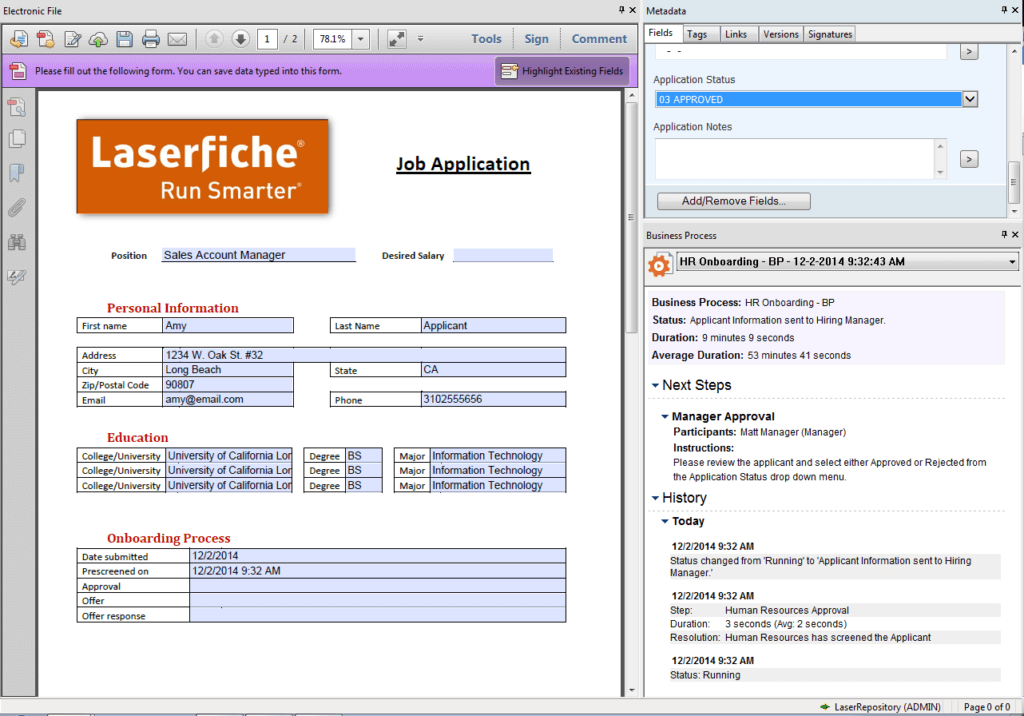
The department manager either proceeds with the on-site interview or rejects the candidate by changing the value of the Application Status template field. All of the manager’s and recruiter’s actions are tracked in the job application’s business process history pane.

Click image to view larger in new window.

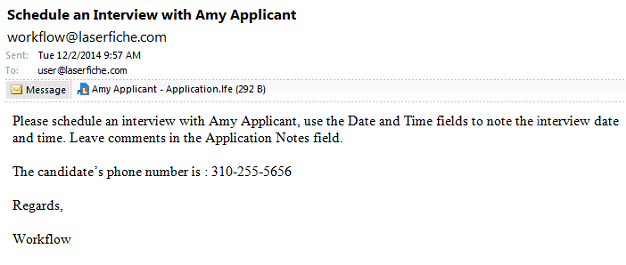
If the manager decides to interview the candidate, the recruiter gets an email notification to schedule the interview.

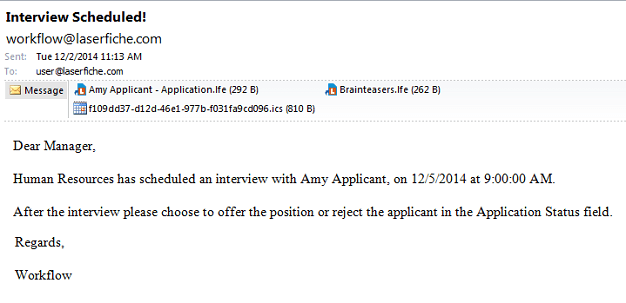
Once the interview is scheduled, the recruiter updates the job application’s metadata with the interview date, time and location. Laserfiche Workflow emails this information to the manager along with a calendar meeting request so that the interview time can be booked directly on the manager’s calendar.

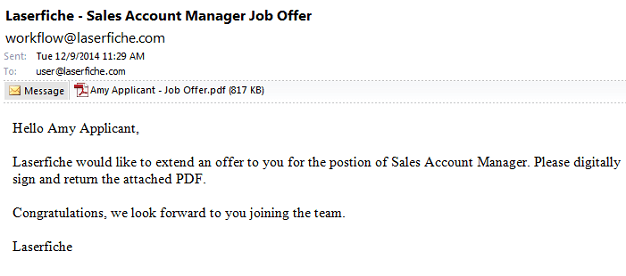
If the candidate is offered a job after the interview, the recruiter inputs information such as the candidate’s salary and proposed start date into the metadata and Laserfiche Workflow automatically generates a PDF offer letter. This letter is automatically emailed to the candidate to electronically sign.

Rejected applicants’ folders are moved to the Rejected Applicants records series in Laserfiche where they remain until they can be destroyed according to the state’s retention policy.

Benefits of Laserfiche

Automating the hiring process with Laserfiche results in the following benefits:

  • Job applications are always legible and complete, since required fields prevent important information from being omitted.
  • Managers can review and act on applications from any location by simply viewing the application from their laptop, tablet or smartphone.
  • Administrators can easily see the status of each application, allowing them to quickly eliminate bottlenecks.
  • All of the candidate’s information is stored in one centralized folder in Laserfiche, making document retrieval faster.

You can learn more about paperless processes in HR by downloading the free guide to HR automation.