Laserfiche Solution Contributed By: Mike Mesa, Application Support Specialist and Cheryl Aragon, Deputy City Clerk, City of Greeley, CO
The City of Greeley, CO, processes an average of 150 liquor license renewals per year. Previously, the City Clerk had to manually collect and collate feedback from multiple departments before mailing the application to the state of Colorado.
Here is how Laserfiche Workflow made the liquor license renewal process more efficient.
License renewal applications
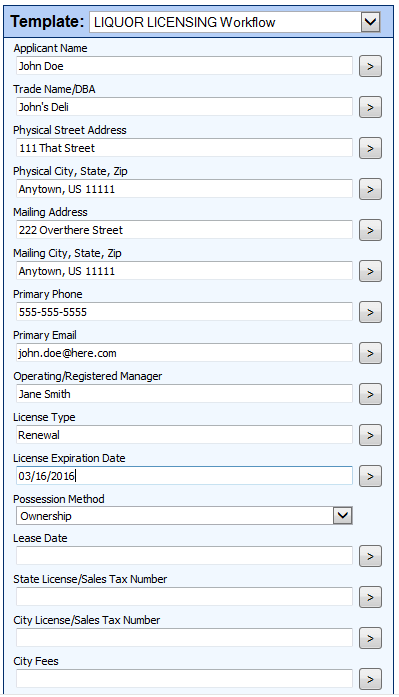
As required by the State of Colorado, business owners fill out liquor license renewal applications on paper and deliver or mail them to the City Clerk’s office.
The Deputy City Clerk reviews the applications before scanning them into Laserfiche with Laserfiche Scanning. During this process, she also populates some of the metadata. The rest of the metadata will be populated at a later stage in the process.
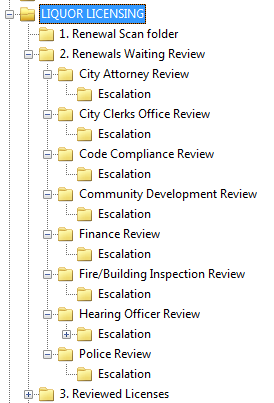
Applications are scanned into the “Renewal Scan” folder. Here is what the folder structure looks like:
Laserfiche Workflow
As soon as an application is scanned into Laserfiche, Laserfiche Workflow:
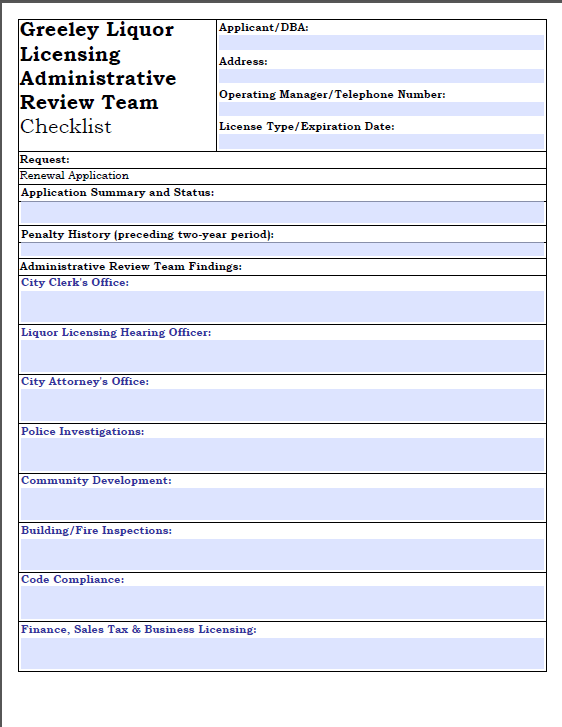
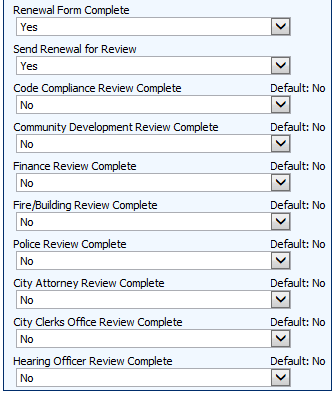
Creates a new “Review” document in the form of a fillable PDF and populates it with information stored in the original application’s metadata. Reviewers can leave comments in this form.
Sends an email to the designated reviewer in the following five departments:
Fire and Building Inspection Department
Code Compliance Department
Community Development
Finance Office
Police Department
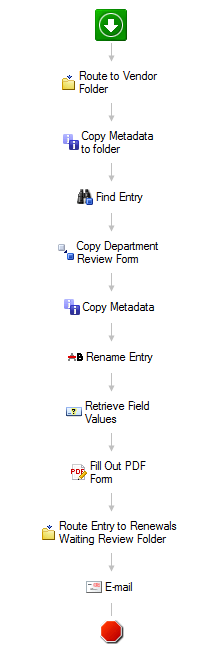
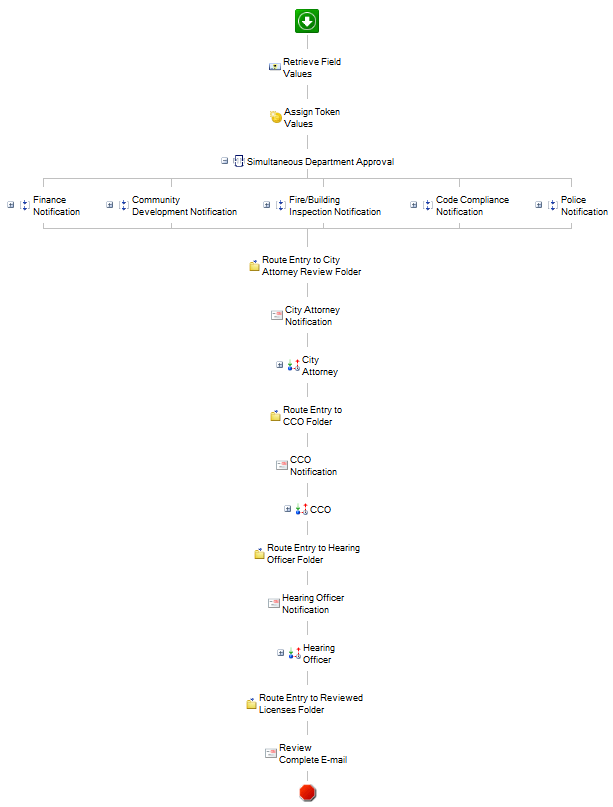
Here is what this workflow looks like:
Each department makes its comments in the “Review” document. Since the departments are all working from shortcuts, all changes are made in the same master document.
After they review the document, the departmental reviewers change the value of the corresponding metadata field to “Yes.”
After all five departments have reviewed the document, the Attorney’s Office is automatically notified.
The reviewer at the Attorney’s Office checks for legal compliance and makes his own comments in the “Review” document.
If at any point in the process a reviewer takes no action within two days, the reviewer receives a follow-up email. If no action is taken within five business days, an email is sent to both the primary department contact and his backup.
Once the Attorney’s Office has performed its review, the Deputy City Clerk is notified by email. She reviews the reviewers’ comments to make sure that they are clear and complete. Laserfiche Workflow then routes the application to the hearing officer, who has the final say on whether or not to issue the liquor license.
A hearing officer acts much like a judge, but only deals with cases involving administrative agencies. The hearing officer reviews and electronically signs the application. It is then routed back to the Deputy City Clerk, who also signs it electronically, prints it out and mails it to the state, which issues the license.
Here is the workflow that routes shortcuts of the application to the various departments for review:
Benefits of Laserfiche
Automating the liquor license renewal process with Laserfiche resulted in the following benefits:
Reviewing license renewal applications is much faster because email notifications remind users to finish tasks in a timely manner.
This workflow is so easy to configure that the city plans to apply this process to new license applications and transfer of ownership documents.
Any new documents related to a specific license application are automatically stored in the appropriate Laserfiche folder, making all license documents easy to find.
Learn how to map out your business process before automating it with this free guide.
Breckenridge Grand Vacations manages three timeshare resorts in Breckenridge, CO and is currently building a fourth one. With 400 employees and a 50% turnover rate, the hiring process used to involve a great deal of paper. Here is how Laserfiche Forms made onboarding new hires a quick and painless process.
Legacy process
After a prospective employee accepted a job offer at Breckenridge Grand Vacations, the hiring manager had to:
Fill out a lengthy new hire form in Microsoft Excel with all of the new hire’s personal data and salary information.
Submit a new helpdesk ticket to set the new employee up with all appropriate hardware and software, such as computer login and phone number.
Register the employee for new employee orientation.
Hiring managers generally performed these steps at different times, so the people who needed the information frequently didn’t receive it in a timely matter. The new hire form in particular had to be printed and driven around the organization’s eight different locations through interoffice mail to be signed. It was then delivered to HR, where an employee manually entered all of the new hire’s information into the HR system, only to find out that required information was missing or the form was not filled out correctly.
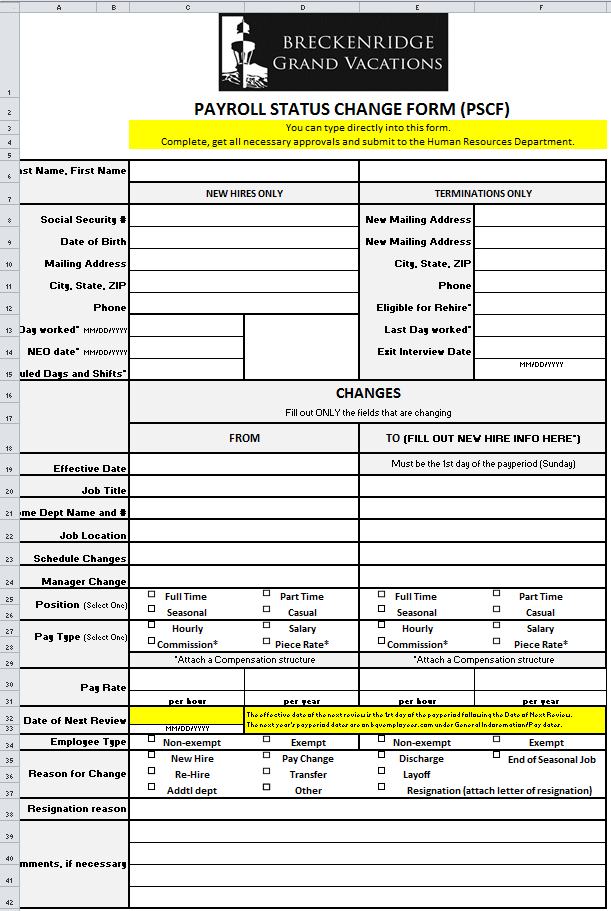
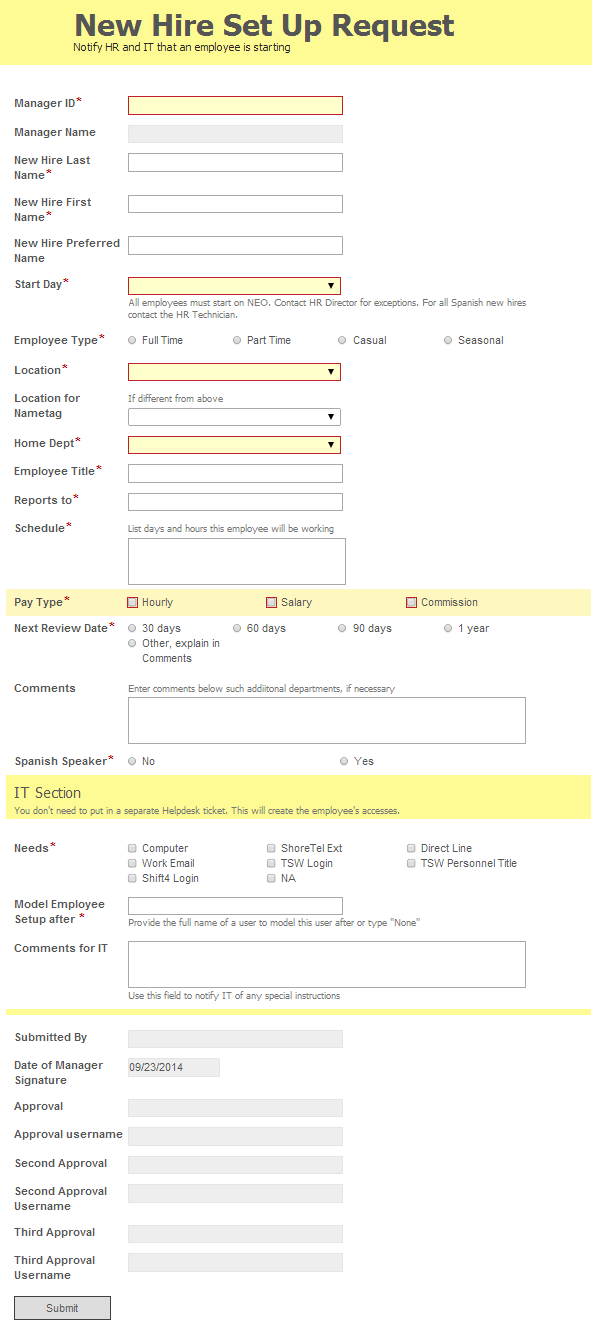
Here is what the old, cumbersome new hire form looked like:
Current process
With the new process, the hiring manager simply fills out one Laserfiche form to perform all of the tasks listed above. Here is what this form looks like:
This form is created to be as user-friendly as possible so that the hiring manager only enters a minimal amount of information. Some of the most useful features of this form include:
Drop-down fields that ensure the manager selects an answer that is appropriate to the question. For example, the Location field has a list of all of the available locations. The manager does not have to remember the proper spelling or name of a location.
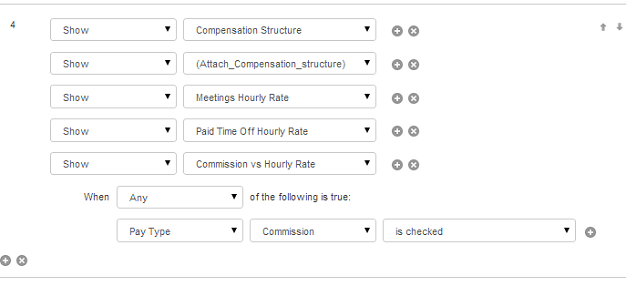
Field rules that guarantee the manager only fills out information that is pertinent to the particular new hire. For example, the compensation structure fields only appear if the manager selects the commission pay type.
Database lookups that allow some of the information, such as the name of the hiring manager’s supervisor, to be prepopulated directly from the employee database. This ensures that the form is routed to the correct people for review.
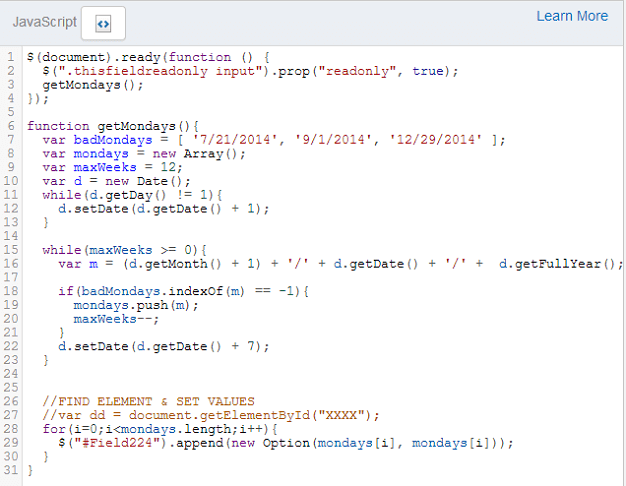
Custom JavaScript applied to the Start Day field that ensures that the new employee starts work on the day of a new hire orientation (every Monday for English speakers and every Friday for Spanish-speakers). This eliminates the problem of a new hire starting on a Tuesday, and not attending the new hire orientation until the following Monday. Here is what this JavaScript looks like:
Read-only fields that ensure that some of the prepopulated data cannot be changed. For example, the three different approvers who need to review the form are automatically populated based on the employee ID of the submitter. Those fields are set as read-only so that the submitter cannot alter the chain of review.
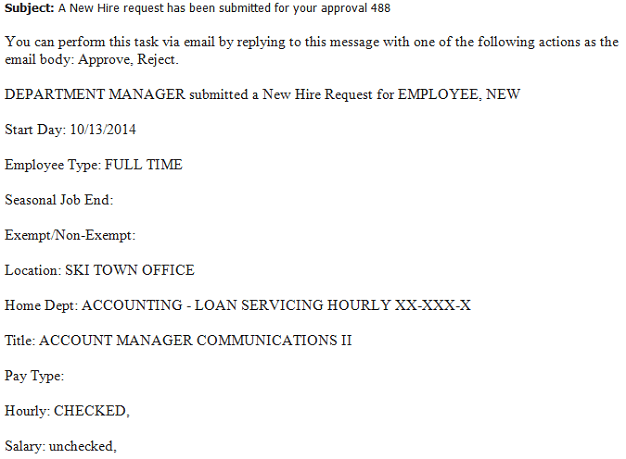
Once the form is submitted, it goes through three different levels of approval (unless the first approver is one of the company’s executives, in which case the other two approval levels are bypassed.) The reviewer is notified by email of a new hire form to review and can view and approve/reject this form directly in Laserfiche Forms. Alternatively, the reviewer can reply directly to the email with either “approve” or “reject” in the email body. Either action will move the form along in the process. Here is what a sample email looks like:
If the reviewer doesn’t approve or reject the form in three days, he/she receives a reminder email. If at any point the form is rejected, an email is sent to the hiring manager and the process is terminated.
Once the form has been approved by all reviewers, the HR assistant is notified by email. Another email is sent to the IT helpdesk. The IT email notification contains all of the information the IT employee needs to set up the user in all systems.
Here is what the entire Laserfiche Forms business process looks like:
Click image to view larger in new window.
Benefits of Laserfiche Forms
Automating the new hire process with Laserfiche Forms has resulted in the following benefits for Breckenridge Grand Vacations:
The HR and IT departments receive information that is always correct, complete and timely so that everything is ready before the new hire’s first day.
The forms can be built by an HR technician, who can also make changes without having to wait for assistance from the IT department.
Direct approval allows managers who travel between locations to approve new hire forms quickly from their email inbox without having to log into Laserfiche Forms.
Employee information is more secure—there is no longer the possibility of a form being lost on the way to another location or accidentally viewed by an unauthorized person.
Contributed by:Rick Dunphy, Information Technology Manager and Natalia Chebel, Records Officer, City of Mount Pearl
The City of Mount Pearl hires as many as 25 temporary employees during its peak season each year. The recruiting process used to be tedious and paper heavy, but Laserfiche Workflow has changed the way the city works.
Applications
Once a request to hire is submitted to Human Resources by the hiring manager, HR advertises the job either internally within the organization or externally, depending on the position. Normally there is an application deadline of one week for internal job postings and two weeks for external job postings.
The majority of applications are submitted by email while the rest are delivered either in person or by mail.
Previously, applications were kept in paper recruitment files that could contain as many as 500 pages. Now, they are either imported into Laserfiche through the Laserfiche Microsoft Outlook integration or scanned with Laserfiche Scanning.
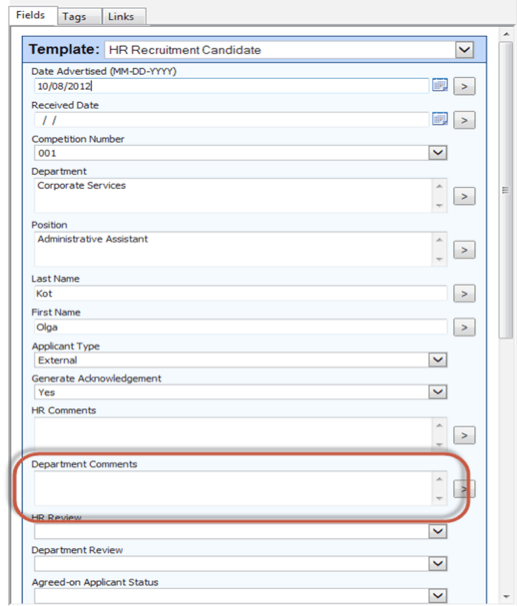
During the importing or scanning process, the HR administrative assistant fills out the Recruitment Candidate and Recruitment Position templates.
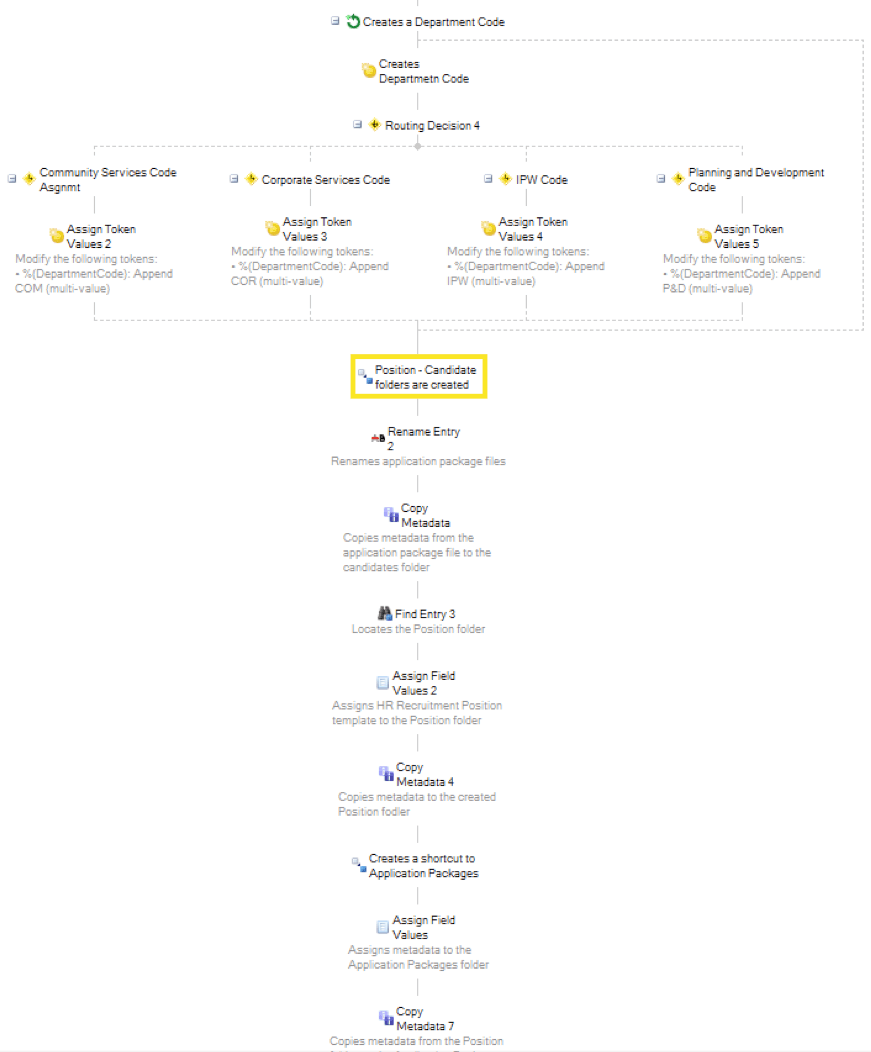
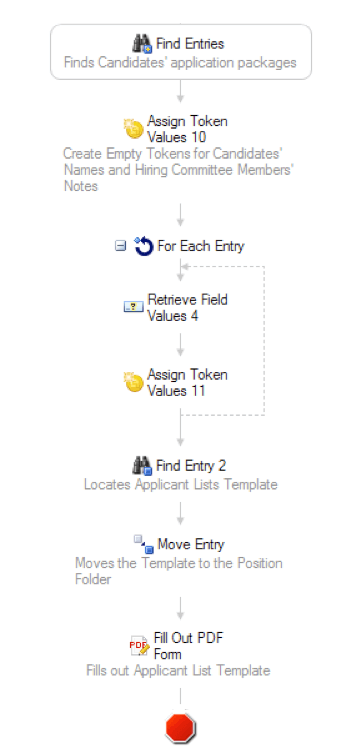
Once an application is saved in Laserfiche and the template is populated, Laserfiche Workflow moves it to a brand new candidate folder that it just created and synchronizes the metadata between the document and folder. Here is what this part of the workflow looks like:
Click image to view larger in new window.
To help the hiring committee access the applications more conveniently, Laserfiche Workflow also creates a separate folder that contains only shortcuts to the application packages.
Laserfiche Workflow also sends an email confirmation to the candidate.
Review
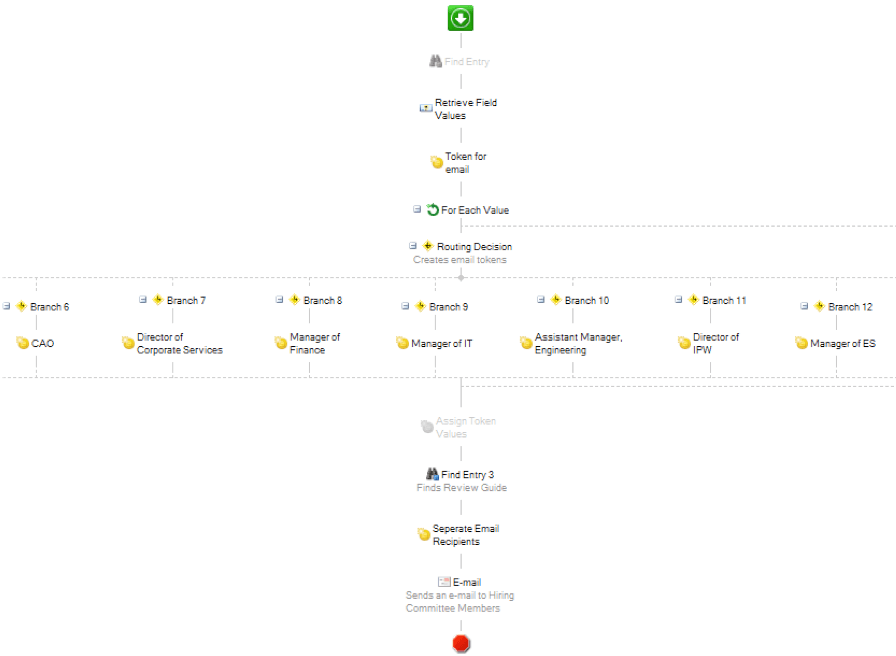
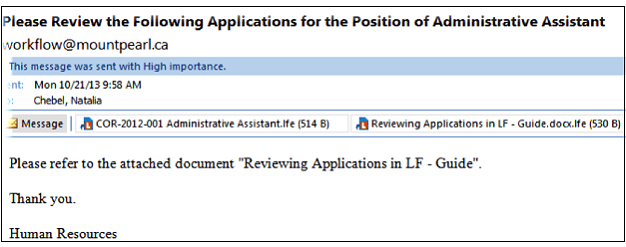
As soon as the system starts processing applications, the HR administrative assistant runs a business process that sends a notification to hiring committee members letting them know that they may start the review process.
Click image to view larger in new window.
The notification email contains a shortcut to the Application Packages folder and a brief guide on how to leave comments on the applications with metadata and annotations.
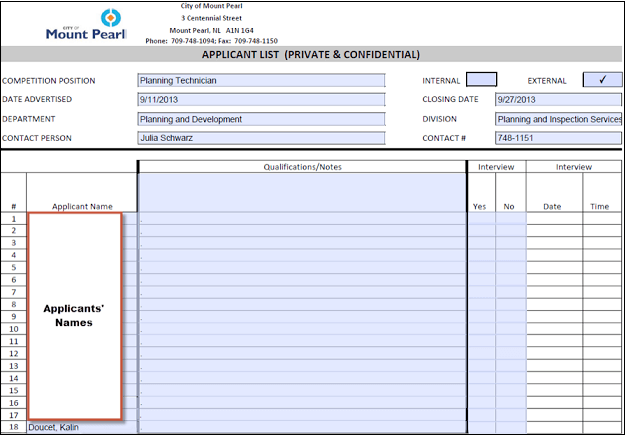
The day after the job posting closes, Laserfiche Workflow generates a list of applicants with their contact information, qualification notes and status (internal or external). This report is a PDF form that is filled out by Laserfiche Workflow based on the information contained in metadata fields.
Here is what this section of the workflow looks like:
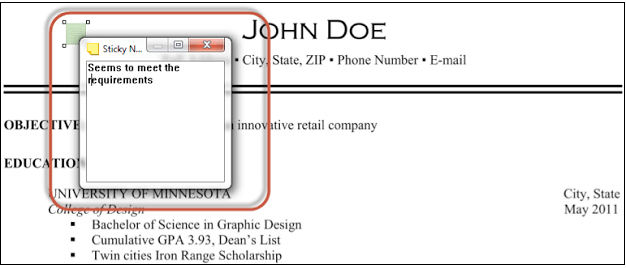
At each step of the screening, members of the hiring committee make notes, either private or visible to other members. Private notes, useful for reminding the individual committee member about what he liked or disliked about a candidate, are made using sticky notes while public notes are made in the template fields directly.
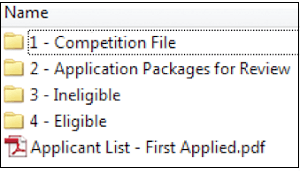
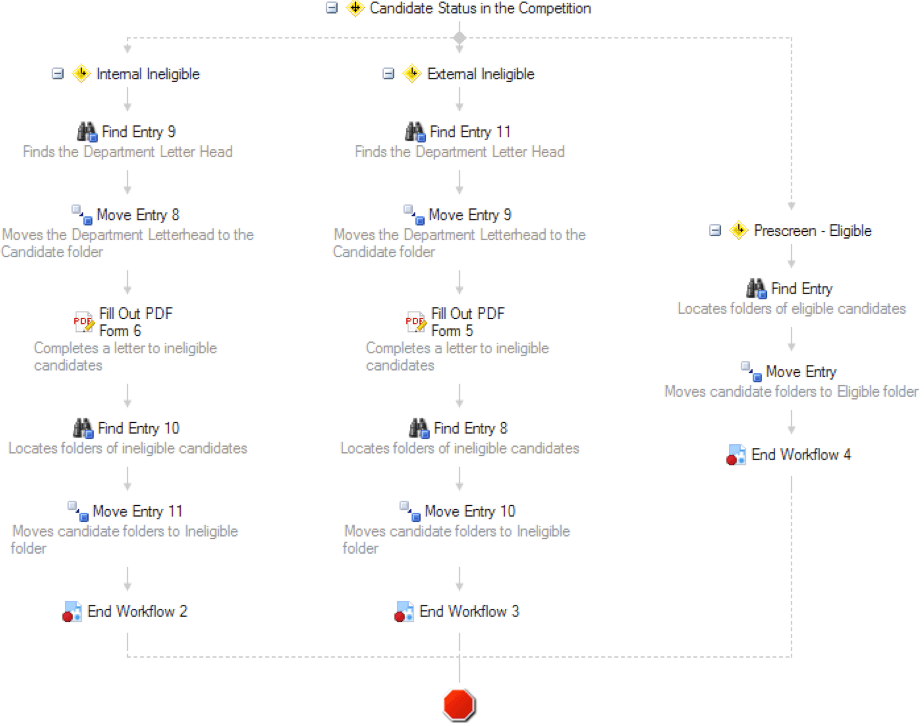
Once all of the members of the hiring committee make a decision about a particular candidate, they change the Agreed-on Applicant Status field to either eligible or ineligible. Candidate folders marked as eligible are moved to the Eligible folder while candidate folders marked as ineligible are moved into the Ineligible folder.
Here is the section of the workflow that moves the files:
Throughout the process, Laserfiche Workflow generates acknowledgement letters to applicants at different stages of the recruitment process. For example, it creates and sends letters letting applicants know that they were identified as ineligible after a certain screening stage.
If several positions with the same title (i.e. lifeguard, summer student or laborer) are filled, Laserfiche Workflow also generates standard offer letters.
Benefits of Laserfiche
Automating the recruitment process with Laserfiche has saved the City of Mount Pearl an estimated $30,000 CAD annually after the first year of implementation. In addition, the city was able to:
Optimize the screening process by allowing hiring committee members to work with electronic application packages, collaborate more efficiently by sharing notes on applicants, view applicants’ status in the competition and receive notifications of applications pending review.
Save time for the HR team by eliminating the need to print and assemble application files (which, in some cases, consisted of over 1,000 pages!).
Avoid the grief associated with maintaining physical records—filing, re-filing, running out of space, retrieving, preparing records for disposition, etc.
Standardize and speed up notifications and report generation.
Contributed by: Sarah Knibbs, Clinic Manager, Kids Clinic
Kids Clinic offers comprehensive consultations, evaluations and treatment for children with developmental, behavioral and psychiatric problems from birth through adulthood. From referral to the final consultation letter, the typical patient care process spans months and involves a number of consultations and tests. Here is how Kids Clinic was able to automate the whole process with Laserfiche.
Patient referral
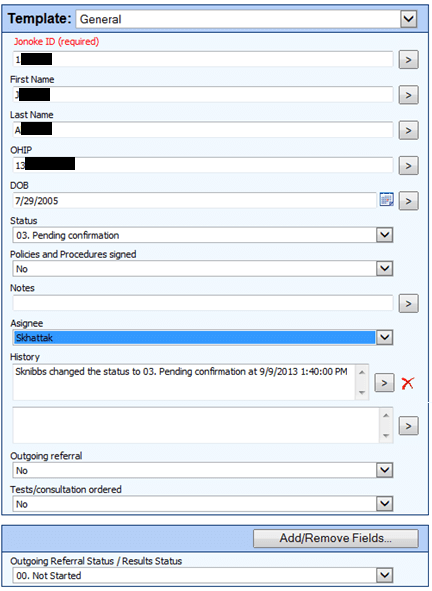
Referrals to the clinic are received by fax. The clinic uses a virtual fax so that all incoming faxes are automatically stored on the server. The receptionist uploads the referrals from the server to the “To be scheduled” folder in Laserfiche. The Scheduling Manager creates the patient’s record in the clinic’s Jonoke EMR system and schedules the patient’s first appointment. When she is finished, she updates the status of the referral to “Pending Confirmation” and populates the Jonoke ID field. Since all patients are required to confirm the appointment, once they do so, the Scheduling Manager updates the status to “Pending Initial Appointment.”
Patient information is exported from Jonoke on a regular basis and stored in a network folder. From there, it is uploaded into a SQL database at regular intervals. A Laserfiche workflow performs a lookup into this SQL database based on the Jonoke ID to populate the remaining metadata fields.
Initial visit
During the patient’s initial visit the receptionist ensures that the policies and procedures form is signed (once per patient) and marks it as signed in Laserfiche. She then assigns the patient file to a psychometrist by changing the value of the Asignee field.
Laserfiche Workflow creates a shortcut to the patient’s file in the doctor’s personal folder in Laserfiche. Here is what this workflow looks like:
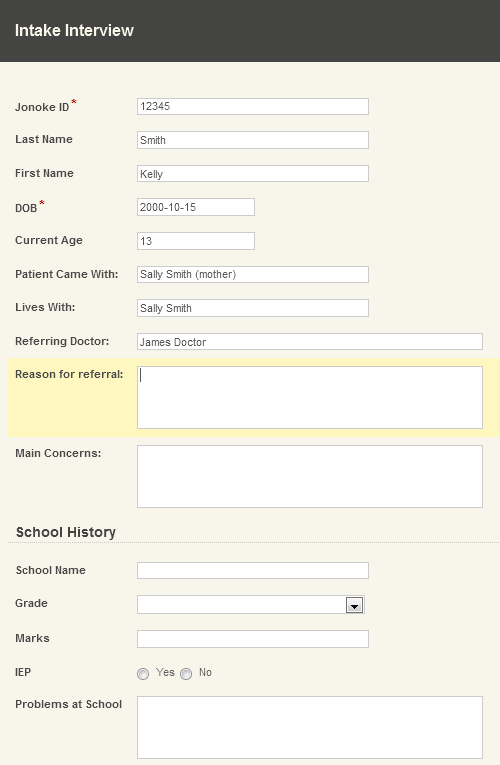
The psychometrist fills out the intake questionnaire in Laserfiche Forms. When the Jonoke ID is provided, a number of fields are pre-filled.
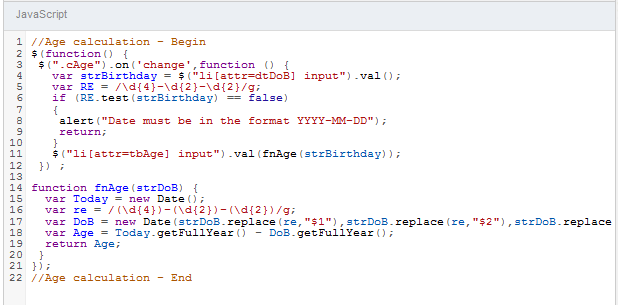
JavaScript is used to automatically calculate the age based on the birth date entered.
After seeing the psychometrist, the patient is assigned to a doctor. The doctor is able to view the patient’s records from his iPad with Laserfiche Mobile during the visit.
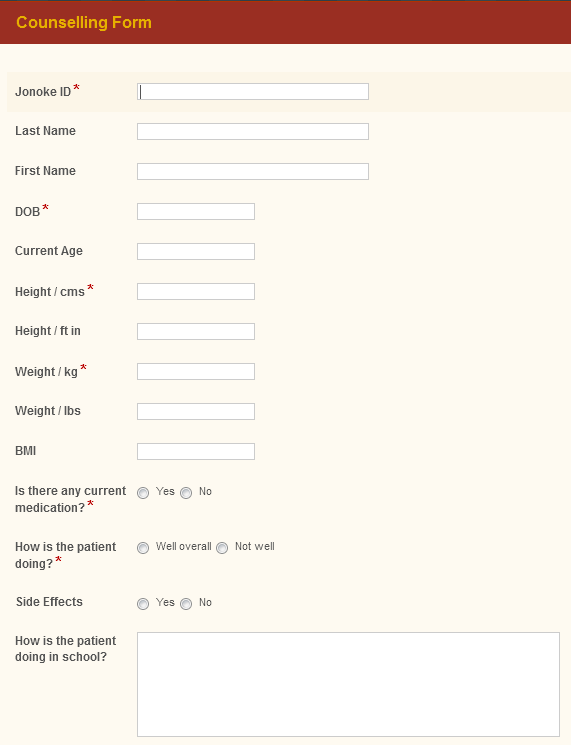
The doctor is also able to fill out a counseling form in Laserfiche Forms.
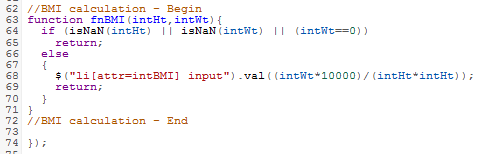
Much of the information is prepopulated from the database based on the Jonoke ID. Certain information, such as the patient’s BMI, is automatically calculated with JavaScript based on the content of the height and weight fields.
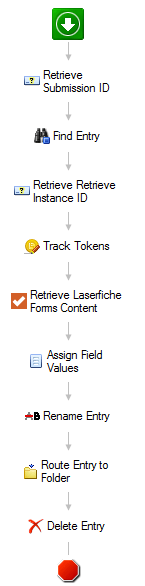
Once the form is submitted, Laserfiche Workflow picks it up and routes it to the patient’s folder in Laserfiche.
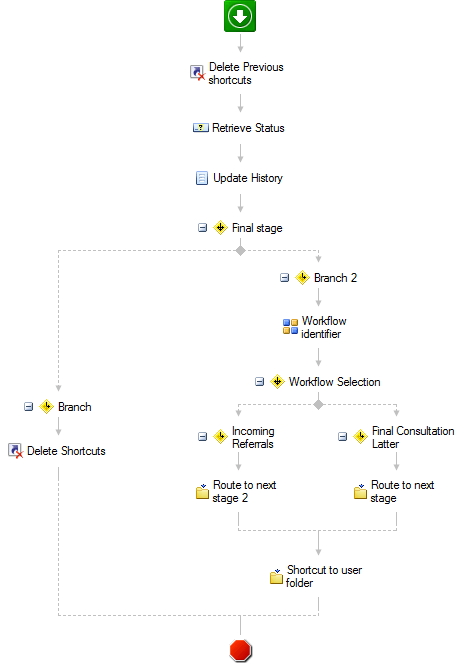
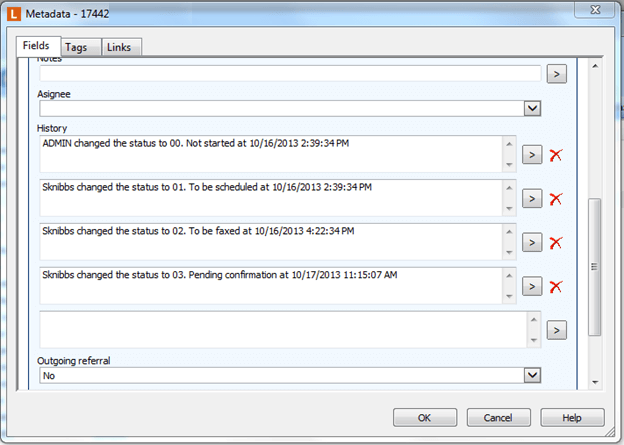
At the end of the visit, the doctor may order tests, provide additional questionnaires or provide feedback. He updates the file’s status accordingly. He also assigns the file to the next person responsible (such as another doctor, a psychometrist, etc.) using the Assignee field.
Laserfiche Workflow removes the existing shortcuts and creates new shortcuts in the assignee’s home folder and in the folder corresponding to the next step in the workflow.
Subsequent visits
The new assignee conducts the assigned tasks (performs and scores tests, sends letters for transcription, etc.) and updates the status and assignee field when they are complete. The task assignments may be exchanged between the doctor and other clinical personnel multiple times and in an ad hoc fashion.
The workflow is designed to accommodate this exchange by not constraining the sequence of stages. Additionally, there is a history field that tracks each stage that the patient file passes through, along with the name of the user who changed the status and the date/time of the change.
New paperwork
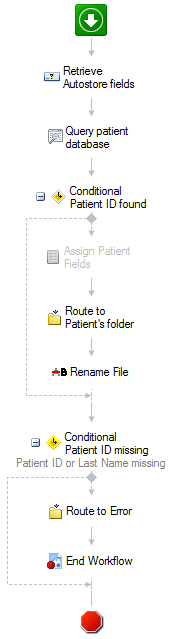
Whenever new patient paperwork is scanned into Laserfiche, the scanner operator populates the Jonoke ID field. Laserfiche Workflow does a lookup into the patient database to populate the remaining metadata.
The new document is then routed into the patient’s folder. If the Patient ID is missing, the document is routed to an Error folder and the workflow terminates. Here is what this workflow looks like:
Advantages of Laserfiche
Implementing Laserfiche has resulted in the following benefits for Kids Clinic:
Doctors, psychometrists and other clinical personnel see all patients assigned to them at a glance in their Laserfiche folders.
Administration can view all of the patients at a given stage in the workflow to identify bottlenecks and see how the clinic is performing against its benchmarks.
Wait times for services have been reduced because employees have more time to focus on the patients.
Data entry errors and effort have been reduced with the implementation of Laserfiche Forms. Many form fields are pre-populated with patient data and calculations (e.g. BMI from height and weight) are performed automatically.
Contributed by: Stan Hardter, Director of Technical Operations and Bruce Green, Technical Specialist, MultiMed
MultiMed provides medical billing services to a large number of ambulance companies within the state of New York. Here is how Laserfiche simplified and automated the entire ambulance billing process.
Capture and processing
The most important piece of documentation that MultiMed deals with is the pre-hospital care report (PCR), which outlines every medical procedure that has been performed on the patient before he arrives at the hospital. Whenever an ambulance responds to a 911 call and transports a patient to a hospital, the emergency medical technicians (EMTs) who staff the ambulance must fill out a PCR.
Each ambulance uses a different vendor for its PCRs. There are approximately nine different PCR formats ranging from printed forms that must be filled out by hand to electronic forms filled out on an onboard computer or tablet.
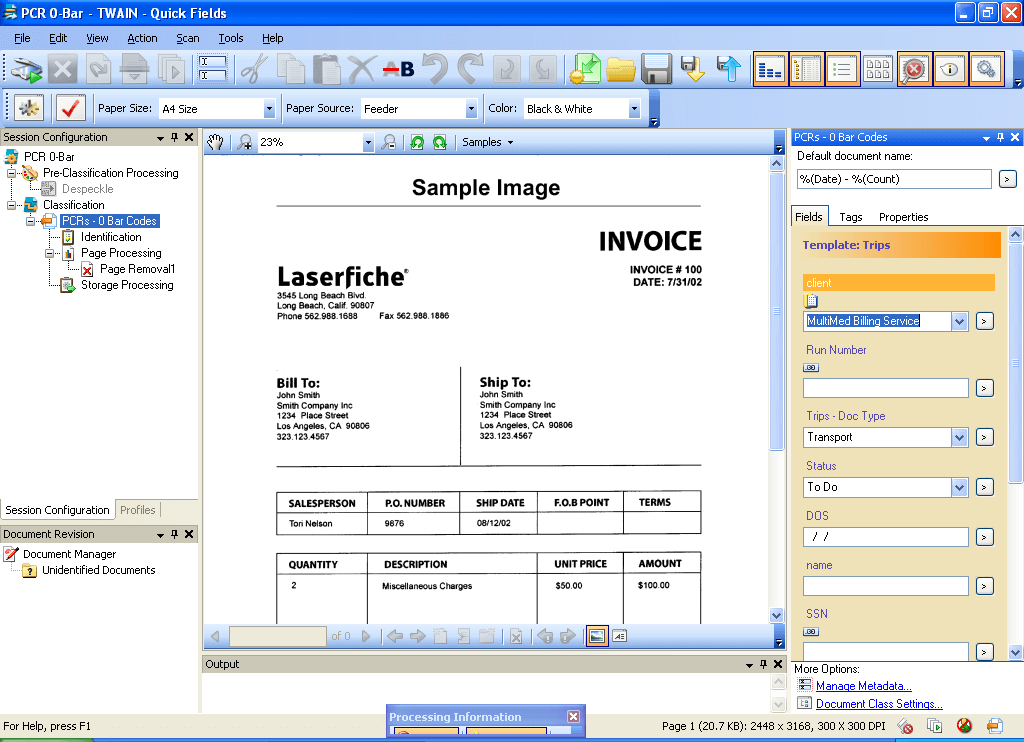
PCRs are sent to MultiMed by mail, fax, or electronically. Reports that arrive by mail are scanned into a network drive with Laserfiche Quick Fields.
Click image to view larger in new window.
Laserfiche Import Agent monitors this network drive for any new incoming files and imports them into a centralized intake folder in the Laserfiche repository.
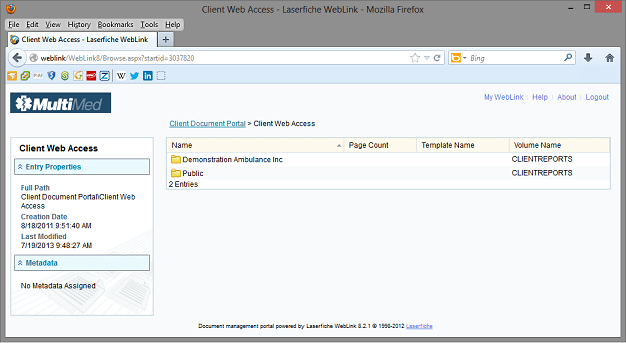
From there, Laserfiche Workflow routes the PCR to the appropriate client folder.
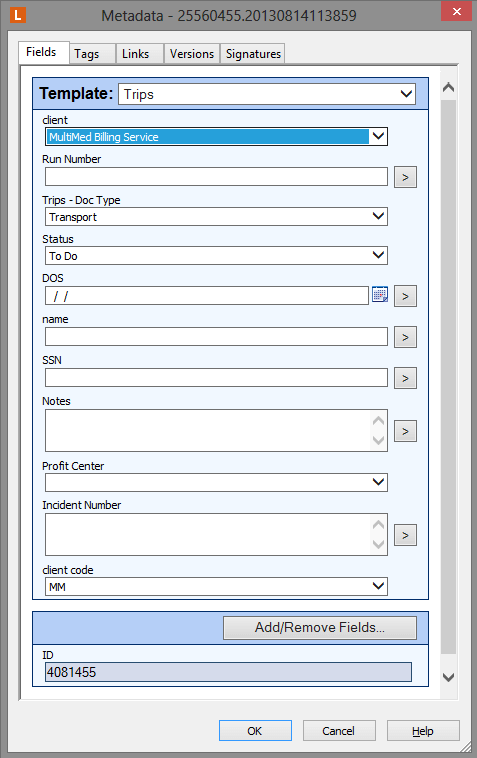
Laserfiche Workflow also automatically populates the remaining metadata such as patient name, social security number, date of service, profit center and incident number from the RescueNet patient billing system database.
MultiMed employs medical coders. Each coder is responsible for coding PCRs for a certain number of clients. The coder monitors his clients’ folders for new PCRs and uses the open PCR to code a specific file in RescueNet. Occasionally, if there is a large volume of claims from a particular client, a coder may be asked to monitor different folders.
Once the coder is finished coding the file in RescueNet, he changes the status of the document in Laserfiche to “Archive.” Laserfiche Workflow then moves the claim to an archive folder.
Laserfiche WebLink
MultiMed provides reports to clients such as the number of claims that got paid or denied. Every client has specific requirements as to the content and frequency of these reports. A product similar to Crystal Reports is used to generate these custom reports and makes them available to the clients through a custom Laserfiche WebLink portal. Clients log into the WebLink portal via a VPN connection.
Advantages of Laserfiche
Implementing Laserfiche at MultiMed has resulted in the following benefits:
Data entry errors have been reduced because the majority of metadata can be automatically populated with information from the RescueNet billing system.
Clients can view the reports that they need, whenever they need them directly through the Laserfiche WebLink portal.
Documents can be quickly retrieved with Laserfiche Search.
Contributed by: Stan Hardter, Director of Technical Operations and Bruce Green, Technical Specialist, MultiMed
MultiMed provides medical billing services to a large number of ambulance companies within the state of New York. Laserfiche is used to manage the entire medical insurance claim lifecycle. Here is how Laserfiche Workflow helps MultiMed track the electronic data interchange of claims to insurance carriers.
Electronic data interchange
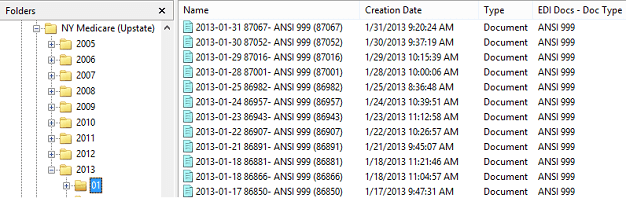
At 2:00 am every morning, claims are sent electronically to insurance carriers in batches via electronic data interchange (EDI). The batch file is essentially a text file broken into pieces with delimiters containing hundreds or even thousands of claims.
ANSI 5010 standards—a new version of the standards for HIPAA-covered electronic transactions that include claims, remittance advice, and requests and responses for eligibility—dictate that the insurance carrier is supposed to acknowledge batches they’ve received by sending specific acknowledgment files back to the sender. This acknowledgment arrives in the form of a 999 files—another delimited text file that notifies the medical billing company if the batch of claims that was just sent over was accepted or rejected.
For accepted batches, a 277 file which notifies the medical billing company what individual claims in the batch file have been accepted or rejected is also sent.
Rejections, at either the batch or claim level, are very important to detect and remediate. If there is one small problem in one claim in a batch of 100 claims, the entire batch may be rejected, even though the batch file contains 99 acceptable claims.
Processing 999 files
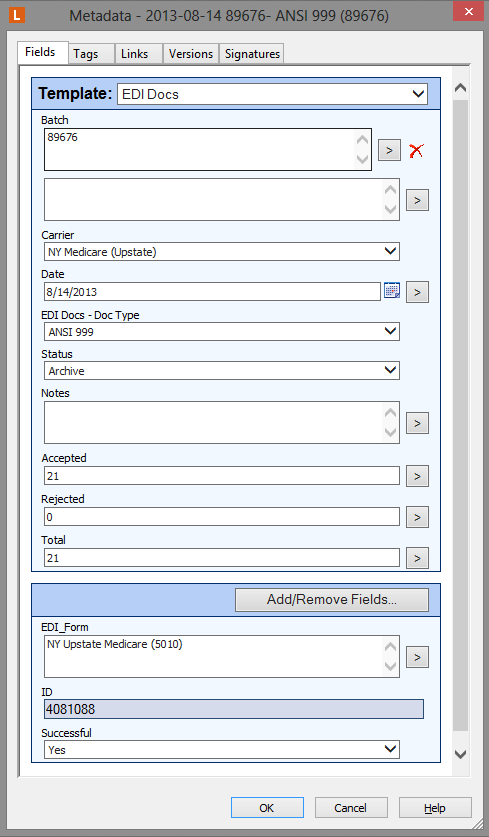
Laserfiche Workflow is used to ensure that if there is a problem with the 999 file, the rejected individual claims are identified and the correct employees are notified so that the issue is resolved quickly. Every time a 999 file is sent by the insurance carrier, it is printed into Laserfiche with Laserfiche Snapshot. The person printing the claim fills out certain document metadata including:
Batch ID Number
Insurance Carrier Name
Whether the batch was accepted or rejected.
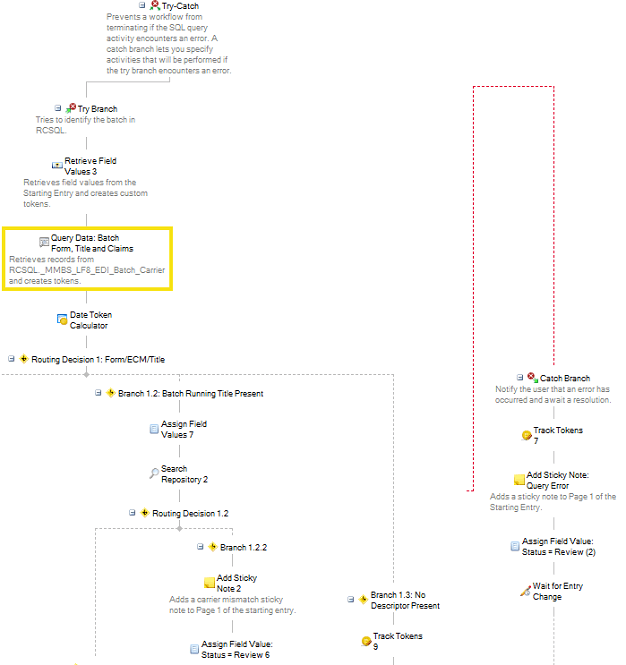
Laserfiche Workflow then checks to see if the batch was accepted or rejected.
If accepted, the file is renamed to include the date, batch ID number and file type and moved into the archive folders.
If rejected, a sticky note is added indicating the insurance carrier and batch ID number. The file is routed to a reviewer’s work folder and an email is sent to the reviewer letting him know that a rejected batch needs attention.
Another workflow checks to ensure that the batch ID number in the template matches the carrier that the batch was sent to. This is done with a lookup in the RescueNet billing software SQL database. To make sure that the workflow does not terminate if the SQL query encounters an error, the Query Data activity is placed within a Try Catch activity.
Laserfiche Workflow also verifies that the total number of claims reported in the template fields matches the number in the RescueNet billing software SQL database. This is done with the help of a Token Calculator activity, which calculates the total of accepted and rejected claims reported in the template.
Processing 277 files
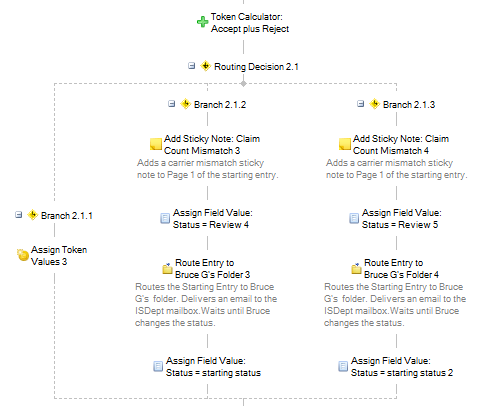
For accepted batches of claims, the insurance carrier sends a 277 file listing the individual claims that have been accepted or rejected. Laserfiche Workflow helps make sure that any rejected claim is corrected by the responsible person.
The EDI processor prints the 277 file into Laserfiche with Laserfiche Snapshot. The processor fills out the template fields corresponding to the number of accepted and the number of rejected claims. In addition, if there are rejected claims, he sets the status to “Review.”
277 files that contain rejected claims are routed to a claims specialist for review and correction.
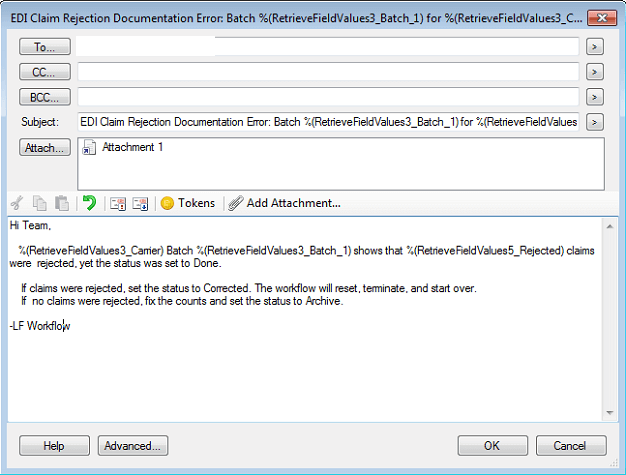
Laserfiche Workflow checks to see if the number of rejected claims is greater than zero and if the status of the file had accidentally been set to “Done.” Such a file has the status changed automatically to “Review” and a sticky note with EDI processor instructions added. Laserfiche Workflow also generates an email notification to the EDI processor notifying him of the mistake.
Once the EDI processor corrects the error, the file is routed to a claims specialist.
Benefits of Laserfiche
Streamlining the claims management process with Laserfiche has resulted in the following advantages for MultiMed:
Files can be found quickly using the Field search in Laserfiche Search. If an insurance carrier claims that they never received a batch, a quick search on the batch ID pulls up the 999 file and a claims specialist can quickly see when it was sent to the carrier and whether it was accepted or rejected.
Laserfiche Workflow allows claims specialists to correct issues with rejected batches on the same day as they are identified.
Contributed by: Greg Buchanan, Records Analyst, Lakewood, CO
The city of Lakewood, CO, comprises a multitude of departments and divisions, each with its own daily concerns, interests and ways of using Laserfiche. In order to maintain consistency within the Laserfiche repositories and provide a place to express concerns and ideas, the city implemented a digital archive group (DAG).
What is the DAG?
The DAG at the city of Lakewood serves to:
Discuss and gather feedback on any new Laserfiche projects as well as existing projects.
Obtain buy-in from upper management for new Laserfiche projects.
Agree on city-wide Laserfiche standards such as a uniform naming convention and repository file structure.
Answer any Laserfiche-related questions posed by new city personnel or existing city employees who use Laserfiche daily.
Advise any other organizations or cities that would like to implement or expand their implementation of Laserfiche.
The DAG is comprised of all the Laserfiche administrators within the city. Anyone who has administrative rights to even one folder within the repository is automatically a member of the group. Some departmental heads and managers are also members of the DAG, even if they are not Laserfiche administrators.
The DAG aims to meet once a month. If there are not enough topics to discuss that month, the meeting may be cancelled. The chair of the DAG decides whether the meeting will go on as planned, and if so, creates an agenda that is emailed to all DAG members before the meeting. Members can choose to attend, based on how pertinent they find the topics of discussion.
Why should an organization implement a DAG?
Implementing a DAG at the city of Lakewood has resulted in the following benefits:
The DAG helped expand Laserfiche to other departments within the city because listening to current Laserfiche users gave others ideas on how they too could benefit from Laserfiche.
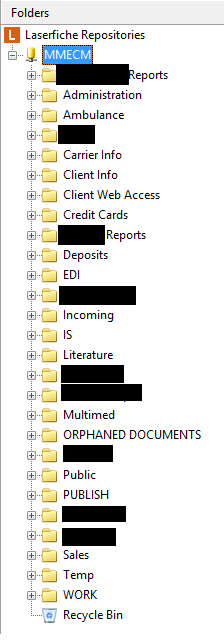
The city of Lakewood maintains organized repositories with a uniform folder structure and naming convention, which enables everyone to easily find documents.
Since a variety of people from different divisions take part in DAG meetings, it is easy to generate new ideas to put into practice. For example, the idea of using Laserfiche to manage the city planning department’s active case files in addition to archiving closed cases was first brought up at a DAG meeting.
Advice for implementing a DAG
Here are some key things to think about when implementing a DAG within any organization:
Make sure to have regular meetings, but only if there are topics to be discussed. If there is a meeting just for the sake of having a meeting, members may be discouraged from coming back.
Representation is very important. Make sure that all departments and divisions are represented at the DAG. It is crucial that the people who attend have the power and knowledge to implement changes within Laserfiche. If they cannot make changes themselves, they should be able to direct others to make them.
Make sure to let upper management know about the DAG’s existence. The city of Lakewood did a presentation to both the management team and the city council about the DAG and its purpose.
Encourage the VAR to attend DAG meetings. This helps the VAR stay on top of Laserfiche projects within the organization and allows the VAR to help the organization attain its Laserfiche initiatives and goals.
If a group cannot come to a conclusion or compromise during one meeting, postpone the discussion so that people have time to think about the opposite views.
Provide snacks and beverages during the meeting. The city provides a unique array of snacks, fruit and beverages at each DAG meeting as an additional way to drive attendance.
A field stores information about a particular Laserfiche entry (document or folder). It is possible to apply fields to specific entries by using templates, which are collections of related fields. An entry can only have one template assigned to it, but each template can contain multiple fields. This article outlines how to create a Laserfiche template that includes different field types, multi-value fields, dynamic fields, and field constraints.
To demonstrate how to create a Laserfiche template, I will use the fictional example of Laser University.
Example: Laser University
As part of Laser University’s admissions process, prospective students have to submit an application along with the following supplemental documents:
Personal statement.
Candidate recommendation.
Transcript.
All of these documents are scanned into Laserfiche with Laserfiche Scanning or printed into Laserfiche with Laserfiche Snapshot and stored in the applicant’s folder in the Laserfiche repository.
Laser University’s admission officers agreed on the following parameters to organize submitted applications and documents. The officers based this list on the information that they would need when searching for applications and related documents.
First and last name.
Date of birth.
Proposed major of study.
Phone number.
E-mail address.
GPA.
SAT score.
Type of degree.
State of residency.
Type of student (new student or transfer student).
Type of document.
Here is how Laser University converted these items into a template that is applied to every application and related document in the Laserfiche repository.
Types of fields
Different field types can contain a different type of information. Some examples of field types include:
Text fields.
Number fields.
Date fields.
List fields.
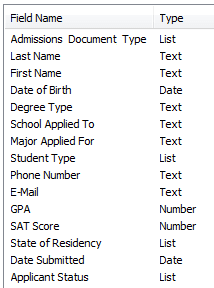
Each field type can be used for a separate purpose. Here is a list of all of the fields in the Laser University “Admissions Application” template and their field types.
Multi-value fields
Sometimes, it would make sense if one field was able to contain more than one value. For example, prospective students can have more than one phone number such as a home phone and a cell phone. To account for this, Laser University can create two different fields: one for cell phone and one for home phone. Two fields would make searching by phone number very inefficient, though, since the admissions officer would not know which of the fields to search because one of them could be null.
A better option would be to create a multi-value phone number field to store either one or both phone numbers. Most fields can be set to contain multiple values and the number of values assigned to such a field varies from entry to entry, depending on user input.
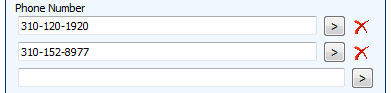
Therefore, Laser University can make one field for “Phone Number” and then set it to allow multiple values. An admissions clerk can then add as many phone numbers as necessary into the field. When searching for an applicant’s document by phone number, an admissions officer can simply perform a single search using whichever phone number he has in front of him.
Field constraints
Using a multi-value field for the phone number can make searching for prospective applicants by phone number simpler, but if phone numbers aren’t entered in a consistent format (xxx-xxx-xxxx vs (xxx)xxx-xxxx), this searching will still be difficult. This is where field constraints fit in.
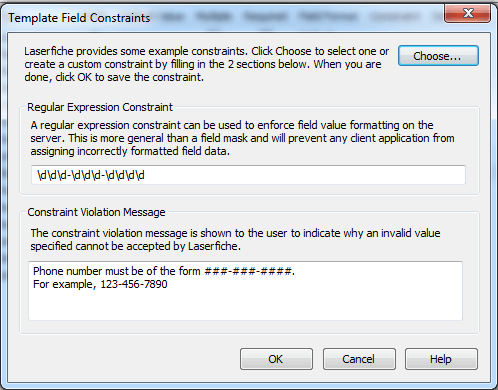
Field constraints restrict users to enter data that fits a particular pattern or is of a particular type. To make it easier for admissions officers to locate documents related to a particular applicant, the administrator can set field constraints on the phone number field. All phone numbers will have to follow this format: xxx-xxx-xxxx. This field constraint can be set with regular expressions.
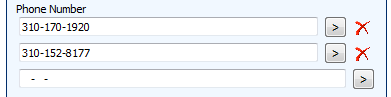
When a user opens the “Admissions – Application” template, he will now see that the phone number field contains two dashes. These dashes signify that a user will not be allowed to enter a phone number in any other format (such as adding parenthesis).
Since all phone numbers are now formatted uniformly, searching by phone number will now be easy.
In addition to field constraints, fields in a template can be designated as “required.” Required fields prevent a user from saving the document without filling them out first. Laser University designated the following fields to be required because they are all used in naming the final documents:
Admissions document type.
Last name.
First name.
Required fields are configured in the Laserfiche Administration Console by simply checking a box.
Dynamic fields
Sometimes, list fields may contain so many different values that it is difficult for the admissions clerk to select the one he needs. For example, since there are over 100 different majors at Laser University, it is time consuming to select just one from a list field that contains them all.
Selecting a particular item from a list field can be simplified by using dynamic fields. Dynamic fields allow a user to be presented with options to select in one field, based on what he had previously selected in another field. Dynamic fields look up information in an external SQL database table and use this to filter the results.
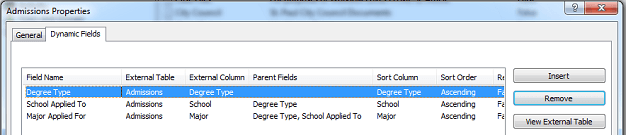
Laser University has set up a series of dynamic fields to help with populating the “School Applied To” and “Major Applied For” fields. For this purpose, the university used an existing database table.
Laser University’s existing external database table looks like this:
In the table pictured above each degree type has associated schools and majors. These relationships have been used to set up the dynamic fields.
When configuring these fields in the Administration Console, the “School Applied To” field is assigned one parent field – the “Degree Type”, and the “Major Applied For” is assigned two parent fields – “Degree Type” and “School Applied To.”
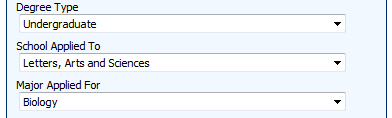
When filling out this template, the admissions clerk will first select a degree type from the “Degree Type” list field. This field will contain a list of all the degree types that are specified in the external database table. Next, the admissions clerk will select the correct school from the “School Applied To” field. The choices in this field are limited to those schools that accept the degree just specified. Once the admissions clerk selects a school, the “Major Applied For” field will be restricted to only those majors that satisfy the degree type and particular school.
For example, if the admissions clerk selects the undergraduate degree type, then the schools listed in the “School Applied To” field are only schools that provide an undergraduate degree (the law school will not be listed since that school only provides graduate degrees). Once the clerk selects the Letters, Arts and Sciences school, the majors listed in “Major Applied For” will only be those that are offered at the school, and for which a student can get an undergraduate degree (mechanical engineering will not be listed, as that major is located in the School of Engineering).
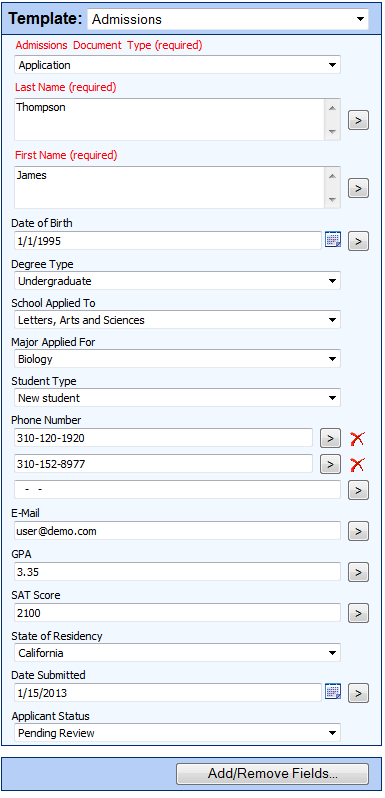
Final template
Here is what the final, populated template looks like:
Best practices for using templates and fields
Administrators should keep the following best practices in mind, when setting up fields and templates.
Reuse fields across templates. If many templates should have a “Last Name” field, then create one field and apply it to the multiple templates. This simplifies searching by allowing a user to find all student records for a person with the last name of “Smith” without having to worry about which template to search in.
List fields, dynamic fields and field constraints can help reduce errors due to data entry or spelling mistakes. This will also make documents easier to search for in the repository.
When creating templates, think of all the different things that an end- user would want to search on and include those as template fields.
With more than 350 employees, the Iowa Tribe of Oklahoma is one of the largest employers in Payne County, OK. Prior to implementing Laserfiche, we had to deal with inconsistent personnel files and paperwork being constantly misfiled or lost. Laserfiche completely revitalized our human resources department and made it almost completely paperless. With twenty-five different workflows running in our HR department, we’ve used Laserfiche to automate everything from employee onboarding to employee separation.
Job application
The employee onboarding process begins when a job requisition is submitted electronically through our Microsoft SharePoint approval system. Once this requisition is approved, the HR assistant sends it into Laserfiche with Laserfiche Snapshot. Laserfiche Workflow then routes this document into a special requisition folder in Laserfiche.
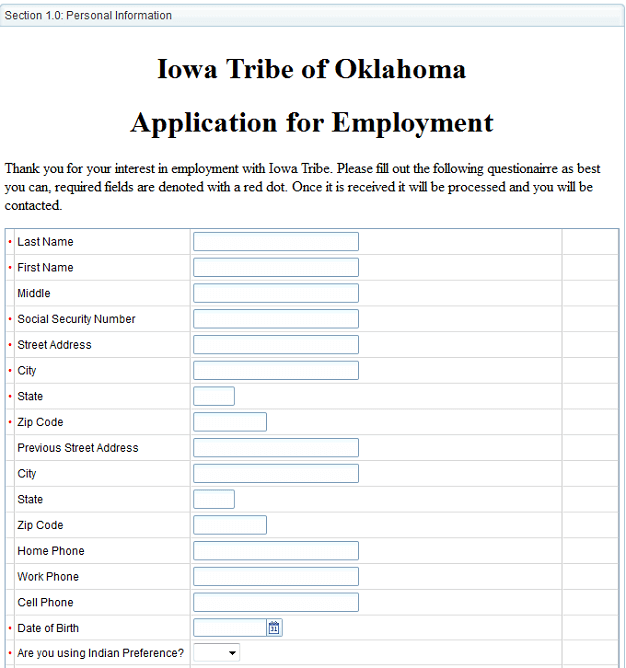
The HR assistant posts this job description on our Website. Potential employees apply for the position by filling out an electronic employment application created with LincDoc – software that creates electronic forms.
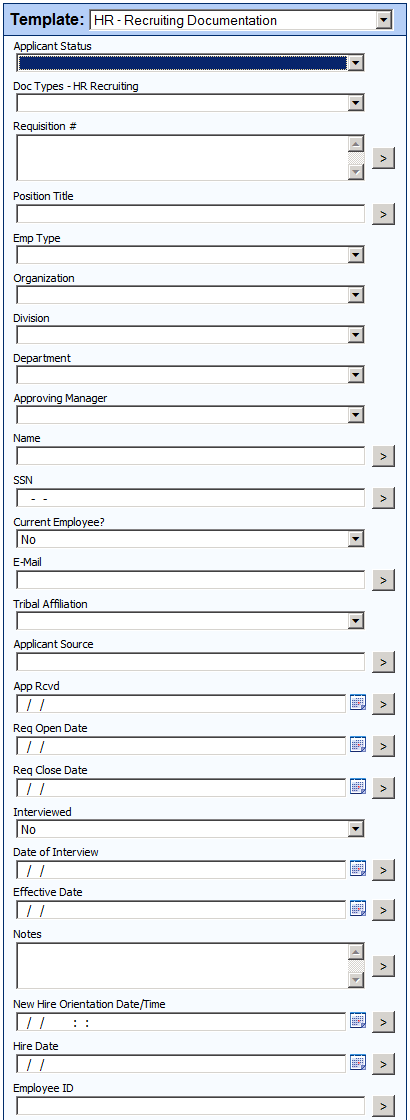
LincDoc is fully integrated with Laserfiche, so once a candidate submits the employment application, it is automatically saved in the “LincwareApplications” folder in the repository with the appropriate template automatically applied.
A large number of the fields in the template, such as “Name”, “SSN” and “Tribal Affiliation” are also populated automatically through the Laserfiche/LincDoc integration.
Laserfiche Workflow monitors the “Applications” folder and automatically routes incoming applications to the appropriate hiring manager for consideration based on the value of the “Approving Manager” field. Here is a screenshot of this workflow:
A shortcut to this job application is also placed in the requisition folder to await a hiring selection.
The hiring manager is able to communicate with candidates during the entire application review process by changing the value of the “Applicant Status” list field. Candidates receive an e-mail notifying them of every status change. Some of the status updates a manager can select are:
Does not meet minimum qualifications.
Application received after closed.
Manager declined.
Selected for hire.
Here is an example of an e-mail notification that is sent when the status is changed to “Manager declined”:
Employee onboarding
Once a hiring manager decides to hire an employee, the application is routed to Human Resources to complete the remainder of the onboarding process. HR maintains communication with the hiring manager throughout the hiring process by updating the “Applicant Status” field. Some of the different statuses they can choose from are:
Offer accepted.
Drug screen and background check completed.
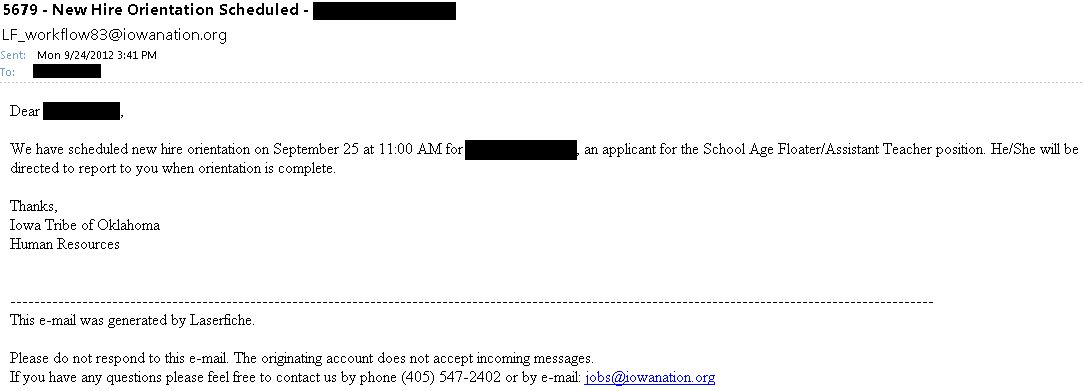
New hire orientation scheduled.
Hired.
Here is an example of a notification e-mail that is sent when the status is changed to “New hire orientation scheduled”:
Throughout the process, every action taken on the document by Laserfiche Workflow is tracked in a special “WFhistory” multi-value field.
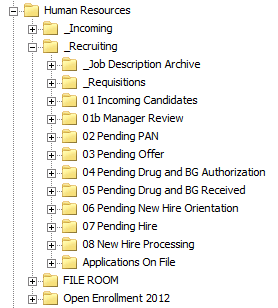
As the application moves through the various steps in the onboarding process, it also physically moves through the various folders in the Laserfiche repository.
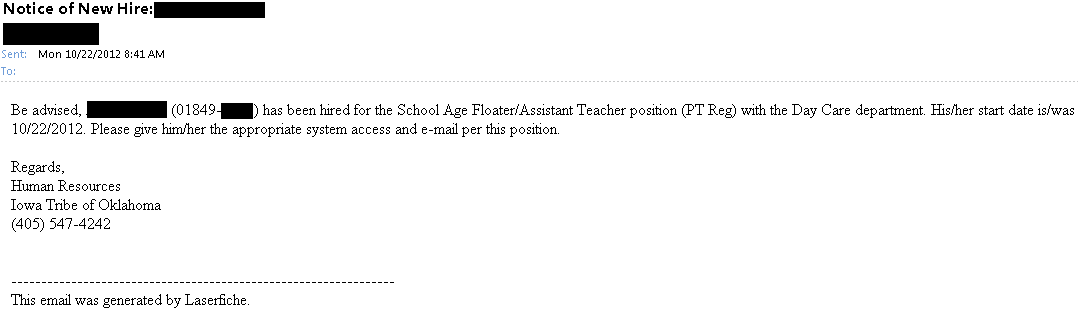
Once an applicant’s status is changed to “Hired”, Laserfiche Workflow notifies Payroll, Purchasing and IT by e-mail to begin distribution of company resources in preparation for the employee’s start date.
Laserfiche Workflow also:
Finds all other job applications that the applicant has in Laserfiche for other positions and sets their status to “rescinded”.
Finds all of the other job applications for this particular position and sets their status to “Manager declined”. This automatically notifies the candidates by e-mail that the position has been filled.
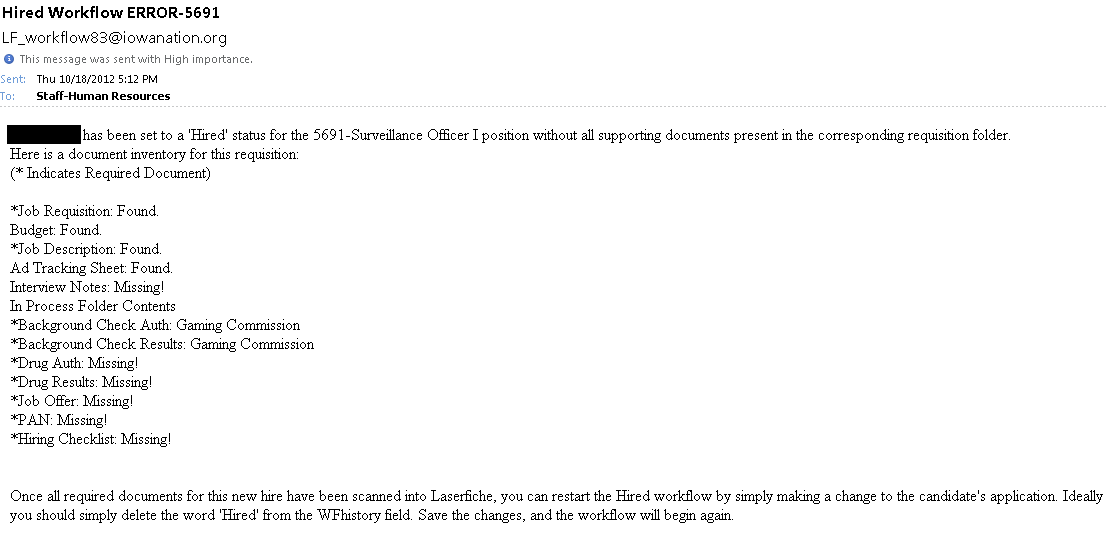
Another workflow performs an inventory of the requisition folder to check if the new employee has any missing documents.
If there are missing documents, HR is notified by e-mail.
If no documents are missing the new employee’s documents are converted to recruitment documents and moved to a pending hire folder where they await an employee number.
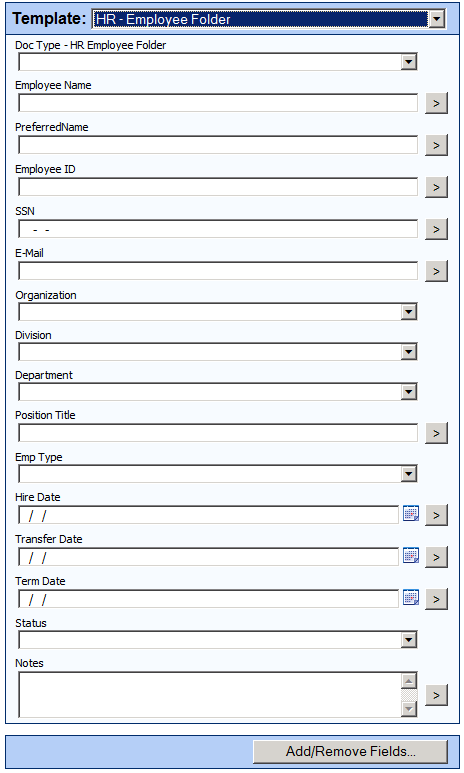
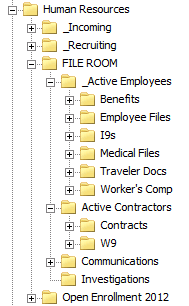
As soon as HR assigns an employee number and fills out the “Employee ID” field, all of the documents are moved to a brand new active employee folder where an “HR-Employee Folder” template is assigned.
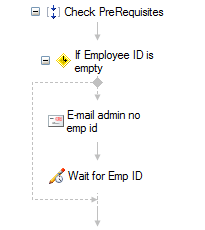
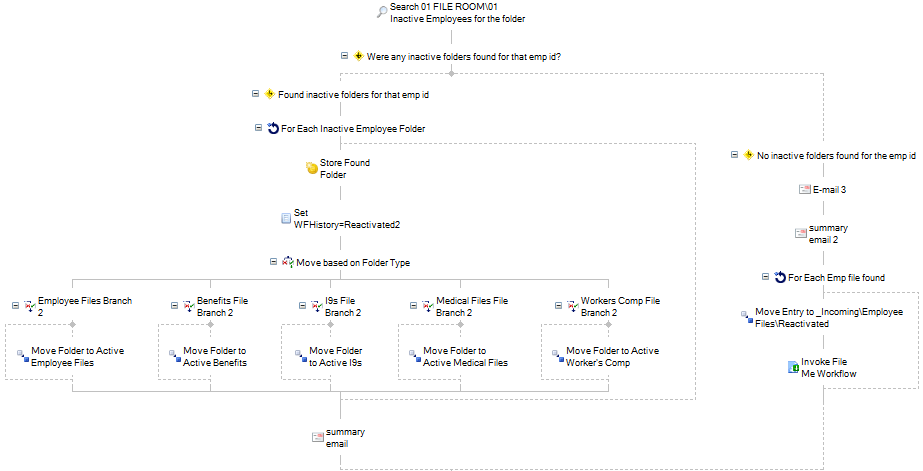
Another workflow scans the inactive employee record series to determine whether the new hire is a previous employee with an existing employee file. If it locates one, it automatically moves all documents back to the active employee folder.
Here is a screenshot of our active employee folders:
Employee document management
In addition to new employee documents, all other HR documents are stored in Laserfiche as soon as they are received. Some of the different document types are:
Personnel Action Notices (PANs) – forms that contain any change to an employee’s record or status.
Direct deposit forms.
Employee evaluations.
W4s.
I9s.
Benefits enrollment.
Worker’s compensation forms.
Discipline forms.
Certifications.
Leave donations.
Medical return to work letters.
Incident drug screens.
Garnishments.
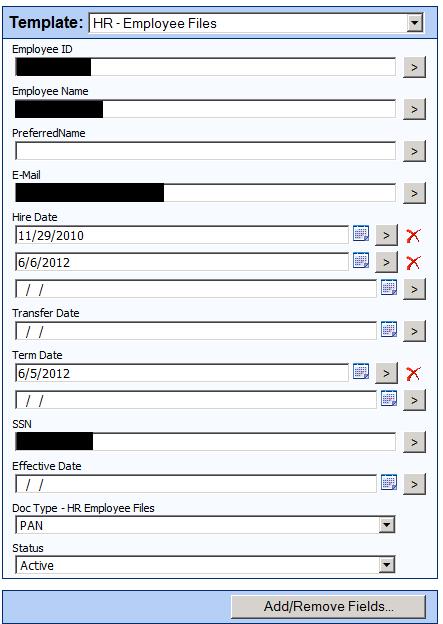
All of these documents are either created electronically and sent to Laserfiche with Laserfiche Snapshot or scanned onto the network, imported into Laserfiche with Import Agent and immediately shredded. They are also assigned the “HR-Employee Files” template.
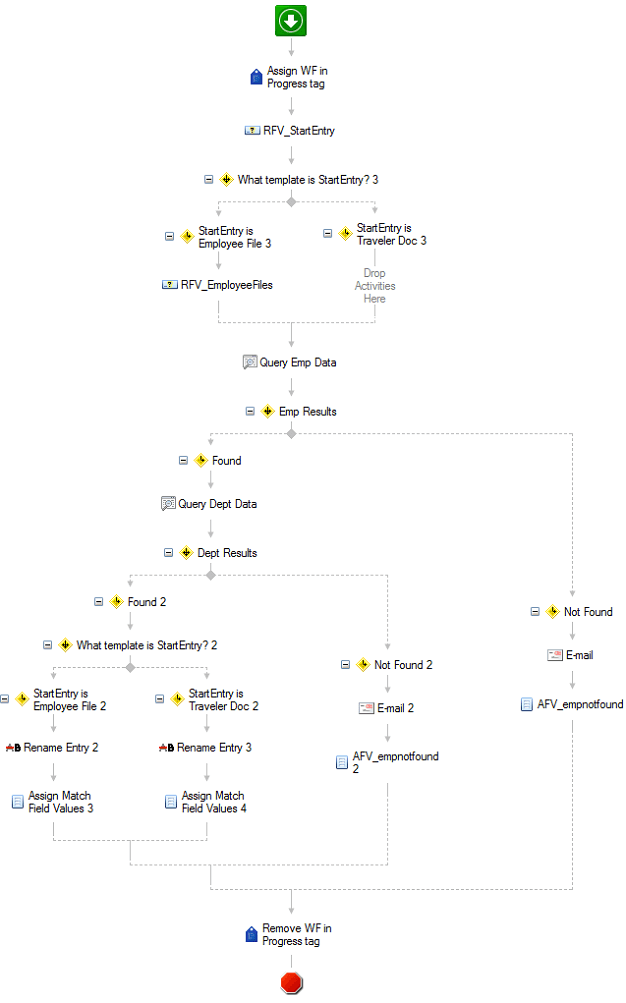
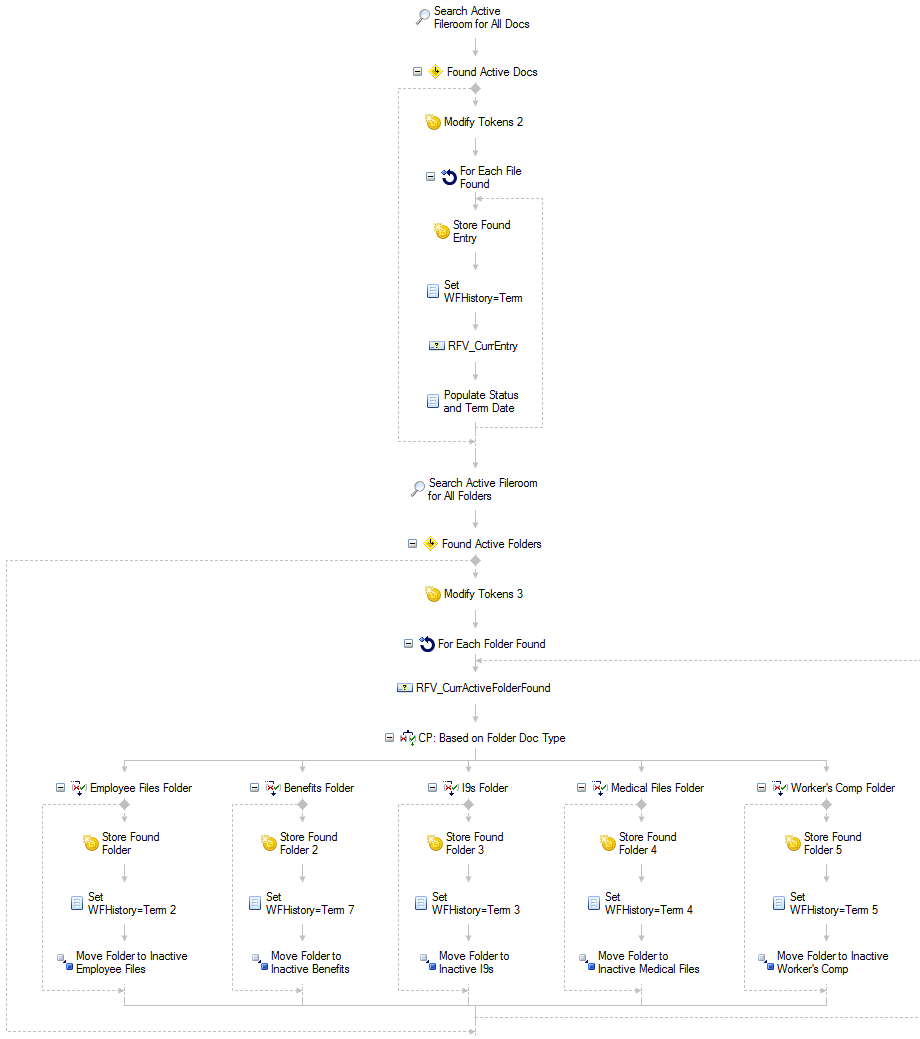
Laserfiche Workflow finds each new document, determines its type and routes it to either Payroll or Benefits as needed. Workflow also performs a database lookup to automatically populate the metadata. Here is the main workflow that processes our incoming employee documents:
Employee separation
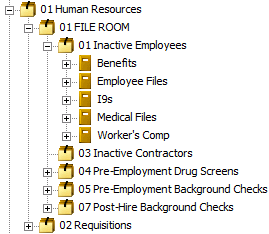
In addition to employee onboarding, Laserfiche Workflow also manages employee separation. Once HR staff submits a separation PAN, Workflow scans the repository for all documents for that employee, terminates them, and files them in our inactive employee record series to keep on file per the retention schedule for each document type.
Here is a section of our separation workflow:
Benefits of Laserfiche
Implementing Laserfiche in the HR department has resulted in the following benefits at Iowa Tribe of Oklahoma:
We have eliminated 80 cubic feet of filing cabinets.
Authorized users can access any active employee file onsite from a Web browser or offsite via authorized VPN access.
The workflow which checks for missing documentation saved us 300 hours a year of employee time.
There is now clear and constant communication between everyone involved in the employee onboarding process including the hiring managers, job candidates and HR staff.
Adams 12 is the fifth largest school district in Colorado with 5,000 employees and 39,500 students. Since we have roughly 8,500 graduates and withdrawals annually, there are a large number of student records that need archiving. Here is how we use Laserfiche to simplify the student records process.
Student records
At the district office, we keep records of students who have either graduated or withdrawn. We also handle an average of 276 requests for transcripts, employment verifications and immunization verifications a month.
After the records arrive at the district office, our records technician goes through each student record and purges any documents that do not need to be retained, such as student photographs. Registrars also assist with this process before sending the documents to the district office.
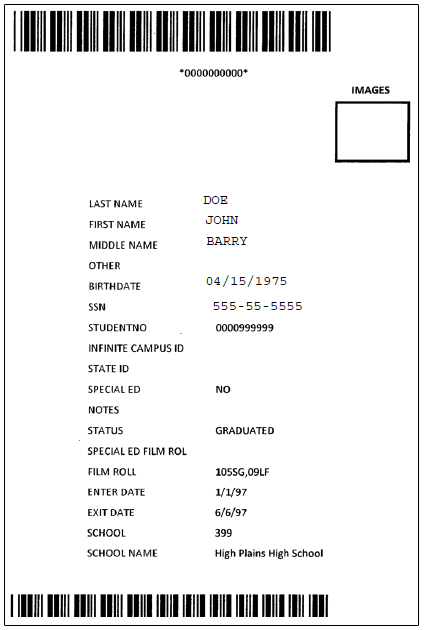
Once the records are organized, our records technician prints a barcode cover sheet for each set of records. These cover sheets are printed from a Microsoft Access database that is regularly updated with data from our Infinite Campus student records system.
There are two different barcodes on the sheet. The top one is from our old student records system SASI, and the bottom one from Infinite Campus, which we’ve been using since 2009. These barcodes are our way of identifying in which database the student data is stored.
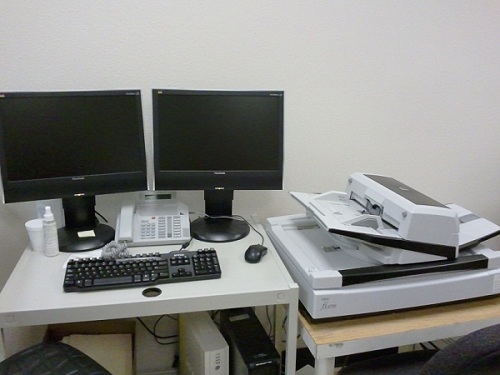
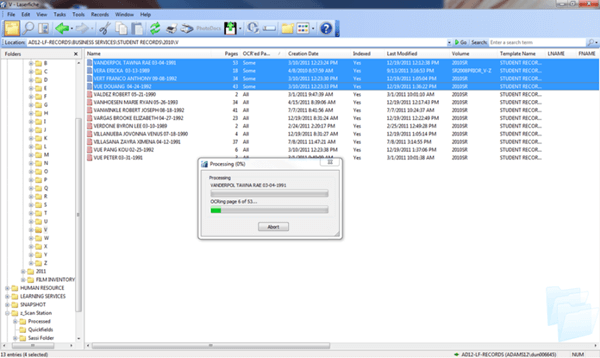
Once the cover sheets are printed, each one is appended to the corresponding documents. We create a batch of about 500 sheets which we run through a multi-purpose scanner (Kofax VRS) and scan directly into Laserfiche.
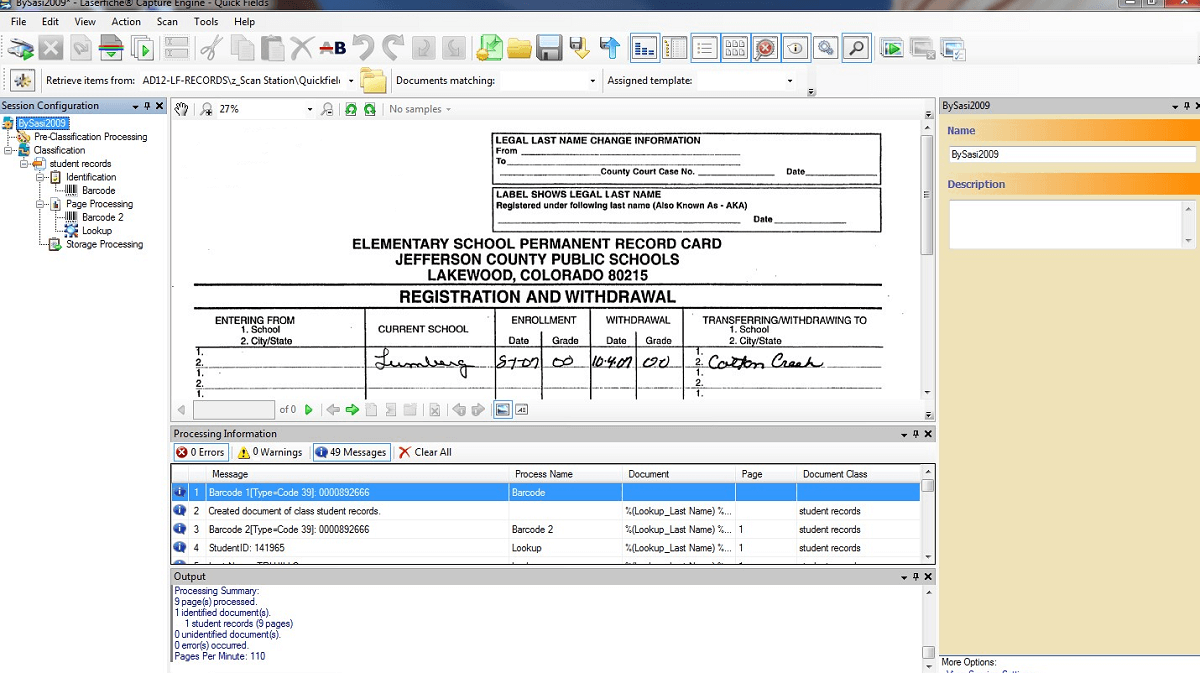
Once all the student record documents have been scanned, they are processed with Laserfiche Quick Fields. We use the Barcode process to read the student number from the barcode. This student number is then used in the Lookup process to gather the information from our student records system and populate the rest of the metadata. This prevents mistakes by reducing manual data entry.
Click image to view larger in new window.
Finally, we run the OmniPage OCR process in the off hours to best utilize our time and resources.
We use Laserfiche Records Management Edition to archive all of our student records.
Though the records are stored permanently, I set up a retention schedule of “100 years, then review” because it is best to review these records and re-evaluate the retention against the schedule.
Retrieving a transcript is now as easy as performing a search in Laserfiche on the unique Student Number.
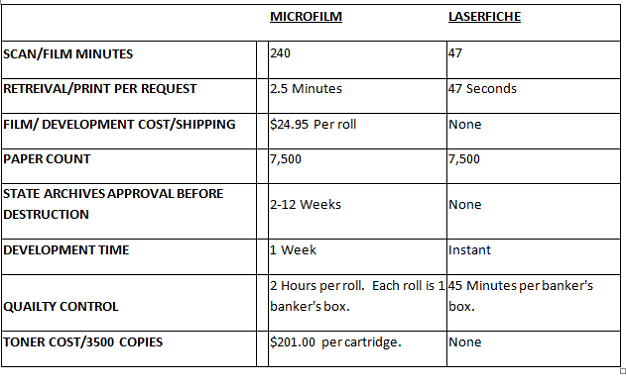
Efficiencies gained
Transitioning from microfilm to Laserfiche has resulted in the following efficiencies: