Best Practices in Records Management
Laserfiche Records Management Edition (RME) functions as an integral part of a well-designed records management program. It has easily configurable components that fit all of your organization’s business needs. Here are some tips and tricks for both Electronic records managers and administrators for ensuring a smooth RME implementation.
Records Manager
The role of a records manager is to manage the records of an organization according to a formal plan. One of the obstacles records managers face is that retention schedules may not provide explicit instructions. This gray area can be used to your advantage by allowing a bit of leeway when setting up cutoff instructions.
A cutoff instruction determines when a record is eligible for cutoff (eligible to enter retention). There are seven different cutoff instructions in Laserfiche, but we will focus on the three most popular:
- Time-based cutoff: When a retention schedule is triggered based on a time-based cycle period (such as monthly or weekly).
- Event-based cutoff: When an event on the record (such as employee termination) triggers a retention schedule.
- Time + Event-based cutoff: Triggered when an event occurs, but the records are only eligible for cutoff after a subsequent time-based cycle period. Basically, this cutoff collects all of the records for which retention was triggered by an event and gives them all the same starting date for future eligibility calculations.
It is a best practice to use either a Time-based or Time + Event-based cutoff. When it comes time for final disposition, all the records with the same cutoff eligibility date will be eligible for disposition on the same date, enabling you to process hundreds of records in one batch instead of one record at a time. Most regulations specify a minimum retention period, so keeping a record a few weeks longer in order to process it with other records should not be a problem.
Reuse instruction definitions
Many records management instruction definitions are similar. For example, there is usually a standardized archive location, general standard retention times for basic handling and so on. Creating generic cutoff, retention and disposition instructions allows you to reuse them across record types and keep the number of unique instructions to pick from to a minimum, making records management much more efficient.
For example, let’s use the following physical retention schedule for a university and convert it to RME.
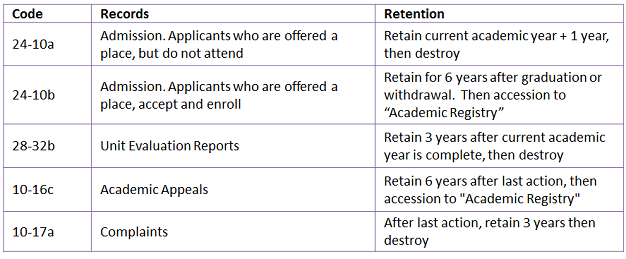
The easiest way to do this is to reuse some of the elements. The color-coded items are the ones that we can group together.
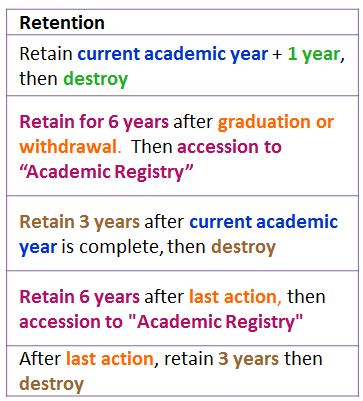
From this we can create two different cutoff instructions:
- Time-based: Academic Year.
- Time + Event-based: An event + Academic Year.
We can also create three retention schedules:
- 1 year, then destroy.
- 6 years, then accession to “Academic Registry”.
- 3 years, then destroy.
Laserfiche Administrator
The Laserfiche administrator’s role involves creating, configuring, securing and maintaining the enterprise content management system. Here are some suggestions to make this system easy to maintain, from a records perspective:
- Determine which documents are records. Not every document is considered a record, so not every document needs to be stored in a records folder.
- Organize your records series on a broad level, such as by department or by content type and year, and the records folders at a more specific level, such as by month or employee name.
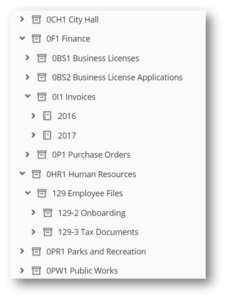
- In addition to making your records retention easier to apply, organizing your records in this way imposes a limit on how many records can be stored in a particular folder. For example, there is a limited number of records that can be stored in the folder corresponding to the month of May in the year 2011. This will prevent your system from infinite growth, which could negatively affect performance.
- Use Laserfiche Workflow to route your records to the correct storage location in the Laserfiche repository based on either the field values Laserfiche Quick Fields extracts from them or the field values a user manually enters during scanning. This alleviates users from having to remember where different types of documents are stored in Laserfiche. It also saves the records manager from having to manually store each document themselves. Simply configure Laserfiche Workflow to start when you update one of your metadata fields and it will automatically name and store your records for you.
- Implement transparent records management (TRM). TRM allows records managers and general users to have their own repository views and still have access to the same content.
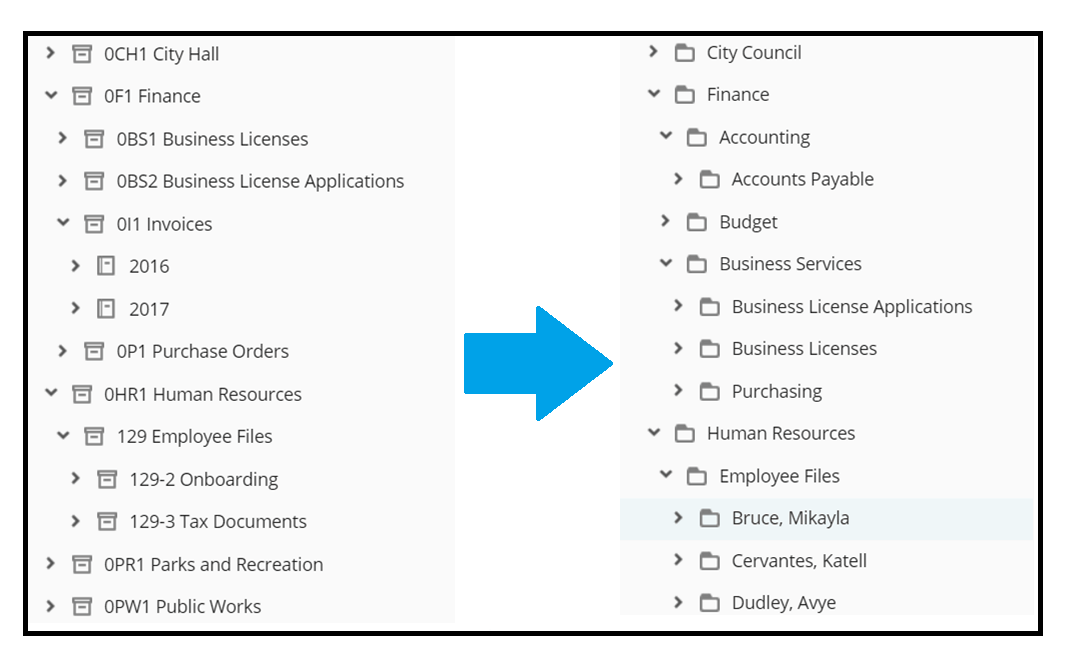
- In the above screenshot the records manager’s folder structure is on the left and the user’s folder structure is on the right. The records manager’s folder structure is functional and allows him to store all of his records in a way that will maintain compliance with the published retention schedules and aid the administrator in setting up security. The user’s folder structure is more logical and provides an intuitive way to find content. In order to make TRM possible, Laserfiche Workflow automatically stores the original documents in the appropriate location in the overall records management structure while creating shortcuts in other folders that general users have access to.
- Automatically create records management items, such as cutoff instructions and retention schedules, from an Excel spreadsheet with the Records Series Setup Utility.
If you’d like to learn more about records management best practices, download the free, complete guide to records management.
